
User Manual
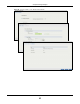
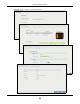
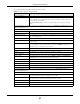
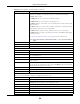
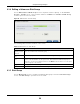
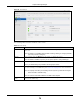
Table Of Contents
- Cloud Storage
- Web Desktop at a Glance
- Web Configurator
- Storage Manager
- Status Center
- Control Panel
- Videos, Photos, Music, & File Browser
- Administrator
- Managing Packages
- Tutorials
- 14.1 Overview
- 14.2 Windows 7 Network
- 14.3 Windows 7 Network Map
- 14.4 Playing Media Files in Windows 7
- 14.5 Windows 7 Devices and Printers
- 14.6 File Sharing Tutorials
- 14.7 Download Service Tutorial
- 14.8 Printer Server Tutorial
- 14.9 Copy and Flickr Auto Upload Tutorial
- 14.10 FTP Uploadr Tutorial
- 14.11 Web Configurator’s Security Sessions
- 14.12 Using FTPES to Connect to the NAS
- 14.13 Using a Mac to Access the NAS
- 14.14 How to Use the BackupPlanner
- Technical Reference
- Status Screen
- System Setting
- Applications
- Packages
- Auto Upload
- Dropbox
- Using Time Machine with the NAS
- Users
- Groups
- Shares
- WebDAV
- Maintenance Screens
- Protect
- Troubleshooting
- 28.1 Troubleshooting Overview
- 28.2 Power, Hardware, Connections, and LEDs
- 28.3 NAS Starter Utility
- 28.4 NAS Login and Access
- 28.5 I Cannot Access The NAS
- 28.6 Users Cannot Access the NAS
- 28.7 External USB Drives
- 28.8 Storage
- 28.9 Firmware
- 28.10 File Transfer
- 28.11 Networking
- 28.12 Some Features’ Screens Do Not Display
- 28.13 Media Server Functions
- 28.14 Download Service Functions
- 28.15 Web Publishing
- 28.16 Auto Upload
- 28.17 Package Management
- 28.18 Backups
- 28.19 Google Drive
- Product Specifications
- Customer Support
- Legal Information
- Index

Chapter 8 Storage Manager
Cloud Storage User’s Guide
68
Choose a RAI D type Select a RAI D t y pe from t he drop- down list box. The corresponding space
allocat ions of available size, data prot ection area, and wasted size display.
Use Ba sic w it h one disk.
Use JBOD wit h tw o or m ore disks for m axim um capacit y.
Use RAI D 0 wit h two or four disks for m axim um speed.
Use RAI D 1 w ith t wo or m ore disk s t o m irror prim ary dat a t o anot her disk( s) wit h
high perfor mance.
Use RAI D 5 wit h three or m ore disks t o balance perform ance, hard disk capacity
usage wit h dat a prot ect ion in case of disk failure.
Use RAI D 6 w it h four disks for m ore data prot ection in case of disk failure.
Use RAI D 1 0 wit h four disks t o get bett er perform an ce t h an RAI D 6, w it h sligh t ly
less dat a prot ect ion.
See
Table 8 on page 50 or Sect ion 8.6 on page 98 for m ore inform at ion.
Note: Use the same capacity of hard disks for RAID 1, 5, 6, or 10 to avoid wasting
space.
Back Click Back t o go t o t he previous screen.
Next Click N ex t to go t o the next step.
Cancel Click Cancel to close the screen w it hout saving any set tings.
St ep 2. Create Volum e
Disk group inform ation
Nam e This field displays t he nam e of t he disk group.
Unallocated capacit y This field displays t he percent age of t he available size, t he size in used, and t otal
size of t he disk group.
Create Volum e
Volum e Nam e This field displays the default nam e of t he volum e. You can also type a new nam e
for t he volum e.
Volum e Capacit y This field displays t he num ber of Gigabytes available on t he volum e by default .
You can set t he size t o allocate for this volum e. Click M AX t o allocate all available
capacity of t he disk group to the volum e.
Back Click Back t o go t o t he previous st ep.
Next Click N ex t to go t o the next step.
Cancel Click Cancel to close the screen w it hout saving any set tings.
St ep 3. Sum m ary
Use this scr een to review the set tings you configured in t he last step.
Disk Select ed This field displays the hard disk (s) on which t he RAI D array will be built.
RAI D Type This field displays t he t ype of RAI D on which the volum e w ill be built .
Volum e Type This field displays the type of t he volum e, Mu lt iple volum e s on RAI D ( Disk
Grou p X) where Disk Group X is t he disk gr oup’s nam e.
Volum e Nam e This field displays t he nam e of t he volum e.
Volum e Capacit y This field displays t he size of t he volum e.
Back Click Back t o go t o t he previous st ep.
Apply Click Apply to save t he set tings.
Cancel Click Cancel to close the screen w ithout saving any set tings.
Table 14 Creat e Volum e on Disk Group ( cont inued)
LABEL DESCRIPTION