
User Manual
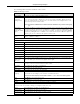
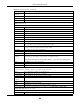
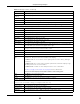
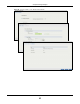
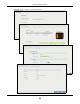
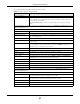
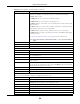
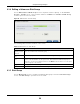
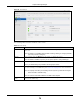
Table Of Contents
- Cloud Storage
- Web Desktop at a Glance
- Web Configurator
- Storage Manager
- Status Center
- Control Panel
- Videos, Photos, Music, & File Browser
- Administrator
- Managing Packages
- Tutorials
- 14.1 Overview
- 14.2 Windows 7 Network
- 14.3 Windows 7 Network Map
- 14.4 Playing Media Files in Windows 7
- 14.5 Windows 7 Devices and Printers
- 14.6 File Sharing Tutorials
- 14.7 Download Service Tutorial
- 14.8 Printer Server Tutorial
- 14.9 Copy and Flickr Auto Upload Tutorial
- 14.10 FTP Uploadr Tutorial
- 14.11 Web Configurator’s Security Sessions
- 14.12 Using FTPES to Connect to the NAS
- 14.13 Using a Mac to Access the NAS
- 14.14 How to Use the BackupPlanner
- Technical Reference
- Status Screen
- System Setting
- Applications
- Packages
- Auto Upload
- Dropbox
- Using Time Machine with the NAS
- Users
- Groups
- Shares
- WebDAV
- Maintenance Screens
- Protect
- Troubleshooting
- 28.1 Troubleshooting Overview
- 28.2 Power, Hardware, Connections, and LEDs
- 28.3 NAS Starter Utility
- 28.4 NAS Login and Access
- 28.5 I Cannot Access The NAS
- 28.6 Users Cannot Access the NAS
- 28.7 External USB Drives
- 28.8 Storage
- 28.9 Firmware
- 28.10 File Transfer
- 28.11 Networking
- 28.12 Some Features’ Screens Do Not Display
- 28.13 Media Server Functions
- 28.14 Download Service Functions
- 28.15 Web Publishing
- 28.16 Auto Upload
- 28.17 Package Management
- 28.18 Backups
- 28.19 Google Drive
- Product Specifications
- Customer Support
- Legal Information
- Index

Chapter 8 Storage Manager
Cloud Storage User’s Guide
61
The following table describes t he labels in this screen.
Table 13 Manage Volum e
LABEL DESCRIPTION
Repair RAI D Select t his to repair a degraded RAI D volum e.
Expand t he
volum e by
adding disk( s)
Select t his to add one or m ore disks t o a JBOD, RAI D 1 or RAI D 5 volum e. You can add a
disk to increase an array’s capacity or t o use as a hot- spare (standby ). When you add a
disk t o an exist ing array, you do not have t o re- create shares, access rights and so on as
you would if you creat e a new volum e.
Note: This option is available when a disk has not been allocated to any volume or disk group
yet.
Expand t he
volum e w ith
unallocat ed disk
space
Select t his t o add m ore st orage space t o a volum e if t here is st ill som e space unallocat ed on
the sam e disk group. Select t his if t he NAS fails t o expand a volum e by adding disk(s) and
the final volum e capacity is not as expect ed. For exam ple, you want t o expand a 1 TB RAI D
1 volum e by adding t wo m ore 1 TB disks. The volum e size should be 2 TB aft er expansion,
however, you j ust see 1 TB. Use t his opt ion to fix the issue.
Change RAI D
Ty p e
Select t his if you want to change t he volum e’s RAI D t ype from Basic t o RAI D 1, RAI D 1 to
RAI D 5, or RAI D 5 t o RAI D 6.
The follow ing describes labels on the following screens aft er you select Rep air RAI D in t his screen.
St ep 1. Select Disks
A This shows t he nam e of t he volum e you have selected.
St atus This field displays t he st atus of t he volum e.
RAI D Ty pe This field displays t he type of RAI D on which t he volum e is built .
Disk I nfo
St atus This field displays t he stat us of t he disk.
Disk Nam e This field displays t he nam e of t he disk.
Size This field displays t he tot al capacit y of the disk.
Model Nam e This field displays t he m odel of t he disk.
Select a disk to
replace t he
failed one
This section list s all available hard disks in t he table and displays the corresponding disk
tray of t he disks you select ed on t he graphic at the right .
Select one or m ore hard disks for increasing t he volum e’s capacit y. Use t he check box on
the t op t o select or unselect all ent ries in t his colum n.
Disk Nam e This field shows t he nam e of a hard disk.
Size This field shows t he tot al disk size.
Model Nam e This field show s t he m odel of t he hard disk.
Expect ed
Capacity
This field shows t he corr esponding space allocations of available size, dat a pr ot ect ion area,
and wasted size according to your select ions on hard disks above.
Note: Use the same capacity of hard disks for RAID 1, 5, 6, or 10 to avoid wasting space.
Back Click Back to go to the previous st ep.
Next Click N ext t o go t o t he next st ep.
Cancel Click Can ce l t o close the screen wit hout saving any set tings.
St ep 2. Sum m ary
Use this scr een to review the set tings you configured in t he last step.
Action This field displays for what the configuration is.
Volum e Nam e This field displays the nam e of t he volum e.
Disk Selected This field displays the hard disks you have select ed.