
User Manual
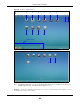
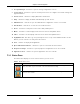
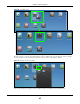
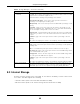
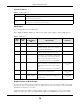
Table Of Contents
- Cloud Storage
- Web Desktop at a Glance
- Web Configurator
- Storage Manager
- Status Center
- Control Panel
- Videos, Photos, Music, & File Browser
- Administrator
- Managing Packages
- Tutorials
- 14.1 Overview
- 14.2 Windows 7 Network
- 14.3 Windows 7 Network Map
- 14.4 Playing Media Files in Windows 7
- 14.5 Windows 7 Devices and Printers
- 14.6 File Sharing Tutorials
- 14.7 Download Service Tutorial
- 14.8 Printer Server Tutorial
- 14.9 Copy and Flickr Auto Upload Tutorial
- 14.10 FTP Uploadr Tutorial
- 14.11 Web Configurator’s Security Sessions
- 14.12 Using FTPES to Connect to the NAS
- 14.13 Using a Mac to Access the NAS
- 14.14 How to Use the BackupPlanner
- Technical Reference
- Status Screen
- System Setting
- Applications
- Packages
- Auto Upload
- Dropbox
- Using Time Machine with the NAS
- Users
- Groups
- Shares
- WebDAV
- Maintenance Screens
- Protect
- Troubleshooting
- 28.1 Troubleshooting Overview
- 28.2 Power, Hardware, Connections, and LEDs
- 28.3 NAS Starter Utility
- 28.4 NAS Login and Access
- 28.5 I Cannot Access The NAS
- 28.6 Users Cannot Access the NAS
- 28.7 External USB Drives
- 28.8 Storage
- 28.9 Firmware
- 28.10 File Transfer
- 28.11 Networking
- 28.12 Some Features’ Screens Do Not Display
- 28.13 Media Server Functions
- 28.14 Download Service Functions
- 28.15 Web Publishing
- 28.16 Auto Upload
- 28.17 Package Management
- 28.18 Backups
- 28.19 Google Drive
- Product Specifications
- Customer Support
- Legal Information
- Index

Chapter 7 Web Configurator
Cloud Storage User’s Guide
43
2 Stor age M ana ger- click this to open the storage configuration screens.
3 Cont r ol Pa ne l - click t his to open the cont rol panel screens t o configure the network sett ing and
upgrade firm ware.
4 Stat u s Cent er - click t his t o display NAS status inform ation.
5 Help - click t his t o display t he NAS’ em bedded help syst em screens.
6 Adm inist ra t or - click t his t o open t he adm inistrat or configuration screens in a new t ab.
7 File Brow se r - click t his t o see files in a tree-folder structure.
8 Phot o - click t his t o view photos in the shares t hat publish photos.
9 Music - click t his to view and play m usic files in the shares t hat publish m usic.
10 Video - click this t o view and play video files in the shares t hat publish videos.
11 m yZy XELclou d - click t his t o go t o m ycloud.zyxel.com to set up a free DDNS hostnam e for t he
NAS so you can connect t o it easily from t he I nternet.
12 Use r - click t his t o display t he Logou t link.
13 Ej e ct N AS Ex t ernal D rive s - click this t o eject t he connected external volum es.
14 Playzon e Sett ings - click t his t o open t he playzone configurat ion screen in a new t ab.
15 Applicat ion Zone - click t his t o open t he applicat ion zone in a new t ab.
7.3.1 Status Zone
The Stat us Zone displays icons for various feat ures you can access.
Table 5 Status Zone I cons
ICON DESCRIPTION
Click Syste m St at us t o open t he Sta tu s Cent er screen. Syst em Sta tus displays t he health
st ate of the NAS. A green cir cle wit h a check m ark indicates healthy.
W eb Se ssions displays the current num ber of web sessions. Click t his t o go t o t he N et w or k
screen for m ore det ails.