
User Manual
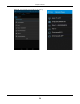

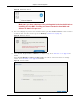
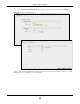
Table Of Contents
- Cloud Storage
- Web Desktop at a Glance
- Web Configurator
- Storage Manager
- Status Center
- Control Panel
- Videos, Photos, Music, & File Browser
- Administrator
- Managing Packages
- Tutorials
- 14.1 Overview
- 14.2 Windows 7 Network
- 14.3 Windows 7 Network Map
- 14.4 Playing Media Files in Windows 7
- 14.5 Windows 7 Devices and Printers
- 14.6 File Sharing Tutorials
- 14.7 Download Service Tutorial
- 14.8 Printer Server Tutorial
- 14.9 Copy and Flickr Auto Upload Tutorial
- 14.10 FTP Uploadr Tutorial
- 14.11 Web Configurator’s Security Sessions
- 14.12 Using FTPES to Connect to the NAS
- 14.13 Using a Mac to Access the NAS
- 14.14 How to Use the BackupPlanner
- Technical Reference
- Status Screen
- System Setting
- Applications
- Packages
- Auto Upload
- Dropbox
- Using Time Machine with the NAS
- Users
- Groups
- Shares
- WebDAV
- Maintenance Screens
- Protect
- Troubleshooting
- 28.1 Troubleshooting Overview
- 28.2 Power, Hardware, Connections, and LEDs
- 28.3 NAS Starter Utility
- 28.4 NAS Login and Access
- 28.5 I Cannot Access The NAS
- 28.6 Users Cannot Access the NAS
- 28.7 External USB Drives
- 28.8 Storage
- 28.9 Firmware
- 28.10 File Transfer
- 28.11 Networking
- 28.12 Some Features’ Screens Do Not Display
- 28.13 Media Server Functions
- 28.14 Download Service Functions
- 28.15 Web Publishing
- 28.16 Auto Upload
- 28.17 Package Management
- 28.18 Backups
- 28.19 Google Drive
- Product Specifications
- Customer Support
- Legal Information
- Index

Cloud Storage User’s Guide
38
CHAPTER 7
Web Configurator
7.1 Overview
This chapter describes how t o access t he NAS web configurator and provides an overview of it s
screens. The web configurat or is an HTML-based m anagem ent interface t hat allows easy NAS setup
and m anagem ent using an I nternet browser.
Use I nt ernet Explorer 11.0.9, Mozilla Firefox 31.0, Safari 5.1.7, Google Chrom e 37.0.2, or lat er
versions of t hese browsers. The recom m ended screen resolut ion is 1440 by 900 pixels or higher.
I n order to use t he web configurator you need t o allow:
• Web browser pop- up windows from your device. Web pop- up blocking is enabled by default in
Window s XP SP ( Service Pack) 2.
• JavaScript ( enabled by default ).
7.2 Accessing the NAS Web Configurator
1 Make sure your NAS is properly connected and t hat your com put er is in t he sam e subnet as t he
NAS ( refer to t he Quick St art Guide or t he appendices).
2 Open your browser and type in the server nam e of t he NAS. The default is “nas” followed by t he
num ber of your m odel (“nas5 4 0 ” for exam ple). Configure the server nam e of your NAS using t he
N et w ork Configura tion screen (
Section 2.3.5 on page 23) of the NAS Starter Utility.
Figure 20 NAS URL
3 The default usernam e and password are “ adm in” and “ 1234” respectively. Enter your usernam e and
password. See
Chapt er 22 on page 281 for how t o creat e other user accounts. I f you use t he opt ion
t o st ay logged in ( assum ing you do not log out), m ake sure you keep your com put er secure from
unaut horized access. Click t he arrow to log in. Logging in with a ( non-adm inistrat or) user account
takes you t o a different Desktop screen ( see
Section 7.3 on page 41 for details) .