
User Manual

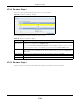
Table Of Contents
- Cloud Storage
- Web Desktop at a Glance
- Web Configurator
- Storage Manager
- Status Center
- Control Panel
- Videos, Photos, Music, & File Browser
- Administrator
- Managing Packages
- Tutorials
- 14.1 Overview
- 14.2 Windows 7 Network
- 14.3 Windows 7 Network Map
- 14.4 Playing Media Files in Windows 7
- 14.5 Windows 7 Devices and Printers
- 14.6 File Sharing Tutorials
- 14.7 Download Service Tutorial
- 14.8 Printer Server Tutorial
- 14.9 Copy and Flickr Auto Upload Tutorial
- 14.10 FTP Uploadr Tutorial
- 14.11 Web Configurator’s Security Sessions
- 14.12 Using FTPES to Connect to the NAS
- 14.13 Using a Mac to Access the NAS
- 14.14 How to Use the BackupPlanner
- Technical Reference
- Status Screen
- System Setting
- Applications
- Packages
- Auto Upload
- Dropbox
- Using Time Machine with the NAS
- Users
- Groups
- Shares
- WebDAV
- Maintenance Screens
- Protect
- Troubleshooting
- 28.1 Troubleshooting Overview
- 28.2 Power, Hardware, Connections, and LEDs
- 28.3 NAS Starter Utility
- 28.4 NAS Login and Access
- 28.5 I Cannot Access The NAS
- 28.6 Users Cannot Access the NAS
- 28.7 External USB Drives
- 28.8 Storage
- 28.9 Firmware
- 28.10 File Transfer
- 28.11 Networking
- 28.12 Some Features’ Screens Do Not Display
- 28.13 Media Server Functions
- 28.14 Download Service Functions
- 28.15 Web Publishing
- 28.16 Auto Upload
- 28.17 Package Management
- 28.18 Backups
- 28.19 Google Drive
- Product Specifications
- Customer Support
- Legal Information
- Index

Chapter 27 Protect
Cloud Storage User’s Guide
336
The following table describes t he labels in this screen.
27.5 Configuration File Backup and Restoration
Use t he Maint e na nce > Configu ra t ion m enus t o creat e a file of your NAS configurations such as
passwords, shares and volum es created, netw ork sett ings and so on. I f you’re going t o do som e
m aj or configurat ion changes, t hen it is advisable to create a configurat ion backup file. I f t hings go
wrong after you m ake t he configurat ion changes, you can always go back t o t he previous
configuration by restoring an earlier configuration file.
I f you forgot t he NAS password, t hen use the RESET button ( see
Section 1.7 on page 17) t o ret urn
the NAS to t he factory default configurat ion.
Note: Configurat ion File Backup and Rest orat ion does not affect dat a (your files and
folders) , volum es on the NAS.
Table 141 Protect > Restore: St ep 4
LABEL DESCRIPTION
St ep 3. Set a rest ore target and start rest oring
Browse Click t his to select a folder w here you want t o place the rest ored files.
• Volum e - Select a volum e from t he list.
• Curr ent Locat ion - This is t he location of t he select ed folder.
• Type - This ident ifies the item as a file or folder.
• N am e - This is t he nam e of the folder/ file.
Click Apply t o save your sett ings and Ca ncel to close the screen.
Previous Click this t o go back t o the previous screen.
Done Click t his t o run the restore process and go back t o t he Back up screen.