
User Manual
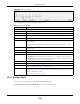
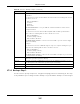
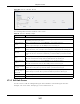
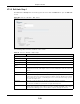
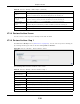
Table Of Contents
- Cloud Storage
- Web Desktop at a Glance
- Web Configurator
- Storage Manager
- Status Center
- Control Panel
- Videos, Photos, Music, & File Browser
- Administrator
- Managing Packages
- Tutorials
- 14.1 Overview
- 14.2 Windows 7 Network
- 14.3 Windows 7 Network Map
- 14.4 Playing Media Files in Windows 7
- 14.5 Windows 7 Devices and Printers
- 14.6 File Sharing Tutorials
- 14.7 Download Service Tutorial
- 14.8 Printer Server Tutorial
- 14.9 Copy and Flickr Auto Upload Tutorial
- 14.10 FTP Uploadr Tutorial
- 14.11 Web Configurator’s Security Sessions
- 14.12 Using FTPES to Connect to the NAS
- 14.13 Using a Mac to Access the NAS
- 14.14 How to Use the BackupPlanner
- Technical Reference
- Status Screen
- System Setting
- Applications
- Packages
- Auto Upload
- Dropbox
- Using Time Machine with the NAS
- Users
- Groups
- Shares
- WebDAV
- Maintenance Screens
- Protect
- Troubleshooting
- 28.1 Troubleshooting Overview
- 28.2 Power, Hardware, Connections, and LEDs
- 28.3 NAS Starter Utility
- 28.4 NAS Login and Access
- 28.5 I Cannot Access The NAS
- 28.6 Users Cannot Access the NAS
- 28.7 External USB Drives
- 28.8 Storage
- 28.9 Firmware
- 28.10 File Transfer
- 28.11 Networking
- 28.12 Some Features’ Screens Do Not Display
- 28.13 Media Server Functions
- 28.14 Download Service Functions
- 28.15 Web Publishing
- 28.16 Auto Upload
- 28.17 Package Management
- 28.18 Backups
- 28.19 Google Drive
- Product Specifications
- Customer Support
- Legal Information
- Index

Chapter 27 Protect
Cloud Storage User’s Guide
325
27.3.3 Backup: Step 3
Use t his screen t o specify com pression, encrypt ion and purge policies for t he backup j ob. This step
is only available if you are doing an archive backup or a synchronizat ion backup t o a rem ot e target .
Rem ote Select t his t o back up t o anot her device.
For Arch iv es:
The rem ote device can be anot her NAS in t he network. Fill in t he following fields in order
to be able t o access it.
• Rem ote NAS Address
• Username
• Password
• Share Nam e
Click Test Conn ection to see if your NAS can com m unicat e with t he rem ote device.
For Synchr onization:
The rem ote device m ust be another NAS com patible wit h t he NAS’s synchronizat ion
feature. Fill in t he following fields in order to be able to access it .
• Rem ote NAS Address
• Usernam e ( always “ adm in” )
• Rem ot e Adm in’s Password
Click Show t ar ge t con t en t t o connect t o t he rem ote NAS so you can select t he target
share for t he backup.
For Rsy n c:
The rem ote device m ust be a NAS t hat supports rsync or a com put er running t he rsync
ut ilit y. Fill in the follow ing fields in order t o be able to access it .
• Rem ote NAS Address
• Usernam e ( always “ adm in” )
• Rem ot e Adm in’s Password
Click Show t arge t cont ent t o connect t o t he r em ot e NAS or com put er so you can select
the t arget folder for t he backup.
Local Select t his if you want t o place your backup in another volum e in t he NAS. Select t he
folder where you want t o place t he backup.
Ext ernal Select t his if you have a USB hard disk connect ed t o t he NAS that you want to use for
your backup. Select the folder where you want t o place the backup.
Previous Click t his t o go back t o the previous screen.
Next Click t his t o go t o t he next screen.
Table 130 Protect > Backup: Step 2 ( continued)
LABEL DESCRIPTION