
User Manual
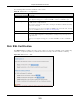
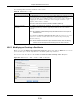
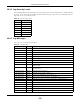

Table Of Contents
- Cloud Storage
- Web Desktop at a Glance
- Web Configurator
- Storage Manager
- Status Center
- Control Panel
- Videos, Photos, Music, & File Browser
- Administrator
- Managing Packages
- Tutorials
- 14.1 Overview
- 14.2 Windows 7 Network
- 14.3 Windows 7 Network Map
- 14.4 Playing Media Files in Windows 7
- 14.5 Windows 7 Devices and Printers
- 14.6 File Sharing Tutorials
- 14.7 Download Service Tutorial
- 14.8 Printer Server Tutorial
- 14.9 Copy and Flickr Auto Upload Tutorial
- 14.10 FTP Uploadr Tutorial
- 14.11 Web Configurator’s Security Sessions
- 14.12 Using FTPES to Connect to the NAS
- 14.13 Using a Mac to Access the NAS
- 14.14 How to Use the BackupPlanner
- Technical Reference
- Status Screen
- System Setting
- Applications
- Packages
- Auto Upload
- Dropbox
- Using Time Machine with the NAS
- Users
- Groups
- Shares
- WebDAV
- Maintenance Screens
- Protect
- Troubleshooting
- 28.1 Troubleshooting Overview
- 28.2 Power, Hardware, Connections, and LEDs
- 28.3 NAS Starter Utility
- 28.4 NAS Login and Access
- 28.5 I Cannot Access The NAS
- 28.6 Users Cannot Access the NAS
- 28.7 External USB Drives
- 28.8 Storage
- 28.9 Firmware
- 28.10 File Transfer
- 28.11 Networking
- 28.12 Some Features’ Screens Do Not Display
- 28.13 Media Server Functions
- 28.14 Download Service Functions
- 28.15 Web Publishing
- 28.16 Auto Upload
- 28.17 Package Management
- 28.18 Backups
- 28.19 Google Drive
- Product Specifications
- Customer Support
- Legal Information
- Index

Chapter 26 Maintenance Screens
Cloud Storage User’s Guide
312
The following table describes t he labels in this screen.
26.6.1 Modifying or Creating a Certificate
When you select t he Edit a self- sign ed CA ce rt ificat e opt ion, then click t he Edit button, a screen
opens t o allow you t o m ake adj ust m ent s t o t he NAS’s public key certificat e.
The screen is also t he sam e for t he Creat e a cert ificat e aut hor ized by ot he r CA option.
Figure 195 Maintenance > SSL > Creat e or Edit a Certificate
Table 121 Maint enance > SSL
LABEL DESCRIPTION
I nst all System Default CA Click Dow nloa d butt on to save a copy of the NAS’s public key cert ificate t o your
local comput er. This is useful for inst alling the cert ificat e without having t o
connect t o t he NAS, or for sending by em ail to ot her users for t hem t o install prior
to logging int o t he NAS for t he first t im e. After saving t he cert ificate to your
com put er, double-click it t o install it .
Note: Each web browser handles certificate installation differently.
Modify t he Exist ing
Certificate
Select Edit a self- signed CA cert ificat e, t hen follow t he on- screen instructions
for cr eat ing a public key cert ificat e signed by the NAS as t he local cert ificat e
aut horit y.
Note: Use certificates created and signed by the NAS if the device is not open to
external access.
Select Cre at e a cert ificat e a ut horized by ot her CA, t hen follow the on- screen
instruct ions t o install a cert ificat e that has been aut horized by a third- part y
cert ificat e aut horit y.
Note: Use this method if the device is open to external access, such as allowing
users to connect through the Internet using FTP over TLS or HTTPs.