
User Manual
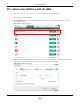
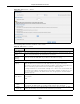
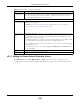

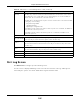
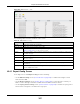
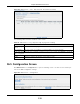
Table Of Contents
- Cloud Storage
- Web Desktop at a Glance
- Web Configurator
- Storage Manager
- Status Center
- Control Panel
- Videos, Photos, Music, & File Browser
- Administrator
- Managing Packages
- Tutorials
- 14.1 Overview
- 14.2 Windows 7 Network
- 14.3 Windows 7 Network Map
- 14.4 Playing Media Files in Windows 7
- 14.5 Windows 7 Devices and Printers
- 14.6 File Sharing Tutorials
- 14.7 Download Service Tutorial
- 14.8 Printer Server Tutorial
- 14.9 Copy and Flickr Auto Upload Tutorial
- 14.10 FTP Uploadr Tutorial
- 14.11 Web Configurator’s Security Sessions
- 14.12 Using FTPES to Connect to the NAS
- 14.13 Using a Mac to Access the NAS
- 14.14 How to Use the BackupPlanner
- Technical Reference
- Status Screen
- System Setting
- Applications
- Packages
- Auto Upload
- Dropbox
- Using Time Machine with the NAS
- Users
- Groups
- Shares
- WebDAV
- Maintenance Screens
- Protect
- Troubleshooting
- 28.1 Troubleshooting Overview
- 28.2 Power, Hardware, Connections, and LEDs
- 28.3 NAS Starter Utility
- 28.4 NAS Login and Access
- 28.5 I Cannot Access The NAS
- 28.6 Users Cannot Access the NAS
- 28.7 External USB Drives
- 28.8 Storage
- 28.9 Firmware
- 28.10 File Transfer
- 28.11 Networking
- 28.12 Some Features’ Screens Do Not Display
- 28.13 Media Server Functions
- 28.14 Download Service Functions
- 28.15 Web Publishing
- 28.16 Auto Upload
- 28.17 Package Management
- 28.18 Backups
- 28.19 Google Drive
- Product Specifications
- Customer Support
- Legal Information
- Index

Chapter 26 Maintenance Screens
Cloud Storage User’s Guide
308
26.4.2 Email Setting
You can enable and configure e- m ail alerts from the NAS. I n t he Re port Config screen, click t he
Em a il Se t t ing t ab t o open t he following screen.
Figure 190 Maintenance > Log > Report Config: Email Sett ing
The following table describes t he labels in this screen.
26.4.3 Report Setting
You can have t he NAS em ail you alert s and report s. I n t he Repor t Config screen, click t he Report
Set t ing t ab to open the following screen.
Table 117 Maint enance > Log > Report Config: Email Sett ing
LABEL DESCRIPTION
Enable Log Email Click t his to have the NAS e-m ail log alert s t o your e-m ail account .
Em ail To Enter t he e- m ail address where you want to receive the log alert s.
Em ail From Enter t he e- m ail address t he NAS uses in t he From field of t he e- m ail header for it s log
alert s.
Em ail Server Ent er t he e-m ail server address t he NAS uses t o send e- m ail alerts,
Em ail Form at Select t he e- m ail form at you want the NAS to use in it s e- m ail alert s.
Use SMTP
Aut hentication
Click t his if the e- mail server you want the NAS t o use for its e- m ail alert s requir es a
usernam e and password.
User Ent er the usernam e for t he e- m ail server.
Passw ord Enter t he password for the e- mail server.
Passw or d
(Confirm )
Re- enter the password t o confirm it.
Aft er apply set tings,
send a t est em ail
Click t his t o have t he NAS send a test e-m ail to t he settings you have entered.
Apply Click this to save your changes.
Cancel Click this t o return to t he pr evious scr een wit hout saving.