
User Manual
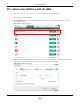

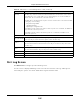
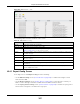
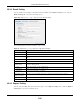
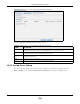
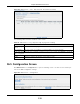
Table Of Contents
- Cloud Storage
- Web Desktop at a Glance
- Web Configurator
- Storage Manager
- Status Center
- Control Panel
- Videos, Photos, Music, & File Browser
- Administrator
- Managing Packages
- Tutorials
- 14.1 Overview
- 14.2 Windows 7 Network
- 14.3 Windows 7 Network Map
- 14.4 Playing Media Files in Windows 7
- 14.5 Windows 7 Devices and Printers
- 14.6 File Sharing Tutorials
- 14.7 Download Service Tutorial
- 14.8 Printer Server Tutorial
- 14.9 Copy and Flickr Auto Upload Tutorial
- 14.10 FTP Uploadr Tutorial
- 14.11 Web Configurator’s Security Sessions
- 14.12 Using FTPES to Connect to the NAS
- 14.13 Using a Mac to Access the NAS
- 14.14 How to Use the BackupPlanner
- Technical Reference
- Status Screen
- System Setting
- Applications
- Packages
- Auto Upload
- Dropbox
- Using Time Machine with the NAS
- Users
- Groups
- Shares
- WebDAV
- Maintenance Screens
- Protect
- Troubleshooting
- 28.1 Troubleshooting Overview
- 28.2 Power, Hardware, Connections, and LEDs
- 28.3 NAS Starter Utility
- 28.4 NAS Login and Access
- 28.5 I Cannot Access The NAS
- 28.6 Users Cannot Access the NAS
- 28.7 External USB Drives
- 28.8 Storage
- 28.9 Firmware
- 28.10 File Transfer
- 28.11 Networking
- 28.12 Some Features’ Screens Do Not Display
- 28.13 Media Server Functions
- 28.14 Download Service Functions
- 28.15 Web Publishing
- 28.16 Auto Upload
- 28.17 Package Management
- 28.18 Backups
- 28.19 Google Drive
- Product Specifications
- Customer Support
- Legal Information
- Index

Chapter 26 Maintenance Screens
Cloud Storage User’s Guide
307
Figure 189 Maintenance > Log
The following table describes t he labels in this screen.
26.4.1 Report Config Screen
I n the Log screen, click Re port Config to do the following:
• Use the Em a il Sett ing screen (
Section 26.4.2 on page 308) to enable and configure e-m ail
alert s from t he NAS.
• Use the Report Sett ing screen ( Section 26.4.3 on page 308) t o select t he t ype of alerts you
want t o receive t hrough e- m ail and schedule when t he NAS e-m ails t he alerts.
• Use the Syslog Se rver Set t ing screen ( Section 26.4.4 on page 309) t o enable t he syslog server
and select t he cat egories t o include in the log report .
Table 116 Maint enance > Log
LABEL DESCRIPTION
Refresh Click t his to updat e the log display.
Purge all Logs Click t his t o erase all logs from t he NAS.
Report Config Click t his t o open a screen where you can configure em ail alert s for logs. Refer t o
Section
26.4.1 on page 307
t o see t he screens for t his.
Display The screen alw ays shows all logs by default. Choose a specific log cat egory t o view logs for
j ust that cat egory.
# This is the log ent ry ’s num ber in t he list according t o t he currently selected sort order.
Tim e This shows the date and t im e the log was created. Click the t op of the colum n t o sort by
oldest or newest .
Class This displays t he log cat egory; see
Table 124 on page 314for details.
Sever ity This displays how serious the log is rat ed by t he NAS. See Table 125 on page 315for m ore
inform ation.
Message This displays a description of t he log. Click the t op of the colum n t o sort by alphabet ical or
reverse alphabetical order.