
User Manual
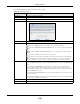
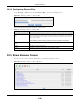
Table Of Contents
- Cloud Storage
- Web Desktop at a Glance
- Web Configurator
- Storage Manager
- Status Center
- Control Panel
- Videos, Photos, Music, & File Browser
- Administrator
- Managing Packages
- Tutorials
- 14.1 Overview
- 14.2 Windows 7 Network
- 14.3 Windows 7 Network Map
- 14.4 Playing Media Files in Windows 7
- 14.5 Windows 7 Devices and Printers
- 14.6 File Sharing Tutorials
- 14.7 Download Service Tutorial
- 14.8 Printer Server Tutorial
- 14.9 Copy and Flickr Auto Upload Tutorial
- 14.10 FTP Uploadr Tutorial
- 14.11 Web Configurator’s Security Sessions
- 14.12 Using FTPES to Connect to the NAS
- 14.13 Using a Mac to Access the NAS
- 14.14 How to Use the BackupPlanner
- Technical Reference
- Status Screen
- System Setting
- Applications
- Packages
- Auto Upload
- Dropbox
- Using Time Machine with the NAS
- Users
- Groups
- Shares
- WebDAV
- Maintenance Screens
- Protect
- Troubleshooting
- 28.1 Troubleshooting Overview
- 28.2 Power, Hardware, Connections, and LEDs
- 28.3 NAS Starter Utility
- 28.4 NAS Login and Access
- 28.5 I Cannot Access The NAS
- 28.6 Users Cannot Access the NAS
- 28.7 External USB Drives
- 28.8 Storage
- 28.9 Firmware
- 28.10 File Transfer
- 28.11 Networking
- 28.12 Some Features’ Screens Do Not Display
- 28.13 Media Server Functions
- 28.14 Download Service Functions
- 28.15 Web Publishing
- 28.16 Auto Upload
- 28.17 Package Management
- 28.18 Backups
- 28.19 Google Drive
- Product Specifications
- Customer Support
- Legal Information
- Index

Chapter 24 Shares
Cloud Storage User’s Guide
295
The following table describes t he labels in this screen.
24.3.3 Public and ANONYMOUS Share Access Rights
I f you m ake a share public, users do not need t o log in.
With ANON YMOUS FTP, you m ust enter eit her 'anonym ous' or 'ft p' as t he usernam e. Any other
nam e is considered a usernam e, so m ust be valid and have a corresponding correct password.
24.4 Recycle Bin Configuration Screen
Use t his screen to periodically clean up it em s in all recycle bins.
24.4.1 Recycle Bins
Recycle bins in t he NAS help users recover accident ally deleted files or folders in t he shares. When
you delet e an it em , a recycle folder is created wit hin t he share t o hold t he deleted it em .
Every share can have it s own recycle folder. You m ust enable t he recycle-bin function t o recycle
delet ed it em s. You can configure this set ting when you add or edit a share. See
Section 24.4.2 on
page 296 for det ails on activat ing t he recycle bin in a share.
Later if you want t o ret rieve a deleted it em , you can locate t he item in t he recycle folder. You m ay
m ove or copy t he deleted it em to anot her share.
Table 109 Sharing > Shares > Add Share ( or Edit Share) > Advanced
LABEL DESCRIPTION
Available Users/ Groups This field list s the user s/ groups t o which you can assign access right s.
Authority Use t his field t o assign access right s t o users/ groups.
Full Cont rol gives users/ groups full access ( read, writ e and execut e) to all files
cont ained wit hin t his share.
Rea d- Only gives users/ gr oups read-only access ( t hey cannot m odify nor
execut e) to all files cont ained wit hin t his share.
Den y blocks access ( users/ groups cannot read, m odify, nor execut e) t o all files
cont ained wit hin t his share.
Am ong all access right s, De ny has t he highest priorit y. For exam ple, User A
belongs t o Group 1. You assign User A full access right s t o t he Music share but
deny access right s to Group 1. Then User A cannot access t he Music share.
Note: If you deny access to all users, no-one can use the share, not even the
administrator.
Click an arrow butt on to m ove users/ groups bet ween the left and r ight fields. Use
the arrow but tons t o assign access right s t o users/ groups.
Apply Click t his to save your changes.
Cancel Click t his t o return to t he previous screen wit hout saving.