
User Manual
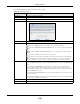
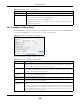
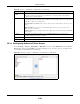
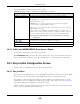
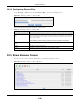
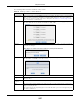
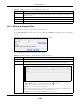
Table Of Contents
- Cloud Storage
- Web Desktop at a Glance
- Web Configurator
- Storage Manager
- Status Center
- Control Panel
- Videos, Photos, Music, & File Browser
- Administrator
- Managing Packages
- Tutorials
- 14.1 Overview
- 14.2 Windows 7 Network
- 14.3 Windows 7 Network Map
- 14.4 Playing Media Files in Windows 7
- 14.5 Windows 7 Devices and Printers
- 14.6 File Sharing Tutorials
- 14.7 Download Service Tutorial
- 14.8 Printer Server Tutorial
- 14.9 Copy and Flickr Auto Upload Tutorial
- 14.10 FTP Uploadr Tutorial
- 14.11 Web Configurator’s Security Sessions
- 14.12 Using FTPES to Connect to the NAS
- 14.13 Using a Mac to Access the NAS
- 14.14 How to Use the BackupPlanner
- Technical Reference
- Status Screen
- System Setting
- Applications
- Packages
- Auto Upload
- Dropbox
- Using Time Machine with the NAS
- Users
- Groups
- Shares
- WebDAV
- Maintenance Screens
- Protect
- Troubleshooting
- 28.1 Troubleshooting Overview
- 28.2 Power, Hardware, Connections, and LEDs
- 28.3 NAS Starter Utility
- 28.4 NAS Login and Access
- 28.5 I Cannot Access The NAS
- 28.6 Users Cannot Access the NAS
- 28.7 External USB Drives
- 28.8 Storage
- 28.9 Firmware
- 28.10 File Transfer
- 28.11 Networking
- 28.12 Some Features’ Screens Do Not Display
- 28.13 Media Server Functions
- 28.14 Download Service Functions
- 28.15 Web Publishing
- 28.16 Auto Upload
- 28.17 Package Management
- 28.18 Backups
- 28.19 Google Drive
- Product Specifications
- Customer Support
- Legal Information
- Index

Chapter 24 Shares
Cloud Storage User’s Guide
293
24.3.1 Adding or Editing Share
Click Add Sha re to create a new share. I n t he Sha res screen, select a share and click Edit Sha re
to open the following screen. Use this screen t o creat e or edit a share.
Figure 179 Shares > Add Share ( or Edit Share)
The following table describes t he labels in this screen.
Share Ow ner This is t he nam e of t he user account t o which t his share belongs.
Perm ission Type This field displays the access perm ission of a share.
Everyone on t he netw or k can access a Public share.
Only t he share owner can access a Privat e share.
An Adva nced share allows you t o assign specific access right s (read- only for exam ple)
to individual users/ groups.
Table 107 Sharing > Shares ( continued)
LABEL DESCRIPTION
Table 108 Shares > Add Share ( or Edit Share)
LABEL DESCRIPTION
Share Nam e Type a share nam e from 1 t o 239 single-byte ( no Chinese characters allowed for exam ple)
ASCI I characters. The nam e cannot be t he sam e as anot her existing share. See
Sect ion
11.2.2 on page 128
for m ore inform at ion on share nam es.
Volum e You should have already created volum es ( a single accessible storage area wit h a single
file system ) on t he NAS. Select t he one t hat cont ains t he folder that you want t o share out .
You cannot m odify t his w hen edit ing a share.
Make t his share
owned by
Select t he adm inist rat or or user account t hat can own (m anage) this share. The share
owner controls access right s to t he share.
Enable t his shar e Click t his t o allow access to this share.
Enable Recycle
Bin
Click this t o act ivat e t he r ecycle bin. When you delete a file from this share, a recycle
folder is creat ed t o store the deleted it em .
Publish t his share
to Media Server
This option is available only w hen you enable t he M edia Se rver (
Sect ion 17.5 on page
216
).
Select t his opt ion t o have t he NAS m ake m edia files in t his share available t o m edia client s
and through the Playzone screens. When you publish a share, you can also select whether
or not to publish m usic t racks, photos, and videos. The m edia client s do not have t o use a
password to play t he shares you publish.