
User Manual

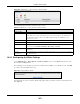
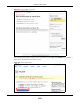
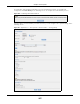
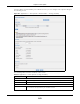
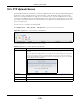
Table Of Contents
- Cloud Storage
- Web Desktop at a Glance
- Web Configurator
- Storage Manager
- Status Center
- Control Panel
- Videos, Photos, Music, & File Browser
- Administrator
- Managing Packages
- Tutorials
- 14.1 Overview
- 14.2 Windows 7 Network
- 14.3 Windows 7 Network Map
- 14.4 Playing Media Files in Windows 7
- 14.5 Windows 7 Devices and Printers
- 14.6 File Sharing Tutorials
- 14.7 Download Service Tutorial
- 14.8 Printer Server Tutorial
- 14.9 Copy and Flickr Auto Upload Tutorial
- 14.10 FTP Uploadr Tutorial
- 14.11 Web Configurator’s Security Sessions
- 14.12 Using FTPES to Connect to the NAS
- 14.13 Using a Mac to Access the NAS
- 14.14 How to Use the BackupPlanner
- Technical Reference
- Status Screen
- System Setting
- Applications
- Packages
- Auto Upload
- Dropbox
- Using Time Machine with the NAS
- Users
- Groups
- Shares
- WebDAV
- Maintenance Screens
- Protect
- Troubleshooting
- 28.1 Troubleshooting Overview
- 28.2 Power, Hardware, Connections, and LEDs
- 28.3 NAS Starter Utility
- 28.4 NAS Login and Access
- 28.5 I Cannot Access The NAS
- 28.6 Users Cannot Access the NAS
- 28.7 External USB Drives
- 28.8 Storage
- 28.9 Firmware
- 28.10 File Transfer
- 28.11 Networking
- 28.12 Some Features’ Screens Do Not Display
- 28.13 Media Server Functions
- 28.14 Download Service Functions
- 28.15 Web Publishing
- 28.16 Auto Upload
- 28.17 Package Management
- 28.18 Backups
- 28.19 Google Drive
- Product Specifications
- Customer Support
- Legal Information
- Index

Chapter 19 Auto Upload
Cloud Storage User’s Guide
270
19.5 FTP Uploadr Screen
The FTP Uploadr feature uploads files stored in t he NAS t o FTP servers. Besides web publishing and
m edia server, auto upload is anot her convenient way t o share m edia files wit h your friends and
fam ily. You can link t he NAS t o the FTP server or t he FTP server on another NAS and select shares
or folders for t he NAS t o upload. The NAS uploads t he files stored in the specified shares to t he FTP
server. When you add new files t o the specified shares, the NAS also autom at ically uploads t he new
files t o the FTP server.
Use t his screen to configure t he FTP Uploadr.
Click Applica t ions > Auto Uploa d > FTP Uploa dr t o open t he screen shown next .
Figure 164 Applications > Aut o Upload > FTP Uploadr
The following table describes t he labels in this screen.
Table 96 Applications > Aut o Upload > FTP Uploadr
LABEL DESCRIPTION
Enable FTP Uploadr Use t he check box t o enable or disable the FTP Uploadr. Click Ap ply t o save your
changes.
When you disable t he FTP Uploadr, a screen opens request ing confirm ation. Select the
check box t o st op any current or queued uploads. I f you do not select the check box,
the FTP Uploadr will finish uploading t he files that are already in the queue list . Clicking
Ye s will disable t he FTP Uploadr.
Add Server Click this t o add a target FTP server entry. See
Sect ion 19.5.1 on page 271 for m ore
details.
Preferences Click t his to m anage t he settings of the FTP Uploadr.
Edit Server Select a server from the list and click t his t o edit t he FTP ser v er ent ry.