
User Manual
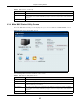

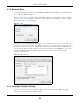

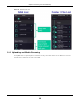
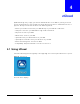
Table Of Contents
- Cloud Storage
- Web Desktop at a Glance
- Web Configurator
- Storage Manager
- Status Center
- Control Panel
- Videos, Photos, Music, & File Browser
- Administrator
- Managing Packages
- Tutorials
- 14.1 Overview
- 14.2 Windows 7 Network
- 14.3 Windows 7 Network Map
- 14.4 Playing Media Files in Windows 7
- 14.5 Windows 7 Devices and Printers
- 14.6 File Sharing Tutorials
- 14.7 Download Service Tutorial
- 14.8 Printer Server Tutorial
- 14.9 Copy and Flickr Auto Upload Tutorial
- 14.10 FTP Uploadr Tutorial
- 14.11 Web Configurator’s Security Sessions
- 14.12 Using FTPES to Connect to the NAS
- 14.13 Using a Mac to Access the NAS
- 14.14 How to Use the BackupPlanner
- Technical Reference
- Status Screen
- System Setting
- Applications
- Packages
- Auto Upload
- Dropbox
- Using Time Machine with the NAS
- Users
- Groups
- Shares
- WebDAV
- Maintenance Screens
- Protect
- Troubleshooting
- 28.1 Troubleshooting Overview
- 28.2 Power, Hardware, Connections, and LEDs
- 28.3 NAS Starter Utility
- 28.4 NAS Login and Access
- 28.5 I Cannot Access The NAS
- 28.6 Users Cannot Access the NAS
- 28.7 External USB Drives
- 28.8 Storage
- 28.9 Firmware
- 28.10 File Transfer
- 28.11 Networking
- 28.12 Some Features’ Screens Do Not Display
- 28.13 Media Server Functions
- 28.14 Download Service Functions
- 28.15 Web Publishing
- 28.16 Auto Upload
- 28.17 Package Management
- 28.18 Backups
- 28.19 Google Drive
- Product Specifications
- Customer Support
- Legal Information
- Index

Chapter 2 Getting Started
Cloud Storage User’s Guide
24
Click Configu ra t ion > Syst e m Set t ing in the m ain ut ilit y screen t o display t he following screen.
Figure 13 NAS St art er Ut ilit y > Configurat ion > System Setting
The following table describes t he labels in this screen.
Table 4 NAS Starter Ut ility > Configurat ion > System Sett ing
LABEL DESCRIPTION
Server Nam e Specify a nam e t o uniquely ident ify the NAS on your net work. You can ent er up t o 15
alphanum eric charact ers wit h m inus signs allowed but not as the last character. The
nam e m ust begin wit h an alphabet ic character ( a-z) and is case sensitive.
Tim e Zone Choose t he t im e zone of your locat ion. This will set t he t im e difference bet ween your
tim e zone and Greenwich Mean Tim e ( GMT).
Enable PPPoE
Connect ion
Click t his if your I nt ernet connect ion requires you t o ent er a user nam e and passw ord to
connect t o t he I nt ernet . Enter your user nam e and passw or d
I P Address Use t hese fields to configure t he I P address of the LAN interface through w hich you are
connect ed t o t he NAS.
When t he LAN int er faces are set t o stand- alone, t his configures the I P address of the LAN
int erface in t he sam e subnet as your com put er. I t configur es LAN1 if both LAN int erfaces
are in t he sam e subnet as your com puter.
I f you use t he adm inistrat or configurat ion screens t o set t he LAN int erfaces to link
aggregat ion, t his configures the I P address that bot h LAN int erfaces share.
Autom atically get
I P address
Select t his if t he NAS is autom atically assigned an I P address from the I SP or a DHCP
server in your net work.
Manually assign I P
address
Select t his if you want t o assign t he NAS a fixed I P address, subnet m ask and default
gat eway.
Note: Do not configure an IP address that is already in use in your network. This results to
a network IP address conflict and makes the NAS inaccessible.