
User Manual
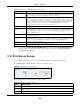
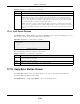
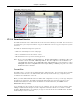
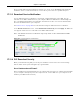
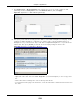
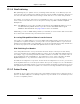
Table Of Contents
- Cloud Storage
- Web Desktop at a Glance
- Web Configurator
- Storage Manager
- Status Center
- Control Panel
- Videos, Photos, Music, & File Browser
- Administrator
- Managing Packages
- Tutorials
- 14.1 Overview
- 14.2 Windows 7 Network
- 14.3 Windows 7 Network Map
- 14.4 Playing Media Files in Windows 7
- 14.5 Windows 7 Devices and Printers
- 14.6 File Sharing Tutorials
- 14.7 Download Service Tutorial
- 14.8 Printer Server Tutorial
- 14.9 Copy and Flickr Auto Upload Tutorial
- 14.10 FTP Uploadr Tutorial
- 14.11 Web Configurator’s Security Sessions
- 14.12 Using FTPES to Connect to the NAS
- 14.13 Using a Mac to Access the NAS
- 14.14 How to Use the BackupPlanner
- Technical Reference
- Status Screen
- System Setting
- Applications
- Packages
- Auto Upload
- Dropbox
- Using Time Machine with the NAS
- Users
- Groups
- Shares
- WebDAV
- Maintenance Screens
- Protect
- Troubleshooting
- 28.1 Troubleshooting Overview
- 28.2 Power, Hardware, Connections, and LEDs
- 28.3 NAS Starter Utility
- 28.4 NAS Login and Access
- 28.5 I Cannot Access The NAS
- 28.6 Users Cannot Access the NAS
- 28.7 External USB Drives
- 28.8 Storage
- 28.9 Firmware
- 28.10 File Transfer
- 28.11 Networking
- 28.12 Some Features’ Screens Do Not Display
- 28.13 Media Server Functions
- 28.14 Download Service Functions
- 28.15 Web Publishing
- 28.16 Auto Upload
- 28.17 Package Management
- 28.18 Backups
- 28.19 Google Drive
- Product Specifications
- Customer Support
- Legal Information
- Index

Chapter 17 Applications
Cloud Storage User’s Guide
239
1 Click Applica t ions > W e b Publishing and configure t he screen as shown (enable the web
publishing and m ove Fam ilyPhot os over t o Published Sha re s) and click Apply.
Figure 139 Applications > Web Publishing (Exam ple)
2 Now open your web browser and t ype in t he address of t he NAS’s Fam ilyPhot os web page. I n t his
exam ple, t he NAS’s I P address is 192.168.1.33, and t he nam e of t he web- published share is
Fam ilyPhot os. So you would enter “ ht tp: / / 192.168.1.33/ MyWeb/ Fam ilyPhot os/ ” in your browser’s
address bar. Then press [ ENTER] or click Go. A screen displays listing the share’s files.
Figure 140 Browsing to an NAS Share Exam ple
• Click a file’s link t o open the file.
• Right- click a file’s link and select Sa ve Tar get As.. ( in I nt ernet Explorer) to save a copy of the
file.
• Click a label in t he heading row t o sort t he files by t hat criteria.
• To custom ize how t he page looks and works, create an index.ht m l or index.htm file and st ore it in
the share.