
User Manual
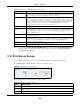
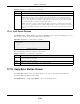
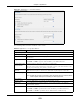
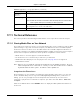
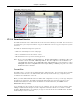
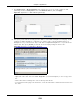
Table Of Contents
- Cloud Storage
- Web Desktop at a Glance
- Web Configurator
- Storage Manager
- Status Center
- Control Panel
- Videos, Photos, Music, & File Browser
- Administrator
- Managing Packages
- Tutorials
- 14.1 Overview
- 14.2 Windows 7 Network
- 14.3 Windows 7 Network Map
- 14.4 Playing Media Files in Windows 7
- 14.5 Windows 7 Devices and Printers
- 14.6 File Sharing Tutorials
- 14.7 Download Service Tutorial
- 14.8 Printer Server Tutorial
- 14.9 Copy and Flickr Auto Upload Tutorial
- 14.10 FTP Uploadr Tutorial
- 14.11 Web Configurator’s Security Sessions
- 14.12 Using FTPES to Connect to the NAS
- 14.13 Using a Mac to Access the NAS
- 14.14 How to Use the BackupPlanner
- Technical Reference
- Status Screen
- System Setting
- Applications
- Packages
- Auto Upload
- Dropbox
- Using Time Machine with the NAS
- Users
- Groups
- Shares
- WebDAV
- Maintenance Screens
- Protect
- Troubleshooting
- 28.1 Troubleshooting Overview
- 28.2 Power, Hardware, Connections, and LEDs
- 28.3 NAS Starter Utility
- 28.4 NAS Login and Access
- 28.5 I Cannot Access The NAS
- 28.6 Users Cannot Access the NAS
- 28.7 External USB Drives
- 28.8 Storage
- 28.9 Firmware
- 28.10 File Transfer
- 28.11 Networking
- 28.12 Some Features’ Screens Do Not Display
- 28.13 Media Server Functions
- 28.14 Download Service Functions
- 28.15 Web Publishing
- 28.16 Auto Upload
- 28.17 Package Management
- 28.18 Backups
- 28.19 Google Drive
- Product Specifications
- Customer Support
- Legal Information
- Index

Chapter 17 Applications
Cloud Storage User’s Guide
231
Note: I f you installed php- MySQL- phpM yAdm in through t he Pack a ge M anagem ent
screen (
Section 18.6 on page 251) and enable it , you can use PHP and MySQL in
your published web page.
17.9 Print Server Screen
Use t he Print Serve r screen t o view and m anage t he NAS’s list of printers and print jobs.
Click Applica t ions > Pr int Serve r t o open t he following screen.
Figure 131 Applications > Print Server
The following table describes t he labels in this screen.
Support HTTPS Select this to allow users t o use web br ow ser securit y for connect ions t o t he w eb-
published shares. I n order to use secured connect ions users m ust use “ht tps: / / ” in t he
NAS’s web addr ess and inst all the NAS’s public key cert ificat e.
Port Num ber Specify a port num ber for accessing t he published share websit es hosted on the NAS. I f
you ent er a num ber ot her than 80, m ake sure you include it when telling ot hers how t o
access t he w eb- published share. For exam ple, say you specified port 8080, t he NAS’s I P
address is 192.168.1.23, and the nam e of the web- published share is Fam ilyPhot os. You
would have to ent er “ ht tp: / / 192.168.1.23: 8080/ MyWeb/ Fam ilyPhotos/ ” in your
browser’s addr ess bar t o access t he share’s web page.
Unpublished Shares This list box displays t he shares t hat the NAS does not publish for web browser access.
Publish Selected
Share(s)
Select shar es in t h e Unpublished Sha res box and click t his t o let people access files in
the published shares using a web browser, wit hout logging int o t he Web Configurat or.
Use t he [ SHI FT] key t o select a range of entries. Hold down t he [ CTRL] key t o select
m ult iple individual ent ries.
Published Shares This list box displays t he shares people can access using a web browser, without logging
int o t he Web Configurat or.
Unpublish Select ed
Share(s)
Select shares in t he Publishe d Shar es box and click this t o not let people access using
a web browser wit hout logging into the Web Configurat or. Use the [ SHI FT] key t o select
a range of entries. Hold down t he [ CTRL] key to select m ult iple individual ent ries.
Apply Click t his to save your changes.
Reset Click t his t o rest ore your previously saved set tings.
Table 79 Applications > Web Publishing ( cont inued)
LABEL DESCRIPTION
Table 80 Applications > Print Server
LABEL DESCRIPTION
Refresh Click this t o updat e t he list of pr int ers and print jobs.
The t able list s print er s and their queued print j obs. Click a colum n’s heading t o sort t he entries
by that crit eria.
St atus This fields shows whether the print er is connect ed and turned on ( on- line ) or not ( off- lin e ).