
User Manual

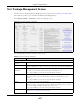
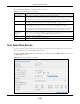
Table Of Contents
- Cloud Storage
- Web Desktop at a Glance
- Web Configurator
- Storage Manager
- Status Center
- Control Panel
- Videos, Photos, Music, & File Browser
- Administrator
- Managing Packages
- Tutorials
- 14.1 Overview
- 14.2 Windows 7 Network
- 14.3 Windows 7 Network Map
- 14.4 Playing Media Files in Windows 7
- 14.5 Windows 7 Devices and Printers
- 14.6 File Sharing Tutorials
- 14.7 Download Service Tutorial
- 14.8 Printer Server Tutorial
- 14.9 Copy and Flickr Auto Upload Tutorial
- 14.10 FTP Uploadr Tutorial
- 14.11 Web Configurator’s Security Sessions
- 14.12 Using FTPES to Connect to the NAS
- 14.13 Using a Mac to Access the NAS
- 14.14 How to Use the BackupPlanner
- Technical Reference
- Status Screen
- System Setting
- Applications
- Packages
- Auto Upload
- Dropbox
- Using Time Machine with the NAS
- Users
- Groups
- Shares
- WebDAV
- Maintenance Screens
- Protect
- Troubleshooting
- 28.1 Troubleshooting Overview
- 28.2 Power, Hardware, Connections, and LEDs
- 28.3 NAS Starter Utility
- 28.4 NAS Login and Access
- 28.5 I Cannot Access The NAS
- 28.6 Users Cannot Access the NAS
- 28.7 External USB Drives
- 28.8 Storage
- 28.9 Firmware
- 28.10 File Transfer
- 28.11 Networking
- 28.12 Some Features’ Screens Do Not Display
- 28.13 Media Server Functions
- 28.14 Download Service Functions
- 28.15 Web Publishing
- 28.16 Auto Upload
- 28.17 Package Management
- 28.18 Backups
- 28.19 Google Drive
- Product Specifications
- Customer Support
- Legal Information
- Index

Chapter 16 System Setting
Cloud Storage User’s Guide
207
16.4 Package Management Screen
Use t his screen to download and install applications from t he web. See
Chapt er 18 on page 246 for
m ore about t he features you can add t o t he NAS by inst alling packages.
Click Syst e m Se t t in g > Pack ages t o open t he following screen.
Figure 113 Syst em Set ting > Packages
The following table describes t he labels in this screen.
Table 63 Syst em Set ting > Packages
LABEL DESCRIPTION
Package Managem ent
Ret r ieve List From
I nt ernet
Click t his to retrieve a list of available packages from t he ZyXEL websit e.
I nstall/ Upgrade Choose the item (s) on the list and click t his to install the select ed application(s) on your
system or upgrade to the latest version if you have previously inst alled t he application.
Uninstall/ Cancel
I nstallat ion
Choose t he it em ( s) on t he list and click t his to uninstall the selected application(s) from
your system or cancel t heir active download( s) or inst all pr ocess/ es.
This is only available if you have previously inst alled the package.
Enable This option is only for non built- in packages.
Choose t he it em (s) on t he list and click this t o enable t he applicat ion( s) on your
system .
This is only available if you have previously inst alled the package.
Disable This option is only for non built- in packages.
Choose t he it em (s) on the list and click this t o disable t he application on your syst em .
You have to enable the applicat ion again in order to use it .
This is only available if you have previously inst alled the package.
Package I nfo Select an item on the list and click this to display inform at ion about t he package. See
Sect ion 16.4.1 on page 208 for m ore details.