
User Manual

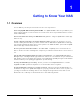
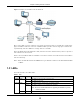
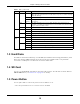
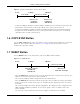
Table Of Contents
- Cloud Storage
- Web Desktop at a Glance
- Web Configurator
- Storage Manager
- Status Center
- Control Panel
- Videos, Photos, Music, & File Browser
- Administrator
- Managing Packages
- Tutorials
- 14.1 Overview
- 14.2 Windows 7 Network
- 14.3 Windows 7 Network Map
- 14.4 Playing Media Files in Windows 7
- 14.5 Windows 7 Devices and Printers
- 14.6 File Sharing Tutorials
- 14.7 Download Service Tutorial
- 14.8 Printer Server Tutorial
- 14.9 Copy and Flickr Auto Upload Tutorial
- 14.10 FTP Uploadr Tutorial
- 14.11 Web Configurator’s Security Sessions
- 14.12 Using FTPES to Connect to the NAS
- 14.13 Using a Mac to Access the NAS
- 14.14 How to Use the BackupPlanner
- Technical Reference
- Status Screen
- System Setting
- Applications
- Packages
- Auto Upload
- Dropbox
- Using Time Machine with the NAS
- Users
- Groups
- Shares
- WebDAV
- Maintenance Screens
- Protect
- Troubleshooting
- 28.1 Troubleshooting Overview
- 28.2 Power, Hardware, Connections, and LEDs
- 28.3 NAS Starter Utility
- 28.4 NAS Login and Access
- 28.5 I Cannot Access The NAS
- 28.6 Users Cannot Access the NAS
- 28.7 External USB Drives
- 28.8 Storage
- 28.9 Firmware
- 28.10 File Transfer
- 28.11 Networking
- 28.12 Some Features’ Screens Do Not Display
- 28.13 Media Server Functions
- 28.14 Download Service Functions
- 28.15 Web Publishing
- 28.16 Auto Upload
- 28.17 Package Management
- 28.18 Backups
- 28.19 Google Drive
- Product Specifications
- Customer Support
- Legal Information
- Index

Chapter 1 Getting to Know Your NAS
Cloud Storage User’s Guide
17
Figure 2 Using t he Power But ton t o Turn Off the NAS
• To have t he NAS go t hrough it s norm al soft ware shut dow n process and t urn it self off, press the
pow er but ton until you hear one beep ( aft er about three seconds), t hen release it.
• To perform a hardware shut down and have t he NAS im m ediat ely t urn it self off wit hout going
through t he norm al shut down process, press t he power but t on unt il you hear a second beep
(aft er about five seconds), then release it .
1.6 COPY/SYNC Button
Use t he COPY/ SYN C but t on on t he front panel to copy or synchronize files between a connected
USB or SD device and t he NAS. See
Section 17.10 on page 232 for m ore det ails on how t o
configure t he copy/ sync sett ings.
1.7 RESET Button
Use t he RESET but ton on t he rear panel to restore t he NAS’s default sett ings.
Figure 3 The RESET But ton
• Press the RESET but ton until you hear one beep ( aft er about t wo seconds), t hen release it . You
will hear one m ore beep aft er you release t he button.
This resets t he NAS’s I P address and password t o the default values.
• Press the RESET but ton until you hear t wo beeps. Aft er t he second beep, cont inue pressing the
but t on for five m ore seconds, t hen release it . You will hear t hree quick beeps after you release
the but t on.
This resets t he NAS to t he factory default configurat ion. All settings you have configured on t he
NAS, including I P address, password, user account s, groups, and so on will be reset t o t he
fact ory default s.
The reset process does NOT affect t he volum e set tings, nor data stored on the NAS.
Pr e ss
1 Bee p
2 Beeps
2 m ore seconds
Rele a se for
3 secon ds
Re lease for
soft w a r e
shu t dow n
har dw are
shu t dow n
Pr e ss
1 Bee p
2 Beeps
I P Address
Pa ssw ord
Cle a r All Se t t ings
5 m or e seconds
Re lease t o
Re lease t o Re se t