
User Manual
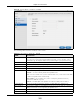
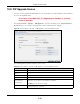
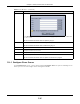
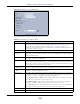
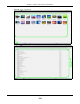
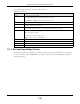
Table Of Contents
- Cloud Storage
- Web Desktop at a Glance
- Web Configurator
- Storage Manager
- Status Center
- Control Panel
- Videos, Photos, Music, & File Browser
- Administrator
- Managing Packages
- Tutorials
- 14.1 Overview
- 14.2 Windows 7 Network
- 14.3 Windows 7 Network Map
- 14.4 Playing Media Files in Windows 7
- 14.5 Windows 7 Devices and Printers
- 14.6 File Sharing Tutorials
- 14.7 Download Service Tutorial
- 14.8 Printer Server Tutorial
- 14.9 Copy and Flickr Auto Upload Tutorial
- 14.10 FTP Uploadr Tutorial
- 14.11 Web Configurator’s Security Sessions
- 14.12 Using FTPES to Connect to the NAS
- 14.13 Using a Mac to Access the NAS
- 14.14 How to Use the BackupPlanner
- Technical Reference
- Status Screen
- System Setting
- Applications
- Packages
- Auto Upload
- Dropbox
- Using Time Machine with the NAS
- Users
- Groups
- Shares
- WebDAV
- Maintenance Screens
- Protect
- Troubleshooting
- 28.1 Troubleshooting Overview
- 28.2 Power, Hardware, Connections, and LEDs
- 28.3 NAS Starter Utility
- 28.4 NAS Login and Access
- 28.5 I Cannot Access The NAS
- 28.6 Users Cannot Access the NAS
- 28.7 External USB Drives
- 28.8 Storage
- 28.9 Firmware
- 28.10 File Transfer
- 28.11 Networking
- 28.12 Some Features’ Screens Do Not Display
- 28.13 Media Server Functions
- 28.14 Download Service Functions
- 28.15 Web Publishing
- 28.16 Auto Upload
- 28.17 Package Management
- 28.18 Backups
- 28.19 Google Drive
- Product Specifications
- Customer Support
- Legal Information
- Index

Chapter 11 Videos, Photos, Music, & File Browser
Cloud Storage User’s Guide
126
11.2.1 Configure Share Screen
I n the File Brow ser screen, select a share and click Configure Sha re t o open t he following screen
where you can see and configure share m anagem ent details.
Upload Click this to open t he following screen where you can add files t o t he share.
Use the Brow se b u t t on t o locat e y ou r f i le/ s an d cl ick Apply t o upload t he file. Click Can cel t o
close t his screen.
Note: Do not refresh the screen while an upload is going on.
Download Select a file and click t his to save t he file t o your com put er.
Note: Do not refresh the screen while a download is going on.
Com press Select files or folders and click t his t o com press t hem int o a zip file.
Decom press Select a zipped file and click this to cr eate a folder nam ed after the zip file and save t he
decom pressed files int o t he folder.
Rest ore When you are in a recycle bin folder, select a folder or file and click this t o rest ore it.
Refresh Click t his t o updat e t he inform at ion displayed in the screen.
Note: Do not refresh the screen while an upload or download is in progress.
Table 51 File Browser ( cont inued)
LABEL DESCRIPTION