
User Manual
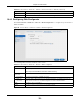
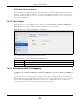
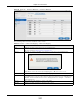
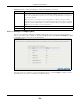
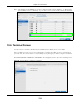
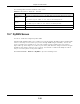
Table Of Contents
- Cloud Storage
- Web Desktop at a Glance
- Web Configurator
- Storage Manager
- Status Center
- Control Panel
- Videos, Photos, Music, & File Browser
- Administrator
- Managing Packages
- Tutorials
- 14.1 Overview
- 14.2 Windows 7 Network
- 14.3 Windows 7 Network Map
- 14.4 Playing Media Files in Windows 7
- 14.5 Windows 7 Devices and Printers
- 14.6 File Sharing Tutorials
- 14.7 Download Service Tutorial
- 14.8 Printer Server Tutorial
- 14.9 Copy and Flickr Auto Upload Tutorial
- 14.10 FTP Uploadr Tutorial
- 14.11 Web Configurator’s Security Sessions
- 14.12 Using FTPES to Connect to the NAS
- 14.13 Using a Mac to Access the NAS
- 14.14 How to Use the BackupPlanner
- Technical Reference
- Status Screen
- System Setting
- Applications
- Packages
- Auto Upload
- Dropbox
- Using Time Machine with the NAS
- Users
- Groups
- Shares
- WebDAV
- Maintenance Screens
- Protect
- Troubleshooting
- 28.1 Troubleshooting Overview
- 28.2 Power, Hardware, Connections, and LEDs
- 28.3 NAS Starter Utility
- 28.4 NAS Login and Access
- 28.5 I Cannot Access The NAS
- 28.6 Users Cannot Access the NAS
- 28.7 External USB Drives
- 28.8 Storage
- 28.9 Firmware
- 28.10 File Transfer
- 28.11 Networking
- 28.12 Some Features’ Screens Do Not Display
- 28.13 Media Server Functions
- 28.14 Download Service Functions
- 28.15 Web Publishing
- 28.16 Auto Upload
- 28.17 Package Management
- 28.18 Backups
- 28.19 Google Drive
- Product Specifications
- Customer Support
- Legal Information
- Index

Chapter 10 Control Panel
Cloud Storage User’s Guide
111
The following table describes t he labels in this screen.
10.4.2.2 Configuring PPPoE Settings
Use t his screen to configure PPPoE set tings for a direct I nt ernet connection. Select t he ppp0
interface and then click Edit .
Figure 64 Control Panel > Network > TCP/ I P > Network I nt erface > PPPoE
The following table describes t he labels in this screen.
Table 41 Cont rol Panel > Net work > TCP/ I P > Network I nt erface > Creat e
LABEL DESCRIPTION
Aut om at ically Select t his option to have t he int erface get I P address inform at ion autom at ically.
I f no I P address inform ation is assigned, t he NAS uses Aut o-I P to assign it self an I P
address and subnet m ask. For exam ple, y ou could connect t he NAS directly to your
com puter. I f t he comput er is also set t o get an I P address aut om at ically, the com put er
and t he NAS will choose addresses for t hem selves and be able to com municat e.
Manually Select this opt ion for the int erface t o use fixed TCP/ I P inform ation. You m ust fill in t he
following fields.
I P Addr e ss - Ty pe an I P address in t his field.
Subne t M ask - Type an I P subnet m ask in t his field.
De fa ult Ga te w ay - Ty pe a default gateway address in t his field.
Creat e Click this t o save the sett ings and creat e a port t runking.
Cancel Click t his t o return t o t he previous screen wit hout saving.
Table 42 Cont rol Panel > Net work > TCP/ I P > Network I nt erface > PPPoE
LABEL DESCRIPTION
Enable PPPoE t o
direct ly connect
to the I nternet
Select or clear t his field t o enable or disable PPPoE.
Usernam e Ent er the usernam e exactly as your I SP assigned. I f assigned a nam e in the form
user@dom ain where dom ain ident ifies a serv ice nam e, then enter bot h com ponent s
exactly as given.
Password Enter t he password associat ed wit h t he user nam e above.
Show password Select t his field t o reveal t he password hidden behind ast erisks or clear this field t o hide
the password.