FSG2200HNU Multiservice Gateway with 802.11n Wireless Firmware V1.00 Edition 1, 1/2010 DEFAULT LOGIN DETAILS IP Address: http://192.168.1.1 User Login: User Name: user Password: user Administrator Login: User Name: admin Password: admin www.zyxel.
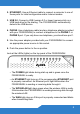
Device Panels CATV LED WPS/ PHONE 1, 2 WLAN LEDS LED USB WAN LEDS LED ETHERNET 1~4 LEDS WPS/WLAN BUTTON INTERNET LED USB PORTS 2 ETHERNET PORTS RESET ON/OFF PHONE PORTS POWER
Overview The FSG2200HNU is a single-mode optical fiber Integrated Access Device (IAD) which combines high-speed Internet access, a built-in switch, a firewall and high-speed wireless networking capability. It also has two USB 2.0 port for sharing files via a USB compatible storage device and two phone ports for making calls over the Internet (Voice over IP or VoIP). Requirements Make sure you have the following things before you start.
• Internet Explorer 6.0 or later or Netscape Navigator 7.0 or later, with JavaScript enabled. See the User’s Guide on the CD for all configuration details including setting up a shared printer. Hardware Connections 1. FIBER: Use a fiber optic cable to connect to a fiber optic jack with Internet access.
2. ETHERNET: Use an Ethernet cable to connect a computer to one of these ports for initial configuration and/or Internet access. 3. USB 2.0: Connect a USB (version 2.0 or lower) memory stick or a USB hard drive for file sharing. The FSG2200HNU automatically detects the USB device. 4. PHONE: Use a telephone cable (and any telephone adaptor provided with your FSG2200HNU) to connect a telephone to the PHONE 1 or PHONE 2 port. If you only have one telephone, you should use port 1. 5.
• The INTERNET light is green when Internet access is available. • The PHONE lights stay on when your SIP account is registered and they blink if the receiver is off the hook. • The USB light turns on when there is a USB device (printer or memory stick) connected to the FSG2200HNU and blinks when transmitting data. • The CATV light turns on when the FSG2200HNU is connected to the FTU2000 and the fiber optic cable TV service is active. Refer to the Quick Start Guide of your FTU2000 for more information.
2. For administrator login, enter username admin and password admin (default). For user login, enter user as the username and user as the password. Click Login. If the login screen does not open, make sure you allow web browser pop-up windows, JavaScripts and Java permissions. Your computer should be also set to get an IP address automatically from a DHCP server. See the appendices in your User’s Guide for more information. Only administrators (‘admin’) can configure the SIP account settings.
Set Up a Wireless Network To set up a wireless network you need at least one wireless network card/adapter. • If you have a desktop computer, use either a wireless USB adapter or a wireless PCI adapter. • If you have a laptop, use either a wireless USB adapter or a wireless CardBus card. These are built into many laptops. Setting Up a Wireless Network with WPS If your wireless devices display the WPS logo, you can use Wi-Fi Protected Setup (WPS) to add wireless devices to your wireless network.
Push Button Configuration 1. Place a WPS-enabled device that is installed in your system and supports the WPS Push Button method within range of the FSG2200HNU. 2. Press the WLAN button on the FSG2200HNU’s top panel for five seconds. 3. Use the WPS-enabled device’s WPS button. It can be either a button in the utility or a physical button. See the device’s documentation if you cannot locate the WPS button. It doesn’t matter which button is pressed first.
2. Log into the FSG2200HNU’s web configurator at http://192.168.1.1 (see Log into the Web Configurator on page 6 for more details on this). 3. In the Status screen click Network in the left panel then click Wireless LAN. In the Wireless LAN screen click the WPS Station tab. 4. Enter the PIN of the other WPS-enabled device into the Input Station’s PIN number text box and click Start. You can locate this PIN number in the other device’s utility or on the device itself.
Set Up a Wireless Network Manually Configure wireless devices to use the same wireless settings as the FSG2200HNU. If you didn’t configure the FSG2200HNU’s wireless settings, use the wireless SSID (network name) and WPA-PSK encryption key on the FSG2200HNU’s rear panel. The connection procedure is shown here using Windows XP as an example. 1. Right-click the wireless adapter icon which appears in the bottom right of your computer monitor. Click View Available Wireless Networks. 2.
3. You are prompted to enter a password. Enter it and click Connect. 4. You may have to wait several minutes while your computer connects to the wireless network. 5. You should now be securely connected wirelessly to the FSG2200HNU. Congratulations! Your computer is now ready to connect to the Internet wirelessly through your FSG2200HNU. If you cannot connect wirelessly to the FSG2200HNU, check you have selected the correct SSID and entered the correct security key.
• To dial a SIP number that only uses numbers (for example, “12345”), dial the number on your phone’s keypad. You can also set up a speed-dial entry, if you want. See the User’s Guide for instructions. • To dial a SIP number that uses letters, set up a speed-dial entry first. See the User’s Guide for instructions. Then, dial the speed-dial number to make the call. • To call regular telephone numbers, use your VoIP service provider’s dialing plan.
Phone Functions Summary Keys Function Description *98# Call transfer Transfer a call to another phone. *92# Call return Place a call to the last person who called you. *95# Enable Do Not Disturb Set your phone not to ring when someone calls you, or to turn this function off. #95# Disable Do Not Disturb *43# Enable call waiting #43# Disable call waiting *21*# Uncondition Forward Activate Enter the number where the calls should be forwarded in . Forward all incoming calls.
Keys Function Description *67*# Busy Forward Activate Enter the number where the calls should be forwarded in . Forward calls if you are already making a call. This feature must be supported by your service provider before it can be enabled. #67# Busy Forward Deactivate Disable forwarding incoming calls if you are already making a call. *31# Caller ID Display Activate call waiting. #31# Caller ID Hidden Deactivate call waiting.
Configure USB File Sharing 1. Click Advanced > File Sharing. 2. Check the box Enable File Sharing Services and click Apply. The FSG2200HNU automatically recognizes the USB device which is connected to the USB port and makes it available for sharing (shown in the figure above).
Browse to the USB File Share 1. In Windows Explorer’s Address bar type a double backslash “\\” followed by the IP address of the FSG2200HNU (192.168.1.1 is the default) and hit [ENTER]. 2. Enter the user name and password in the window prompt that appears and hit OK. 3. The files on the USB file sharing device connected to the FSG2200HNU are now part of your file structure and you can manage those files just like any other files on your computer.