
User's Manual


Chapter 22 Manage Accessible LAN Resources
NBG-510S User’s Guide
142
22.2.1 Add/Edit Server Screen
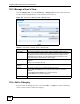
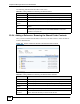
Click the Add or Edit icon in the Portal User > Manage Servers screen to open this screen.
Use this screen to create a new or edit an existing server entry.
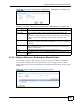
Figure 99 User Portal > Manage Servers > Add
The following table describes the labels in this screen.
User Name This field displays the user name used to access the computer. Anonymous
displays if a user name and password are not required to access the server.
Add icon This column provides icons to add, edit, and remove server entries.
Click the Add icon to go to the screen where you can add an entry.
Click the Edit icon to go to the screen where you can edit the server entry.
Click the Delete icon to remove a server entry.
Table 44 User Portal > Manage Servers (continued)
LABEL DESCRIPTION
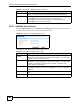
Table 45 User Portal > Manage Server > Add
LABEL DESCRIPTION
Host Name / IP
Address
Type the name of the computer or the computer’s (static) IP address.
Enter between 1 and 31 alphanumeric characters, underscores (
_), the at sign (@),
or dashes (-). This value is case-sensitive.
User Name Enter the user name that you need to use to access the server.
Enter between 1 and 31 alphanumeric characters, underscores (_), the at sign (@),
or dashes (-), but the first character cannot be a number. This value is case-
sensitive. Spaces are not allowed.
Password Enter the password in the field. You can enter between 4 to 31 characters.
Alphanumeric characters (0-9a-zA-Z) and `~!@#$%^&*()_-+={}|\;:'<,>./ characters
are allowed.
Apply Changes Click Apply Changes to create or edit the server entry and return to the previous
screen.
Cancel Click Cancel to return to the previous screen without saving your changes.