
P-2302R Series VoIP Station Gateway User's Guide

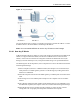
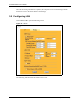
Table Of Contents
- P-2302R Series
- User’s Guide
- Copyright
- Federal Communications Commission (FCC) Interference Statement
- Safety Warnings
- ZyXEL Limited Warranty
- Customer Support
- Table of Contents
- List of Figures
- List of Tables
- Preface
- Introducing the Prestige
- Introducing the Web Configurator
- Wizard Setup
- System Screens
- LAN Setup
- WAN Screens
- Introduction to VoIP
- VoIP Screens
- Phone
- Phone Book
- Phone Usage
- Network Address Translation (NAT) Screens
- Static Route
- Firewall
- Content Filtering
- Remote Management Screens
- Universal Plug-and-Play (UPnP)
- Logs
- Bandwidth Management
- 19.1 Bandwidth Management Overview
- 19.2 Bandwidth Classes and Filters
- 19.3 Proportional Bandwidth Allocation
- 19.4 Application-based Bandwidth Management
- 19.5 Subnet-based Bandwidth Management
- 19.6 Application and Subnet-based Bandwidth Management
- 19.7 Scheduler
- 19.8 Maximize Bandwidth Usage
- 19.9 Bandwidth Borrowing
- 19.10 Configuring Summary
- 19.11 Configuring Class Setup
- 19.12 Configuring Monitor
- Maintenance
- Introducing the SMT
- General Setup
- WAN Setup
- LAN Setup
- Internet Access
- Remote Node Configuration
- Static Route Setup
- Network Address Translation (NAT)
- Enabling the Firewall
- Filter Configuration
- SNMP Configuration
- System Information and Diagnosis
- Firmware and Configuration File Maintenance
- 33.1 Filename Conventions
- 33.2 Backup Configuration
- 33.2.1 Backup Configuration
- 33.2.2 Using the FTP Command from the Command Line
- 33.2.3 Example of FTP Commands from the Command Line
- 33.2.4 GUI-based FTP Clients
- 33.2.5 TFTP and FTP over WAN Management Limitations
- 33.2.6 Backup Configuration Using TFTP
- 33.2.7 TFTP Command Example
- 33.2.8 GUI-based TFTP Clients
- 33.3 Restore Configuration
- 33.4 Uploading Firmware and Configuration Files
- System Maintenance
- Remote Management
- Call Scheduling
- Troubleshooting
- 37.1 Problems Starting Up the Prestige
- 37.2 Problems with the LAN Interface
- 37.3 Problems with the WAN Interface
- 37.4 Problems with Internet Access
- 37.5 Problems with the Password
- 37.6 Problems with the Web Configurator
- 37.7 Problems with a Telephone or the Telephone Port
- 37.8 Problems with Voice Service
- 37.9 Pop-up Windows, JavaScripts and Java Permissions
- Product Specifications
- Wall-mounting Instructions
- Setting up Your Computer’s IP Address
- IP Subnetting
- PPPoE
- Triangle Route
- SIP Passthrough
- Index

P-2302R Series User’s Guide
Chapter 5 LAN Setup 72
CHAPTER 5
LAN Setup
This chapter describes how to configure LAN settings.
5.1 LAN Overview
A Local Area Network (LAN) is a shared communication system to which many computers
are attached. A LAN is a computer network limited to the immediate area, usually the same
building or floor of a building. The LAN screens can help you configure a LAN DHCP server,
manage IP addresses, and partition your physical network into logical networks.
5.2 IP Address and Subnet Mask
Similar to the way houses on a street share a common street name, so too do computers on a
LAN share one common network number.
Where you obtain your network number depends on your particular situation. If the ISP or
your network administrator assigns you a block of registered IP addresses, follow their
instructions in selecting the IP addresses and the subnet mask.
If the ISP did not explicitly give you an IP network number, then most likely you have a single
user account and the ISP will assign you a dynamic IP address when the connection is
established. If this is the case, it is recommended that you select a network number from
192.168.0.0 to 192.168.255.0 and you must enable the Network Address Translation (NAT)
feature of the Prestige. The Internet Assigned Number Authority (IANA) reserved this block
of addresses specifically for private use; please do not use any other number unless you are
told otherwise. Let's say you select 192.168.1.0 as the network number; which covers 254
individual addresses, from 192.168.1.1 to 192.168.1.254 (zero and 255 are reserved). In other
words, the first three numbers specify the network number while the last number identifies an
individual computer on that network.
Once you have decided on the network number, pick an IP address that is easy to remember,
for instance, 192.168.1.1, for your Prestige, but make sure that no other device on your
network is using that IP address.
The subnet mask specifies the network number portion of an IP address. Your Prestige will
compute the subnet mask automatically based on the IP address that you entered. You don't
need to change the subnet mask computed by the Prestige unless you are instructed to do
otherwise.