
P-2302R Series VoIP Station Gateway User's Guide
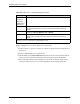
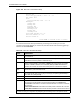


Table Of Contents
- P-2302R Series
- User’s Guide
- Copyright
- Federal Communications Commission (FCC) Interference Statement
- Safety Warnings
- ZyXEL Limited Warranty
- Customer Support
- Table of Contents
- List of Figures
- List of Tables
- Preface
- Introducing the Prestige
- Introducing the Web Configurator
- Wizard Setup
- System Screens
- LAN Setup
- WAN Screens
- Introduction to VoIP
- VoIP Screens
- Phone
- Phone Book
- Phone Usage
- Network Address Translation (NAT) Screens
- Static Route
- Firewall
- Content Filtering
- Remote Management Screens
- Universal Plug-and-Play (UPnP)
- Logs
- Bandwidth Management
- 19.1 Bandwidth Management Overview
- 19.2 Bandwidth Classes and Filters
- 19.3 Proportional Bandwidth Allocation
- 19.4 Application-based Bandwidth Management
- 19.5 Subnet-based Bandwidth Management
- 19.6 Application and Subnet-based Bandwidth Management
- 19.7 Scheduler
- 19.8 Maximize Bandwidth Usage
- 19.9 Bandwidth Borrowing
- 19.10 Configuring Summary
- 19.11 Configuring Class Setup
- 19.12 Configuring Monitor
- Maintenance
- Introducing the SMT
- General Setup
- WAN Setup
- LAN Setup
- Internet Access
- Remote Node Configuration
- Static Route Setup
- Network Address Translation (NAT)
- Enabling the Firewall
- Filter Configuration
- SNMP Configuration
- System Information and Diagnosis
- Firmware and Configuration File Maintenance
- 33.1 Filename Conventions
- 33.2 Backup Configuration
- 33.2.1 Backup Configuration
- 33.2.2 Using the FTP Command from the Command Line
- 33.2.3 Example of FTP Commands from the Command Line
- 33.2.4 GUI-based FTP Clients
- 33.2.5 TFTP and FTP over WAN Management Limitations
- 33.2.6 Backup Configuration Using TFTP
- 33.2.7 TFTP Command Example
- 33.2.8 GUI-based TFTP Clients
- 33.3 Restore Configuration
- 33.4 Uploading Firmware and Configuration Files
- System Maintenance
- Remote Management
- Call Scheduling
- Troubleshooting
- 37.1 Problems Starting Up the Prestige
- 37.2 Problems with the LAN Interface
- 37.3 Problems with the WAN Interface
- 37.4 Problems with Internet Access
- 37.5 Problems with the Password
- 37.6 Problems with the Web Configurator
- 37.7 Problems with a Telephone or the Telephone Port
- 37.8 Problems with Voice Service
- 37.9 Pop-up Windows, JavaScripts and Java Permissions
- Product Specifications
- Wall-mounting Instructions
- Setting up Your Computer’s IP Address
- IP Subnetting
- PPPoE
- Triangle Route
- SIP Passthrough
- Index
P-2302R Series User’s Guide
323 Chapter 36 Call Scheduling
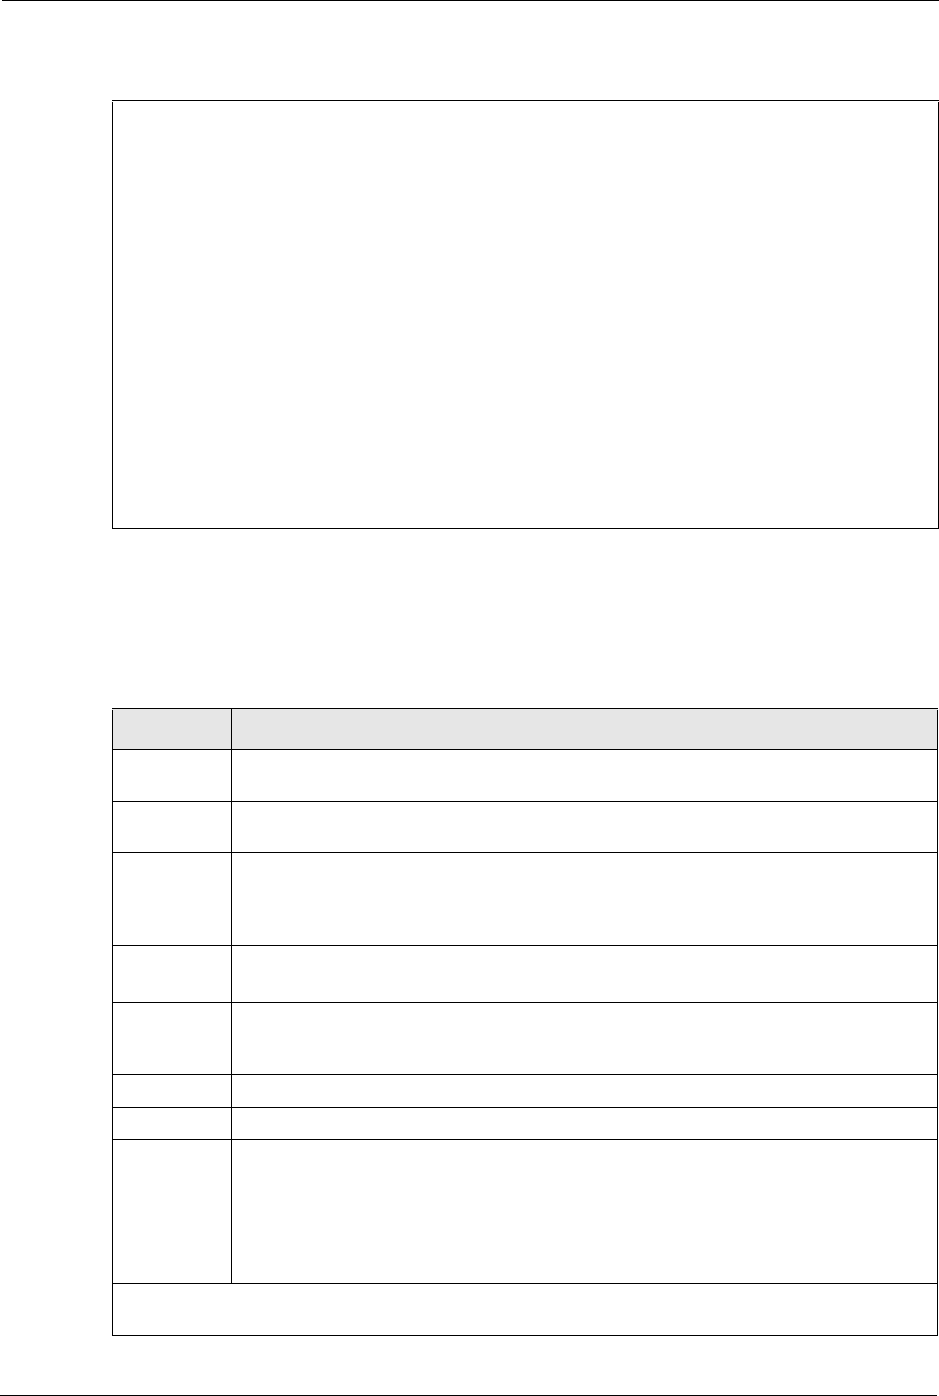
Figure 190 Menu 26.1 Schedule Set Setup
If a connection has been already established, your Prestige will not drop it. Once the
connection is dropped manually or it times out, then that remote node can't be triggered up
until the end of the Duration.
Menu 26.1 - Schedule Set Setup
Active= Yes
Start Date(yyyy/mm/dd) = 2000 – 01 - 01
How Often= Once
Once:
Date(yyyy/mm/dd)= 2000 – 01 - 01
Weekdays:
Sunday= N/A
Monday= N/A
Tuesday= N/A
Wednesday= N/A
Thursday= N/A
Friday= N/A
Saturday= N/A
Start Time (hh:mm)= 00 : 00
Duration (hh:mm)= 00 : 00
Action= Forced On
Press ENTER to Confirm or ESC to Cancel:
Table 130 Menu 26.1 Schedule Set Setup
FIELD DESCRIPTION
Active Press [SPACE BAR] to select Yes or No. Choose Yes and press [ENTER] to activate
the schedule set.
Start Date Enter the start date when you wish the set to take effect in year -month-date format.
Valid dates are from the present to 2036-February-5.
How Often Should this schedule set recur weekly or be used just once only? Press the [SPACE
BAR] and then [ENTER] to select Once or Weekly. Both these options are mutually
exclusive. If Once is selected, then all weekday settings are N/A. When Once is
selected, the schedule rule deletes automatically after the scheduled time elapses.
Once:
Date
If you selected Once in the How Often field above, then enter the date the set should
activate here in year-month-date format.
Weekday:
Day
If you selected Weekly in the How Often field above, then select the day(s) when the
set should activate (and recur) by going to that day(s) and pressing [SPACE BAR] to
select Yes, then press [ENTER].
Start Time Enter the start time when you wish the schedule set to take effect in hour-minute format.
Duration Enter the maximum length of time this connection is allowed in hour-minute format.
Action Forced On means that the connection is maintained whether or not there is a demand
call on the line and will persist for the time period specified in the Duration field.
Forced Down means that the connection is blocked whether or not there is a demand
call on the line.
Enable Dial-On-Demand means that this schedule permits a demand call on the line.
Disable Dial-On-Demand means that this schedule prevents a demand call on the line.
When you have completed this menu, press [ENTER] at the prompt “Press ENTER to confirm or ESC
to cancel” to save your configuration or press [ESC] to cancel and go back to the previous screen.