
P-2302R Series VoIP Station Gateway User's Guide

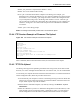
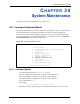
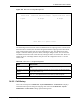
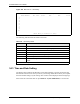
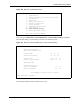
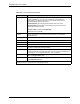
Table Of Contents
- P-2302R Series
- User’s Guide
- Copyright
- Federal Communications Commission (FCC) Interference Statement
- Safety Warnings
- ZyXEL Limited Warranty
- Customer Support
- Table of Contents
- List of Figures
- List of Tables
- Preface
- Introducing the Prestige
- Introducing the Web Configurator
- Wizard Setup
- System Screens
- LAN Setup
- WAN Screens
- Introduction to VoIP
- VoIP Screens
- Phone
- Phone Book
- Phone Usage
- Network Address Translation (NAT) Screens
- Static Route
- Firewall
- Content Filtering
- Remote Management Screens
- Universal Plug-and-Play (UPnP)
- Logs
- Bandwidth Management
- 19.1 Bandwidth Management Overview
- 19.2 Bandwidth Classes and Filters
- 19.3 Proportional Bandwidth Allocation
- 19.4 Application-based Bandwidth Management
- 19.5 Subnet-based Bandwidth Management
- 19.6 Application and Subnet-based Bandwidth Management
- 19.7 Scheduler
- 19.8 Maximize Bandwidth Usage
- 19.9 Bandwidth Borrowing
- 19.10 Configuring Summary
- 19.11 Configuring Class Setup
- 19.12 Configuring Monitor
- Maintenance
- Introducing the SMT
- General Setup
- WAN Setup
- LAN Setup
- Internet Access
- Remote Node Configuration
- Static Route Setup
- Network Address Translation (NAT)
- Enabling the Firewall
- Filter Configuration
- SNMP Configuration
- System Information and Diagnosis
- Firmware and Configuration File Maintenance
- 33.1 Filename Conventions
- 33.2 Backup Configuration
- 33.2.1 Backup Configuration
- 33.2.2 Using the FTP Command from the Command Line
- 33.2.3 Example of FTP Commands from the Command Line
- 33.2.4 GUI-based FTP Clients
- 33.2.5 TFTP and FTP over WAN Management Limitations
- 33.2.6 Backup Configuration Using TFTP
- 33.2.7 TFTP Command Example
- 33.2.8 GUI-based TFTP Clients
- 33.3 Restore Configuration
- 33.4 Uploading Firmware and Configuration Files
- System Maintenance
- Remote Management
- Call Scheduling
- Troubleshooting
- 37.1 Problems Starting Up the Prestige
- 37.2 Problems with the LAN Interface
- 37.3 Problems with the WAN Interface
- 37.4 Problems with Internet Access
- 37.5 Problems with the Password
- 37.6 Problems with the Web Configurator
- 37.7 Problems with a Telephone or the Telephone Port
- 37.8 Problems with Voice Service
- 37.9 Pop-up Windows, JavaScripts and Java Permissions
- Product Specifications
- Wall-mounting Instructions
- Setting up Your Computer’s IP Address
- IP Subnetting
- PPPoE
- Triangle Route
- SIP Passthrough
- Index

P-2302R Series User’s Guide
Chapter 33 Firmware and Configuration File Maintenance 312
4 Enter your password as requested (the default is “1234”).
5 Enter “bin” to set transfer mode to binary.
6 Use “put” to transfer files from the computer to the Prestige, for example, “put
firmware.bin ras” transfers the firmware on your computer (firmware.bin) to the Prestige
and renames it “ras”. Similarly, “put config.rom rom-0” transfers the configuration file
on your computer (config.rom) to the Prestige and renames it “rom-0”. Likewise “get
rom-0 config.rom” transfers the configuration file on the Prestige to your computer and
renames it “config.rom.” See earlier in this chapter for more information on filename
conventions.
7 Enter “quit” to exit the ftp prompt.
Note:
The Prestige automatically restarts after a successful file upload.
33.4.4 FTP Session Example of Firmware File Upload
Figure 180 FTP Session Example of Firmware File Upload
More commands (found in GUI-based FTP clients) are listed earlier in this chapter.
33.4.5 TFTP File Upload
The Prestige also supports the uploading of firmware files using TFTP (Trivial File Transfer
Protocol) over LAN. Although TFTP should work over WAN as well, it is not recommended.
To use TFTP, your computer must have both telnet and TFTP clients. To transfer the firmware
and the configuration file, follow the procedure shown next.
1 Use telnet from your computer to connect to the Prestige and log in. Because TFTP does
not have any security checks, the Prestige records the IP address of the telnet client and
accepts TFTP requests only from this address.
2 Put the SMT in command interpreter (CI) mode by entering 8 in Menu 24 – System
Maintenance.
3 Enter the command “sys stdio 0” to disable the management session idle timeout, so the
TFTP transfer will not be interrupted. Enter “command sys stdio 5” to restore the five-
minute management session idle timeout (default) when the file transfer is complete.
331 Enter PASS command
Password:
230 Logged in
ftp> bin
200 Type I OK
ftp> put firmware.bin ras
200 Port command okay
150 Opening data connection for STOR ras
226 File received OK
ftp: 1103936 bytes sent in 1.10Seconds 297.89Kbytes/sec.
ftp> quit