
P-2302R Series VoIP Station Gateway User's Guide
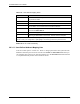


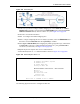
Table Of Contents
- P-2302R Series
- User’s Guide
- Copyright
- Federal Communications Commission (FCC) Interference Statement
- Safety Warnings
- ZyXEL Limited Warranty
- Customer Support
- Table of Contents
- List of Figures
- List of Tables
- Preface
- Introducing the Prestige
- Introducing the Web Configurator
- Wizard Setup
- System Screens
- LAN Setup
- WAN Screens
- Introduction to VoIP
- VoIP Screens
- Phone
- Phone Book
- Phone Usage
- Network Address Translation (NAT) Screens
- Static Route
- Firewall
- Content Filtering
- Remote Management Screens
- Universal Plug-and-Play (UPnP)
- Logs
- Bandwidth Management
- 19.1 Bandwidth Management Overview
- 19.2 Bandwidth Classes and Filters
- 19.3 Proportional Bandwidth Allocation
- 19.4 Application-based Bandwidth Management
- 19.5 Subnet-based Bandwidth Management
- 19.6 Application and Subnet-based Bandwidth Management
- 19.7 Scheduler
- 19.8 Maximize Bandwidth Usage
- 19.9 Bandwidth Borrowing
- 19.10 Configuring Summary
- 19.11 Configuring Class Setup
- 19.12 Configuring Monitor
- Maintenance
- Introducing the SMT
- General Setup
- WAN Setup
- LAN Setup
- Internet Access
- Remote Node Configuration
- Static Route Setup
- Network Address Translation (NAT)
- Enabling the Firewall
- Filter Configuration
- SNMP Configuration
- System Information and Diagnosis
- Firmware and Configuration File Maintenance
- 33.1 Filename Conventions
- 33.2 Backup Configuration
- 33.2.1 Backup Configuration
- 33.2.2 Using the FTP Command from the Command Line
- 33.2.3 Example of FTP Commands from the Command Line
- 33.2.4 GUI-based FTP Clients
- 33.2.5 TFTP and FTP over WAN Management Limitations
- 33.2.6 Backup Configuration Using TFTP
- 33.2.7 TFTP Command Example
- 33.2.8 GUI-based TFTP Clients
- 33.3 Restore Configuration
- 33.4 Uploading Firmware and Configuration Files
- System Maintenance
- Remote Management
- Call Scheduling
- Troubleshooting
- 37.1 Problems Starting Up the Prestige
- 37.2 Problems with the LAN Interface
- 37.3 Problems with the WAN Interface
- 37.4 Problems with Internet Access
- 37.5 Problems with the Password
- 37.6 Problems with the Web Configurator
- 37.7 Problems with a Telephone or the Telephone Port
- 37.8 Problems with Voice Service
- 37.9 Pop-up Windows, JavaScripts and Java Permissions
- Product Specifications
- Wall-mounting Instructions
- Setting up Your Computer’s IP Address
- IP Subnetting
- PPPoE
- Triangle Route
- SIP Passthrough
- Index

P-2302R Series User’s Guide
Chapter 28 Network Address Translation (NAT) 264
28.4 Configuring a Server behind NAT
Follow these steps to configure a server behind NAT:
1 Enter 15 in the main menu to go to Menu 15 - NAT Setup.
2 Enter 2 to display Menu 15.2 - NAT Server Setup as shown next.
Figure 132 Menu 15.2 NAT Server Setup
3 Enter a port number in an unused Start Port No field. To forward only one port, enter it
again in the End Port No field. To specify a range of ports, enter the last port to be
forwarded in the End Port No field.
4 Enter the inside IP address of the server in the IP Address field. In the following figure,
you have a computer acting as an FTP, Telnet and SMTP server (ports 21, 23 and 25) at
192.168.1.33.
5 Press [ENTER] at the “Press ENTER to confirm …” prompt to save your configuration
after you define all the servers or press [ESC] at any time to cancel.
Start This is the starting inside global IP address (IGA). If you have a dynamic IP, enter
0.0.0.0 as the Global IP Start. Note that Global IP Start can be set to 0.0.0.0 only if
the types are Many-to-One or Server.
End This is the ending inside global IP address (IGA). This field is N/A for One-to-One,
Many-to-One and Server types.
When you have completed this menu, press [ENTER] at the prompt “Press ENTER to confirm or ESC
to cancel” to save your configuration or press [ESC] to cancel and go back to the previous screen.
Table 112 Menu 15.1.1.1 Editing/Configuring an Individual Rule in a Set
FIELD DESCRIPTION
Menu 15.2 - NAT Server Setup
Rule Start Port No. End Port No. IP Address
---------------------------------------------------
1. Default Default 0.0.0.0
2. 21 25 192.168.1.33
3. 0 0 0.0.0.0
4. 0 0 0.0.0.0
5. 0 0 0.0.0.0
6. 0 0 0.0.0.0
7. 0 0 0.0.0.0
8. 0 0 0.0.0.0
9. 0 0 0.0.0.0
10. 0 0 0.0.0.0
11. 0 0 0.0.0.0
12. 0 0 0.0.0.0
Press ENTER to Confirm or ESC to Cancel: