
P-2302R Series VoIP Station Gateway User's Guide

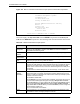
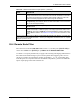

Table Of Contents
- P-2302R Series
- User’s Guide
- Copyright
- Federal Communications Commission (FCC) Interference Statement
- Safety Warnings
- ZyXEL Limited Warranty
- Customer Support
- Table of Contents
- List of Figures
- List of Tables
- Preface
- Introducing the Prestige
- Introducing the Web Configurator
- Wizard Setup
- System Screens
- LAN Setup
- WAN Screens
- Introduction to VoIP
- VoIP Screens
- Phone
- Phone Book
- Phone Usage
- Network Address Translation (NAT) Screens
- Static Route
- Firewall
- Content Filtering
- Remote Management Screens
- Universal Plug-and-Play (UPnP)
- Logs
- Bandwidth Management
- 19.1 Bandwidth Management Overview
- 19.2 Bandwidth Classes and Filters
- 19.3 Proportional Bandwidth Allocation
- 19.4 Application-based Bandwidth Management
- 19.5 Subnet-based Bandwidth Management
- 19.6 Application and Subnet-based Bandwidth Management
- 19.7 Scheduler
- 19.8 Maximize Bandwidth Usage
- 19.9 Bandwidth Borrowing
- 19.10 Configuring Summary
- 19.11 Configuring Class Setup
- 19.12 Configuring Monitor
- Maintenance
- Introducing the SMT
- General Setup
- WAN Setup
- LAN Setup
- Internet Access
- Remote Node Configuration
- Static Route Setup
- Network Address Translation (NAT)
- Enabling the Firewall
- Filter Configuration
- SNMP Configuration
- System Information and Diagnosis
- Firmware and Configuration File Maintenance
- 33.1 Filename Conventions
- 33.2 Backup Configuration
- 33.2.1 Backup Configuration
- 33.2.2 Using the FTP Command from the Command Line
- 33.2.3 Example of FTP Commands from the Command Line
- 33.2.4 GUI-based FTP Clients
- 33.2.5 TFTP and FTP over WAN Management Limitations
- 33.2.6 Backup Configuration Using TFTP
- 33.2.7 TFTP Command Example
- 33.2.8 GUI-based TFTP Clients
- 33.3 Restore Configuration
- 33.4 Uploading Firmware and Configuration Files
- System Maintenance
- Remote Management
- Call Scheduling
- Troubleshooting
- 37.1 Problems Starting Up the Prestige
- 37.2 Problems with the LAN Interface
- 37.3 Problems with the WAN Interface
- 37.4 Problems with Internet Access
- 37.5 Problems with the Password
- 37.6 Problems with the Web Configurator
- 37.7 Problems with a Telephone or the Telephone Port
- 37.8 Problems with Voice Service
- 37.9 Pop-up Windows, JavaScripts and Java Permissions
- Product Specifications
- Wall-mounting Instructions
- Setting up Your Computer’s IP Address
- IP Subnetting
- PPPoE
- Triangle Route
- SIP Passthrough
- Index

P-2302R Series User’s Guide
Chapter 26 Remote Node Configuration 252
26.4 Remote Node Filter
Move the cursor to the field Edit Filter Sets in menu 11.1, and then press [SPACE BAR] to
set the value to Yes. Press [ENTER] to open Menu 11.5 - Remote Node Filter.
Use menu 11.5 to specify the filter set(s) to apply to the incoming and outgoing traffic between
this remote node and the Prestige to prevent certain packets from triggering calls. You can
specify up to 4 filter sets separated by commas, for example, 1, 5, 9, 12, in each filter field.
Note that spaces are accepted in this field. For PPPoE encapsulation, you have the additional
option of specifying remote node call filter sets.
Private This field is valid only for PPPoE encapsulation. This parameter determines if the
Prestige will include the route to this remote node in its RIP broadcasts. If set to Yes,
this route is kept private and not included in RIP broadcast. If No, the route to this
remote node will be propagated to other hosts through RIP broadcasts.
RIP Direction Press [SPACE BAR] and then [ENTER] to select the RIP direction from Both/ None/
In Only/Out Only. The default for RIP on the WAN side is None. It is recommended
that you do not change this setting.
Version Press [SPACE BAR] and then [ENTER] to select the RIP version from RIP-1/RIP-2B/
RIP-2M or None.
Multicast IGMP (Internet Group Multicast Protocol) is a network-layer protocol used to
establish membership in a Multicast group. The Prestige supports both IGMP version
1 (IGMP-v1) and version 2 (IGMP-v2). Press [SPACE BAR] to enable IP Multicasting
or select None to disable it. See Section 5.7 on page 75 for more information on this
feature.
Once you have completed filling in Menu 11.3 Remote Node Network Layer Options, press [ENTER]
at the message “Press ENTER to Confirm...” to save your configuration and return to menu 11, or press
[ESC] at any time to cancel.
Table 106 Remote Node Network Layer Options (continued)
FIELD DESCRIPTION