
P-2302R Series VoIP Station Gateway User's Guide
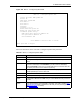
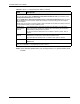


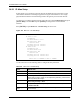
Table Of Contents
- P-2302R Series
- User’s Guide
- Copyright
- Federal Communications Commission (FCC) Interference Statement
- Safety Warnings
- ZyXEL Limited Warranty
- Customer Support
- Table of Contents
- List of Figures
- List of Tables
- Preface
- Introducing the Prestige
- Introducing the Web Configurator
- Wizard Setup
- System Screens
- LAN Setup
- WAN Screens
- Introduction to VoIP
- VoIP Screens
- Phone
- Phone Book
- Phone Usage
- Network Address Translation (NAT) Screens
- Static Route
- Firewall
- Content Filtering
- Remote Management Screens
- Universal Plug-and-Play (UPnP)
- Logs
- Bandwidth Management
- 19.1 Bandwidth Management Overview
- 19.2 Bandwidth Classes and Filters
- 19.3 Proportional Bandwidth Allocation
- 19.4 Application-based Bandwidth Management
- 19.5 Subnet-based Bandwidth Management
- 19.6 Application and Subnet-based Bandwidth Management
- 19.7 Scheduler
- 19.8 Maximize Bandwidth Usage
- 19.9 Bandwidth Borrowing
- 19.10 Configuring Summary
- 19.11 Configuring Class Setup
- 19.12 Configuring Monitor
- Maintenance
- Introducing the SMT
- General Setup
- WAN Setup
- LAN Setup
- Internet Access
- Remote Node Configuration
- Static Route Setup
- Network Address Translation (NAT)
- Enabling the Firewall
- Filter Configuration
- SNMP Configuration
- System Information and Diagnosis
- Firmware and Configuration File Maintenance
- 33.1 Filename Conventions
- 33.2 Backup Configuration
- 33.2.1 Backup Configuration
- 33.2.2 Using the FTP Command from the Command Line
- 33.2.3 Example of FTP Commands from the Command Line
- 33.2.4 GUI-based FTP Clients
- 33.2.5 TFTP and FTP over WAN Management Limitations
- 33.2.6 Backup Configuration Using TFTP
- 33.2.7 TFTP Command Example
- 33.2.8 GUI-based TFTP Clients
- 33.3 Restore Configuration
- 33.4 Uploading Firmware and Configuration Files
- System Maintenance
- Remote Management
- Call Scheduling
- Troubleshooting
- 37.1 Problems Starting Up the Prestige
- 37.2 Problems with the LAN Interface
- 37.3 Problems with the WAN Interface
- 37.4 Problems with Internet Access
- 37.5 Problems with the Password
- 37.6 Problems with the Web Configurator
- 37.7 Problems with a Telephone or the Telephone Port
- 37.8 Problems with Voice Service
- 37.9 Pop-up Windows, JavaScripts and Java Permissions
- Product Specifications
- Wall-mounting Instructions
- Setting up Your Computer’s IP Address
- IP Subnetting
- PPPoE
- Triangle Route
- SIP Passthrough
- Index
P-2302R Series User’s Guide
237 Chapter 24 LAN Setup
24.2 TCP/IP Ethernet Setup and DHCP
Use menu 3.2 to configure your Prestige for TCP/IP.
To edit menu 3.2, enter 3 from the main menu to display Menu 3 — LAN Setup. When menu
3 appears, press 2 and press [ENTER] to display Menu 3.2 — TCP/IP and DHCP Ethernet
Setup, as shown next
:
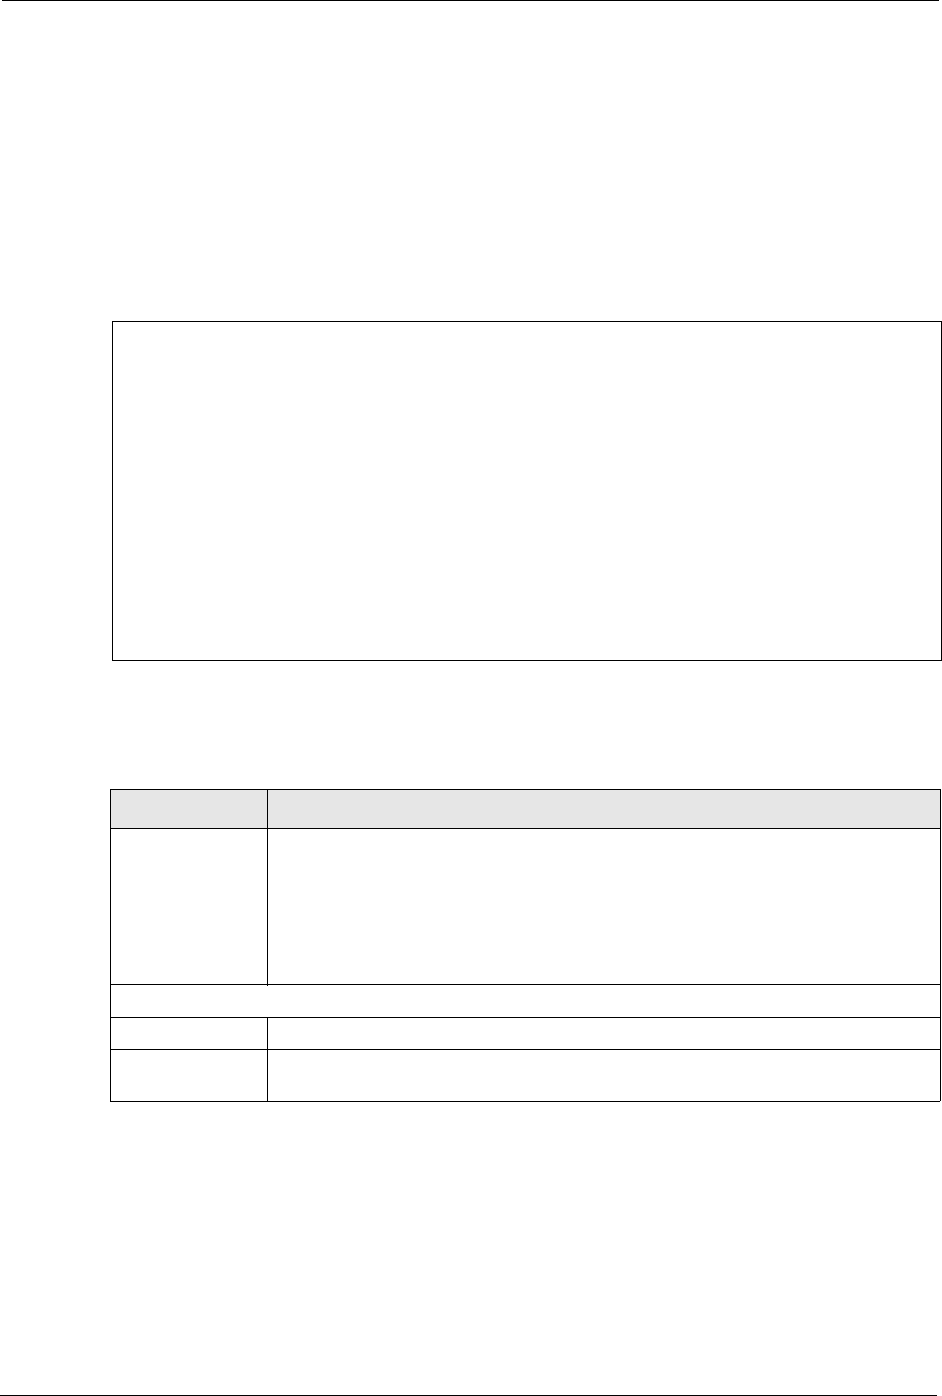
Figure 113 Menu 3.2 TCP/IP and DHCP Ethernet Setup
Follow the instructions in the next table on how to configure the DHCP fields.
Menu 3.2 - TCP/IP and DHCP Ethernet Setup
DHCP= Server TCP/IP Setup:
Client IP Pool:
Starting Address= 192.168.1.33 IP Address= 192.168.1.1
Size of Client IP Pool= 32 IP Subnet Mask= 255.255.255.0
First DNS Server= From ISP RIP Direction= Both
IP Address= N/A Version= RIP-1
Second DNS Server= From ISP Multicast= None
IP Address= N/A Edit IP Alias= No
Third DNS Server= From ISP
IP Address= N/A
DHCP Server Address= N/A
Press ENTER to Confirm or ESC to Cancel:
Table 99 DHCP Ethernet Setup Fields
FIELD DESCRIPTION
DHCP This field enables/disables the DHCP server.
If set to Server, your Prestige will act as a DHCP server.
If set to None, the DHCP server will be disabled.
If set to Relay the Prestige acts as a surrogate DHCP server and relays requests
and responses between the remote server and the clients.
When set to Server, the following items need to be set:
Client IP Pools
Starting Address This field specifies the first of the contiguous addresses in the IP address pool.
Size of Client IP
Pool
This field specifies the size, or count of the IP address pool.