
P-2302R Series VoIP Station Gateway User's Guide
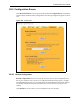
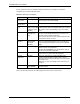
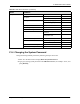
Table Of Contents
- P-2302R Series
- User’s Guide
- Copyright
- Federal Communications Commission (FCC) Interference Statement
- Safety Warnings
- ZyXEL Limited Warranty
- Customer Support
- Table of Contents
- List of Figures
- List of Tables
- Preface
- Introducing the Prestige
- Introducing the Web Configurator
- Wizard Setup
- System Screens
- LAN Setup
- WAN Screens
- Introduction to VoIP
- VoIP Screens
- Phone
- Phone Book
- Phone Usage
- Network Address Translation (NAT) Screens
- Static Route
- Firewall
- Content Filtering
- Remote Management Screens
- Universal Plug-and-Play (UPnP)
- Logs
- Bandwidth Management
- 19.1 Bandwidth Management Overview
- 19.2 Bandwidth Classes and Filters
- 19.3 Proportional Bandwidth Allocation
- 19.4 Application-based Bandwidth Management
- 19.5 Subnet-based Bandwidth Management
- 19.6 Application and Subnet-based Bandwidth Management
- 19.7 Scheduler
- 19.8 Maximize Bandwidth Usage
- 19.9 Bandwidth Borrowing
- 19.10 Configuring Summary
- 19.11 Configuring Class Setup
- 19.12 Configuring Monitor
- Maintenance
- Introducing the SMT
- General Setup
- WAN Setup
- LAN Setup
- Internet Access
- Remote Node Configuration
- Static Route Setup
- Network Address Translation (NAT)
- Enabling the Firewall
- Filter Configuration
- SNMP Configuration
- System Information and Diagnosis
- Firmware and Configuration File Maintenance
- 33.1 Filename Conventions
- 33.2 Backup Configuration
- 33.2.1 Backup Configuration
- 33.2.2 Using the FTP Command from the Command Line
- 33.2.3 Example of FTP Commands from the Command Line
- 33.2.4 GUI-based FTP Clients
- 33.2.5 TFTP and FTP over WAN Management Limitations
- 33.2.6 Backup Configuration Using TFTP
- 33.2.7 TFTP Command Example
- 33.2.8 GUI-based TFTP Clients
- 33.3 Restore Configuration
- 33.4 Uploading Firmware and Configuration Files
- System Maintenance
- Remote Management
- Call Scheduling
- Troubleshooting
- 37.1 Problems Starting Up the Prestige
- 37.2 Problems with the LAN Interface
- 37.3 Problems with the WAN Interface
- 37.4 Problems with Internet Access
- 37.5 Problems with the Password
- 37.6 Problems with the Web Configurator
- 37.7 Problems with a Telephone or the Telephone Port
- 37.8 Problems with Voice Service
- 37.9 Pop-up Windows, JavaScripts and Java Permissions
- Product Specifications
- Wall-mounting Instructions
- Setting up Your Computer’s IP Address
- IP Subnetting
- PPPoE
- Triangle Route
- SIP Passthrough
- Index

P-2302R Series User’s Guide
225 Chapter 21 Introducing the SMT
Several operations that you should be familiar with before you attempt to modify the
configuration are listed in the table below.
After you enter the password, the SMT displays the main menu, as shown next.
Table 93 Main Menu Commands
OPERATION KEYSTROKE DESCRIPTION
Move down to
another menu
[ENTER] To move forward to a submenu, type in the number of the
desired submenu and press [ENTER].
Move up to a
previous menu
[ESC] Press [ESC] to move back to the previous menu.
Move to a “hidden”
menu
Press [SPACE
BAR] to change No
to Yes then press
[ENTER].
Fields beginning with “Edit” lead to hidden menus and have
a default setting of No. Press [SPACE BAR] once to change
No to Yes, and then press [ENTER] to go to the “hidden”
menu.
Move the cursor [ENTER] or [UP]/
[DOWN] arrow
keys.
Within a menu, press [ENTER] to move to the next field. You
can also use the [UP]/[DOWN] arrow keys to move to the
previous and the next field, respectively.
When you are at the top of a menu, press the [UP] arrow key
to move to the bottom of a menu.
Entering
information
Type in or press
[SPACE BAR],
then press
[ENTER].
You need to fill in two types of fields. The first requires you to
type in the appropriate information. The second allows you
to cycle through the available choices by pressing [SPACE
BAR].
Required fields <? > or ChangeMe All fields with the symbol <?> must be filled in order to be
able to save the new configuration.
All fields with ChangeMe must not be left blank in order to
be able to save the new configuration.
N/A fields <N/A> Some of the fields in the SMT will show a <N/A>. This
symbol refers to an option that is Not Applicable.
Save your
configuration
[ENTER] Save your configuration by pressing [ENTER] at the
message “Press ENTER to confirm or ESC to cancel”.
Saving the data on the screen will take you, in most cases to
the previous menu.
Make sure you save your settings in each screen that you
configure.
Exit the SMT Type 99, then
press [ENTER].
Type 99 at the main menu prompt and press [ENTER] to exit
the SMT interface.