
P-2302R Series VoIP Station Gateway User's Guide
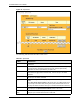
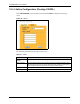

Table Of Contents
- P-2302R Series
- User’s Guide
- Copyright
- Federal Communications Commission (FCC) Interference Statement
- Safety Warnings
- ZyXEL Limited Warranty
- Customer Support
- Table of Contents
- List of Figures
- List of Tables
- Preface
- Introducing the Prestige
- Introducing the Web Configurator
- Wizard Setup
- System Screens
- LAN Setup
- WAN Screens
- Introduction to VoIP
- VoIP Screens
- Phone
- Phone Book
- Phone Usage
- Network Address Translation (NAT) Screens
- Static Route
- Firewall
- Content Filtering
- Remote Management Screens
- Universal Plug-and-Play (UPnP)
- Logs
- Bandwidth Management
- 19.1 Bandwidth Management Overview
- 19.2 Bandwidth Classes and Filters
- 19.3 Proportional Bandwidth Allocation
- 19.4 Application-based Bandwidth Management
- 19.5 Subnet-based Bandwidth Management
- 19.6 Application and Subnet-based Bandwidth Management
- 19.7 Scheduler
- 19.8 Maximize Bandwidth Usage
- 19.9 Bandwidth Borrowing
- 19.10 Configuring Summary
- 19.11 Configuring Class Setup
- 19.12 Configuring Monitor
- Maintenance
- Introducing the SMT
- General Setup
- WAN Setup
- LAN Setup
- Internet Access
- Remote Node Configuration
- Static Route Setup
- Network Address Translation (NAT)
- Enabling the Firewall
- Filter Configuration
- SNMP Configuration
- System Information and Diagnosis
- Firmware and Configuration File Maintenance
- 33.1 Filename Conventions
- 33.2 Backup Configuration
- 33.2.1 Backup Configuration
- 33.2.2 Using the FTP Command from the Command Line
- 33.2.3 Example of FTP Commands from the Command Line
- 33.2.4 GUI-based FTP Clients
- 33.2.5 TFTP and FTP over WAN Management Limitations
- 33.2.6 Backup Configuration Using TFTP
- 33.2.7 TFTP Command Example
- 33.2.8 GUI-based TFTP Clients
- 33.3 Restore Configuration
- 33.4 Uploading Firmware and Configuration Files
- System Maintenance
- Remote Management
- Call Scheduling
- Troubleshooting
- 37.1 Problems Starting Up the Prestige
- 37.2 Problems with the LAN Interface
- 37.3 Problems with the WAN Interface
- 37.4 Problems with Internet Access
- 37.5 Problems with the Password
- 37.6 Problems with the Web Configurator
- 37.7 Problems with a Telephone or the Telephone Port
- 37.8 Problems with Voice Service
- 37.9 Pop-up Windows, JavaScripts and Java Permissions
- Product Specifications
- Wall-mounting Instructions
- Setting up Your Computer’s IP Address
- IP Subnetting
- PPPoE
- Triangle Route
- SIP Passthrough
- Index
P-2302R Series User’s Guide
121 Chapter 10 Phone Book
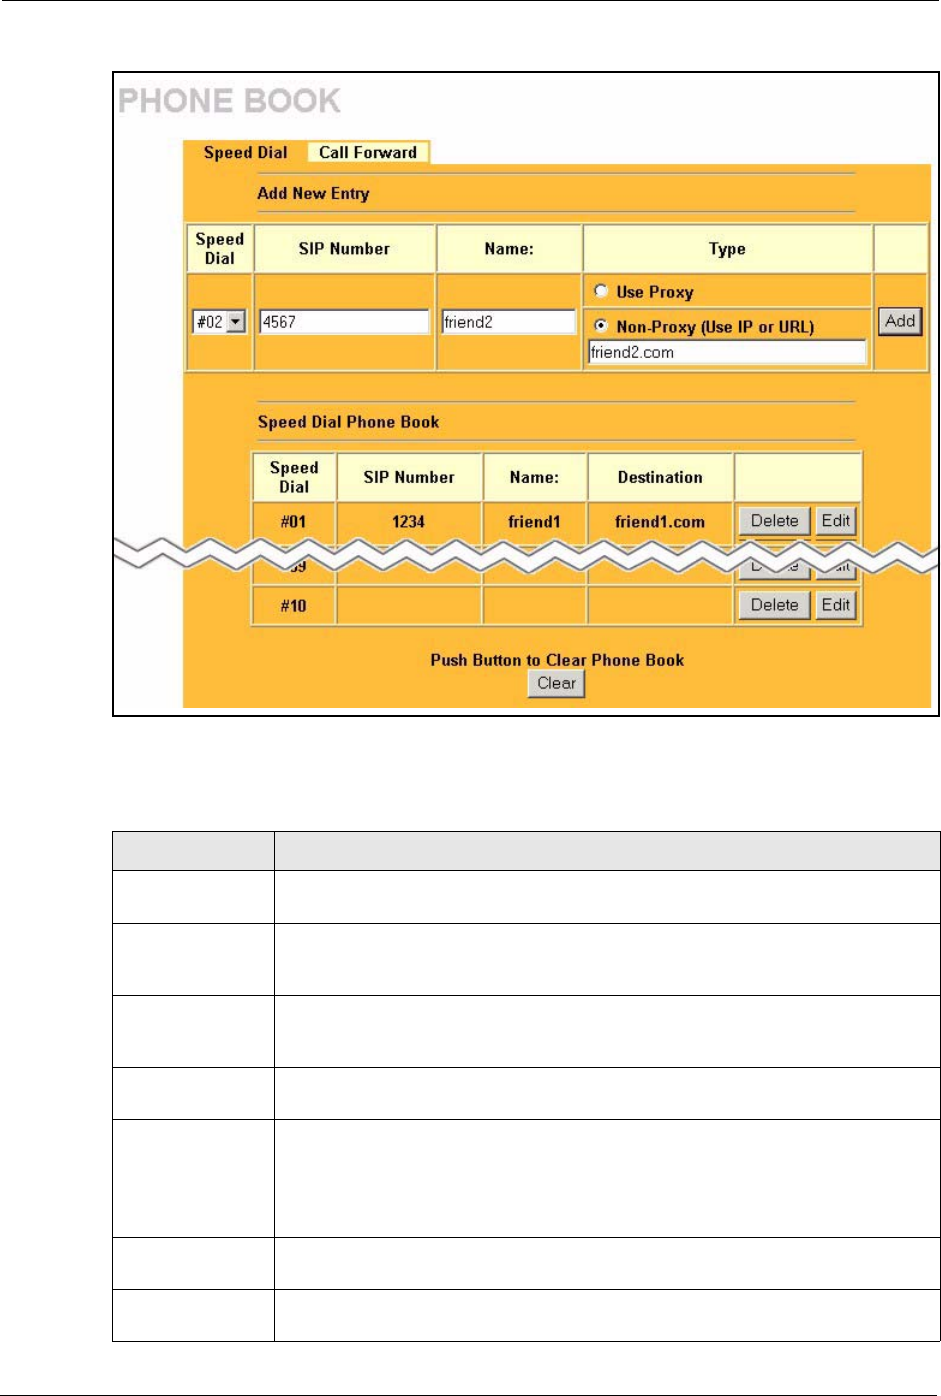
Figure 43 Speed Dial
The following table describes the labels in this screen.
Table 29 Speed Dial
LABEL DESCRIPTION
Add New Entry Use this section of the screen to edit and save new or existing speed dial phone
book entries.
Speed Dial Select a speed dial key combination from the drop-down list box. After configuring
the speed dial entry and adding it to the phone book, dial this speed dial key
combination to use the speed dial entry to make a call.
SIP Number Enter the SIP number of the party that you will call (use the number or text that
comes before the @ symbol in a full SIP URI). You can use up to 127 ASCII
characters.
Name Enter a descriptive name to identify the party that you will use this entry to call. You
can use up to 127 ASCII characters.
Type Select Use Proxy if calls to this party use your SIP account configured in the VoIP
screen.
Select Non-Proxy (Use IP or URL) if calls to this party use a different SIP server
or go directly to the callee’s VoIP phone (peer-to-peer). Enter the SIP server’s or
the party’s IP address or domain name (up to 127 ASCII Extended set characters).
Add Click this button to save the entry in the speed dial phone book. The speed dial
entry displays in the Speed Dial Phone Book section of the screen.
Speed Dial Phone
Book
This section of the screen displays the currently saved speed dial entries. You can
configure up to 10 entries and use them to make calls.