P-2302R Series VoIP Station Gateway User's Guide
Table Of Contents
- P-2302R Series
- User’s Guide
- Copyright
- Federal Communications Commission (FCC) Interference Statement
- Safety Warnings
- ZyXEL Limited Warranty
- Customer Support
- Table of Contents
- List of Figures
- List of Tables
- Preface
- Introducing the Prestige
- Introducing the Web Configurator
- Wizard Setup
- System Screens
- LAN Setup
- WAN Screens
- Introduction to VoIP
- VoIP Screens
- Phone
- Phone Book
- Phone Usage
- Network Address Translation (NAT) Screens
- Static Route
- Firewall
- Content Filtering
- Remote Management Screens
- Universal Plug-and-Play (UPnP)
- Logs
- Bandwidth Management
- 19.1 Bandwidth Management Overview
- 19.2 Bandwidth Classes and Filters
- 19.3 Proportional Bandwidth Allocation
- 19.4 Application-based Bandwidth Management
- 19.5 Subnet-based Bandwidth Management
- 19.6 Application and Subnet-based Bandwidth Management
- 19.7 Scheduler
- 19.8 Maximize Bandwidth Usage
- 19.9 Bandwidth Borrowing
- 19.10 Configuring Summary
- 19.11 Configuring Class Setup
- 19.12 Configuring Monitor
- Maintenance
- Introducing the SMT
- General Setup
- WAN Setup
- LAN Setup
- Internet Access
- Remote Node Configuration
- Static Route Setup
- Network Address Translation (NAT)
- Enabling the Firewall
- Filter Configuration
- SNMP Configuration
- System Information and Diagnosis
- Firmware and Configuration File Maintenance
- 33.1 Filename Conventions
- 33.2 Backup Configuration
- 33.2.1 Backup Configuration
- 33.2.2 Using the FTP Command from the Command Line
- 33.2.3 Example of FTP Commands from the Command Line
- 33.2.4 GUI-based FTP Clients
- 33.2.5 TFTP and FTP over WAN Management Limitations
- 33.2.6 Backup Configuration Using TFTP
- 33.2.7 TFTP Command Example
- 33.2.8 GUI-based TFTP Clients
- 33.3 Restore Configuration
- 33.4 Uploading Firmware and Configuration Files
- System Maintenance
- Remote Management
- Call Scheduling
- Troubleshooting
- 37.1 Problems Starting Up the Prestige
- 37.2 Problems with the LAN Interface
- 37.3 Problems with the WAN Interface
- 37.4 Problems with Internet Access
- 37.5 Problems with the Password
- 37.6 Problems with the Web Configurator
- 37.7 Problems with a Telephone or the Telephone Port
- 37.8 Problems with Voice Service
- 37.9 Pop-up Windows, JavaScripts and Java Permissions
- Product Specifications
- Wall-mounting Instructions
- Setting up Your Computer’s IP Address
- IP Subnetting
- PPPoE
- Triangle Route
- SIP Passthrough
- Index

P-2302R Series User’s Guide
Chapter 9 Phone 118
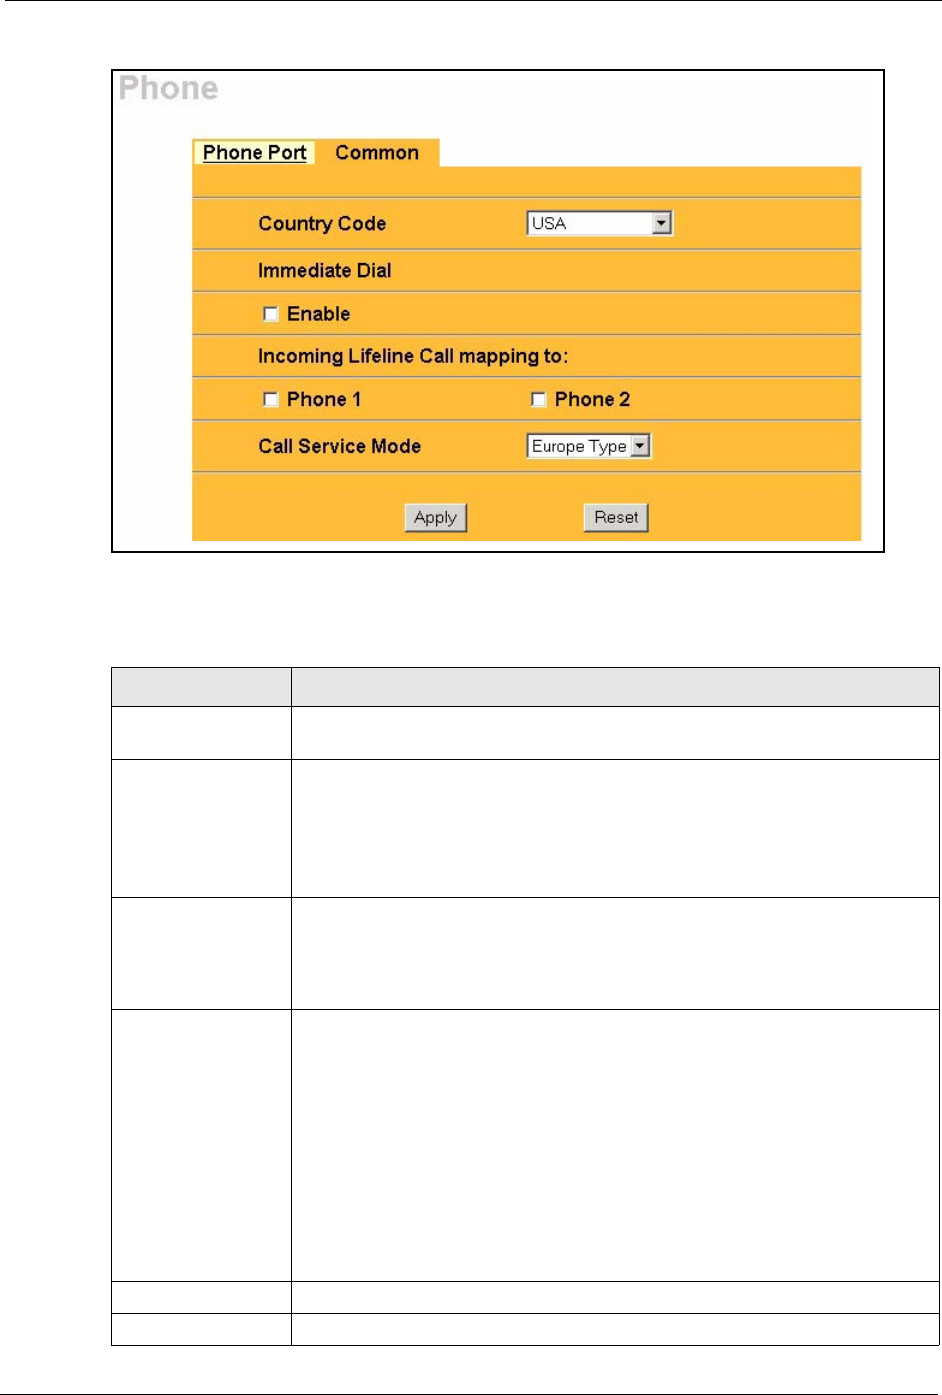
Figure 42 Phone Port Common
The following table describes the labels in this screen.
Table 28 Phone Common
LABEL DESCRIPTION
Country Code Use the drop-down list box to select the country where your Prestige is located.
Do not use Default.
Immediate Dial Use immediate dial to have the Prestige make calls right away instead of waiting
for the dialing interval (the time period it waits to make sure you are done
pressing the keys).
In order to use immediate dial, enable it here. Then press the pound (#) key on
your telephone’s keypad after dialing a phone number (this has the Prestige
make the call right away).
Incoming Lifeline
Call mapping to
(Lifeline models
only)
Phone 1 and Phone 2 correspond to the Prestige’s physical PHONE 1 and 2
ports, respectively. Select whether you want to receive regular (PSTN) phone
calls on Phone 1, Phone 2 or both. If you select both, all of the phones
connected to the Prestige’s PHONE ports will ring when a call comes in on the
PSTN line.
Call Service Mode Use this field to set how the Prestige handles supplementary phone services
(call hold, call waiting, call transfer and three-way conference calls). Select the
mode that your voice service provider supports.
Select Europe Type to use the supplementary phone services in European
mode.
Select USA Type to use the supplementary phone services American mode.
Note: To take full advantage of the supplementary phone
services available though the Prestige's phone ports, you
may need to subscribe to the services from your voice
service provider.
Apply Click Apply to save your changes back to the Prestige.
Reset Click Reset to begin configuring this screen afresh.


