
P-2302R Series VoIP Station Gateway User's Guide

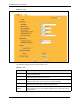
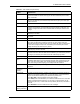
Table Of Contents
- P-2302R Series
- User’s Guide
- Copyright
- Federal Communications Commission (FCC) Interference Statement
- Safety Warnings
- ZyXEL Limited Warranty
- Customer Support
- Table of Contents
- List of Figures
- List of Tables
- Preface
- Introducing the Prestige
- Introducing the Web Configurator
- Wizard Setup
- System Screens
- LAN Setup
- WAN Screens
- Introduction to VoIP
- VoIP Screens
- Phone
- Phone Book
- Phone Usage
- Network Address Translation (NAT) Screens
- Static Route
- Firewall
- Content Filtering
- Remote Management Screens
- Universal Plug-and-Play (UPnP)
- Logs
- Bandwidth Management
- 19.1 Bandwidth Management Overview
- 19.2 Bandwidth Classes and Filters
- 19.3 Proportional Bandwidth Allocation
- 19.4 Application-based Bandwidth Management
- 19.5 Subnet-based Bandwidth Management
- 19.6 Application and Subnet-based Bandwidth Management
- 19.7 Scheduler
- 19.8 Maximize Bandwidth Usage
- 19.9 Bandwidth Borrowing
- 19.10 Configuring Summary
- 19.11 Configuring Class Setup
- 19.12 Configuring Monitor
- Maintenance
- Introducing the SMT
- General Setup
- WAN Setup
- LAN Setup
- Internet Access
- Remote Node Configuration
- Static Route Setup
- Network Address Translation (NAT)
- Enabling the Firewall
- Filter Configuration
- SNMP Configuration
- System Information and Diagnosis
- Firmware and Configuration File Maintenance
- 33.1 Filename Conventions
- 33.2 Backup Configuration
- 33.2.1 Backup Configuration
- 33.2.2 Using the FTP Command from the Command Line
- 33.2.3 Example of FTP Commands from the Command Line
- 33.2.4 GUI-based FTP Clients
- 33.2.5 TFTP and FTP over WAN Management Limitations
- 33.2.6 Backup Configuration Using TFTP
- 33.2.7 TFTP Command Example
- 33.2.8 GUI-based TFTP Clients
- 33.3 Restore Configuration
- 33.4 Uploading Firmware and Configuration Files
- System Maintenance
- Remote Management
- Call Scheduling
- Troubleshooting
- 37.1 Problems Starting Up the Prestige
- 37.2 Problems with the LAN Interface
- 37.3 Problems with the WAN Interface
- 37.4 Problems with Internet Access
- 37.5 Problems with the Password
- 37.6 Problems with the Web Configurator
- 37.7 Problems with a Telephone or the Telephone Port
- 37.8 Problems with Voice Service
- 37.9 Pop-up Windows, JavaScripts and Java Permissions
- Product Specifications
- Wall-mounting Instructions
- Setting up Your Computer’s IP Address
- IP Subnetting
- PPPoE
- Triangle Route
- SIP Passthrough
- Index

P-2302R Series User’s Guide
105 Chapter 8 VoIP Screens
8.3.0.1 Recording Custom Tones
Use the following steps if you would like to create new tones or change your tones:
1 Pick up the phone and press “****” on your phone’s keypad and wait for the message
that says you are in the configuration menu.
2 Press a number from 1101~1108 on your phone followed by the “#” key.
3 Play your desired music or voice recording into the receiver’s mouthpiece. Press the “#”
key.
4 You can continue to add, listen to, or delete tones, or you can hang up the receiver when
you are done.
8.3.0.2 Listening to Custom Tones
Do the following to listen to a custom tone:
1 Pick up the phone and press “****” on your phone’s keypad and wait for the message
that says you are in the configuration menu.
2 Press a number from 1201~1208 followed by the “#” key to listen to the tone.
3 You can continue to add, listen to, or delete tones, or you can hang up the receiver when
you are done.
8.3.0.3 Deleting Custom Tones
Do the following to delete a custom tone:
1 Pick up the phone and press “****” on your phone’s keypad and wait for the message
that says you are in the configuration menu.
2 Press a number from 1301~1308 followed by the “#” key to delete the tone of your
choice. Press 14 followed by the “#” key if you wish to clear all your custom tones.
3 You can continue to add, listen to, or delete tones, or you can hang up the receiver when
you are done.
8.4 Advanced VoIP Settings Configuration
Click VoIP in the navigation panel, select a SIP account and then click Settings to display the
following screen.
Time per Individual Tone 20 seconds
Total Number of Tones
Recordable
Ten
You can record up to ten different custom tones but the total time must
be 120 seconds or less.
For example you could record up to ten 12-second tones or up to six 20-
second tones.
Table 22 Custom Tones Details
LABEL DESCRIPTION