
User manual


Symptom Possible Cause/Solution
Scanning and connecting to
wireless AP takes a long time
Too many wireless APs nearby.
The amount of time taken to scan wireless APs depends on the number of
wireless APs around the camera. If there are too many wireless APs (30 or
more), it may take as long as 3 minutes to complete the scanning process. A
possible workaround is to turn down the video setting a notch temporarily, and
then turn it up again after you have completed configuring your wireless
connection.
For example, you can first set your video setting as QVGA, MPEG-4, 5fps,
512Kbps; Then go to network page for wireless connection setup and set the
video setting back to its original state. This could reduce scanning time
Successful login to the camera,
but no image is displayed
The ActiveX component is not installed.
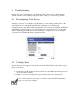
If you are viewing the camera video on Internet Explorer, make sure you have
installed and enabled the camera's ActiveX components. Open Internet
Explorer and go to [Tools] > [Manage Add-ons] and check that you’ve got
both the “IPCamClientActiveX.cab” and “USActiveX.cab” control
components registered and enabled. Refer to the "Trouble with the ActiveX
Client" section of this manual for further help.
The VLC plugin is not installed for non-IE browsers.
If you’re viewing the camera from Firefox, Safari, or Chrome, make sure your
VLC plugin is properly installed. (Visit www.videolan.org/vlc/ to download
the codec.)
Successful access on local
network, but trouble accessing
from the Internet.
The entered hostname/WAN IP address is incorrect.
Make sure you entered the correct hostname (if you use DDNS) or the WAN
IP address of your camera in the location field of the web browser.
The LAN network is not connected to Internet.
Both the device you’re using and the camera need to have a connection to the
Internet. Check if you can browse the Internet on your LAN network. If not,
contact your network administrator for assistance.
The camera's WAN IP address has changed but yet to be updated into DNS
cache.
If you use DDNS service, the information of your camera's IP address and the
domain name the IP address is linked to are stored in the DNS cache. The
cache is used to retrieve the IP information by the DNS server which translates
entered hostname into the camera's IP address. Though the information is
updated every few minutes (determined by the value of TTL, Time to Live),
occasionally the DNS information changes (e.g. your camera acquires a new
IP address) but the old information is still stored in the cache, resulting in
connection failure.
When this happens, try waiting a few minutes for the new IP information to be
updated to the DNS server and then retry connection, or try to decrease the
TTL value. If it still doesn't work, refer to other possible causes and solutions.
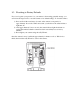
The router's configuration does not allow incoming traffic to the camera.
To access your camera from the internet, you’ll need to enable port forwarding
on your router and allow incoming traffic on the HTTP and RTSP port your
camera is using (your router may require a reboot after port forwarding is set).
Refer to the "Remote Viewing via Internet Explorer" section in the user
manual for detailed information. If you don't know how to enable port
forwarding on the router, consult the manufacturer of your router for
instruction.