
User manual
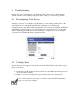

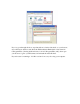


3) Enable port forwarding on your router and allow traffic on the ports the IP camera
is using. You may need to consult the manufacturer of your router for setting
details. Note: Your router may require a reboot after port forwarding is set. The
following figure details the settings required to remotely view the IP camera.
After taking the above steps, you should be able to log into your IP camera from a remote
location by entering the DDNS address or the static IP address into the navigation field of
your web browser. For example, in this case, you could enter http://61.220.20.16:80 into
the location field of Internet Explorer to access your IP camera.
Important:
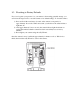
If you have multiple IP cameras installed on a network, you’ll need to change
HTTP and RTSP ports manually so each camera uses a different port. For example,
the second device in the above example would need to use ports 80 and 555, and
the second device would be accessed at http://61.220.20.16:81
When configuring port forwarding/mapping on your router, note that the public
RTSP port must be equal to the internal RTSP port used by the IP camera. For
example, if the IP camera uses RTSP port 554 internally, then its mapped public
RTSP port should also be 554. The same does not apply to the HTTP port.