
Wireless Firewall Router User's Guide


P-335 Series User’s Guide
Chapter 9 Network Address Translation (NAT) 142
9.5.1 Rule Setup Screen
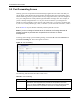
To edit a port forwarding rule, click the edit icon under Modify. The following screen
displays.
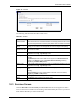
Figure 73 Rule Setup
The following table describes the labels in this screen.
Active This icon is turned on when the port forwarding entry is enabled. Select the edit icon
under Modify and select the Active checkbox in the Rule Setup screen to enable
the port forwarding entry.
Clear the checkbox to disable forwarding of these ports to an inside server without
having to delete the entry.
Name This field displays a name to identify this port-forwarding rule.
Start Port This field displays a start port number.
End Port This field displays an end port number. If the same port number as the Start Port is
displayed then a single port is forwarded. If a different number to the Start Port
number is displayed then a range of ports are forwarded.
Server IP
Address
This field displays the inside IP address of the server.
Modify Click the Edit icon to open the address mapping rule screen. Modify an existing rule
or create a new rule in the Rule Setup screen.
Click the Remove icon to delete an address mapping rule.
Apply Click Apply to save your changes back to the Prestige.
Reset Click Reset to begin configuring this screen afresh.
Table 59 Port Forwarding (continued)
LABEL DESCRIPTION
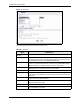
Table 60 Rule Setup
LABEL DESCRIPTION
Active Select the check box to enable this port forwarding entry.
Clear the checkbox to disallow forwarding of these ports to an inside server
without having to delete the entry.
Service Name Type a Service Name to identify this port-forwarding rule.
Start Port Type a start port number. To forward only one port, enter it again in the End Port
field. To specify a range of ports, enter the last port to be forwarded in the End
Port field.