P-335WT 802.11g Wireless Firewall Router with Print Server Quick Start Guide Version 3.
P-335WT Contents ENGLISH ............................................................................................................................ 2 DEUSTCH ......................................................................................................................... 20 ESPANOL ......................................................................................................................... 41 FRANÇAIS.....................................................................................
P-335WT 1 Introducing the Prestige The Prestige is a broadband sharing gateway with a built-in wireless LAN access point and four-port 10/100 Mbps switch that makes it easy for people to set up a small home/office network and share Internet access via a broadband (cable/DSL) modem. Key features of the Prestige include media bandwidth management, an embedded 802.11g wireless LAN security, One-Touch Intelligent Security Technology, firewall, print server, VPN, content filtering, NAT and UPnP.
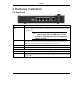
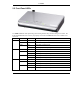
P-335WT 2 Hardware Installation 2.1 Rear Panel LABEL USB PRINTER PORT DESCRIPTION Use a USB cable to connect a USB printer to this port. The Prestige has a built-in print server that allows a network to share a printer. The Prestige automatically detects the make and model of the USB printer. Devices other than the USB printers listed in the User Guide appendix are not compatible with the Prestige. LAN 1 ~ 4 Use an Ethernet cable to connect at least one computer for initial Prestige configuration.
P-335WT 2.2 Front Panel LEDs The PWR LED blinks while performing system testing and then stays on if the testing is successful. The LAN, and WAN LEDs turn on if they are properly connected. The USB LED turns on if a USB device is connected. LED STATUS PWR COLOR DESCRIPTION Off The Prestige is not receiving power. Amber On Power to the Prestige is too low. Green On The Prestige is receiving power. Blinking The Prestige is performing testing. Off The LAN is not connected.
P-335WT LED STATUS WLAN Green OTIST Green USB Green COLOR DESCRIPTION Off The WLAN connection is not ready, or has failed. On The Prestige has a successful WLAN connection. Blinking The Prestige is sending/receiving data Off OTIST is not activated or WLAN settings are manually configured after OTIST is successful. On OTIST is activated and the wireless security settings are given to a wireless client. The LED remains on unless the WLAN settings are changed.
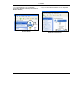
P-335WT 2. In the Control Panel, double-click Network Connections (Network and Dial-up Connections in Windows 2000/NT). 3. Right-click Local Area Connection and then Properties.
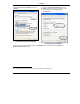
P-335WT 4. Select Internet Protocol (TCP/IP) and then click Properties. 5. Select Use the following IP Address and fill in an IP address (between 192.168.1.3 and 192.168.1.254). 6. Type 255.255.255.0 as the Subnet mask. 1 7. Click Advanced. Local Area Connection Properties Internet Protocol Properties 8. Remove any previously installed gateways in the IP Settings tab and click OK to go back to the Internet Protocol TCP/IP Properties screen.
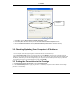
P-335WT No gateways configured. Advanced TCP/IP Settings 9. Click OK to close the Internet Protocol (TCP/IP) Properties window. 10. Click Close (OK in Windows 2000/NT) to close the Local Area Connection Properties window. 11. Close the Network Connections window (Network and Dial-up Connections in Windows 2000/NT). 3.2 Checking/Updating Your Computer’s IP Address 1. In the computer, click Start, (All) Programs, Accessories and then Command Prompt. 2.
P-335WT 3. Press ENTER. The following screen displays. C:\>ping 192.168.1.1 Pinging 192.168.1.1 with 32 bytes of data: Reply Reply Reply Reply from from from from 192.168.1.1: 192.168.1.1: 192.168.1.1: 192.168.1.1: bytes=32 bytes=32 bytes=32 bytes=32 time=10ms time<10ms time<10ms time<10ms TTL=254 TTL=254 TTL=254 TTL=254 Ping statistics for 192.168.1.
P-335WT Default password. 3. It is highly recommended you change the default password! Enter a new password, retype it to confirm and click Apply; alternatively click Ignore to proceed to the main menu if you do not want to change the password now. If you do not change the password, the following screen appears every time you log in. Change default password. 4. You should now see the web configurator MAIN MENU screen.
P-335WT Click a link under MAIN MENU in the navigation panel to configure that Prestige feature. Click MAINTENANCE in the navigation panel to see Prestige performance statistics, upload firmware and back up, restore or upload a configuration file. Click LOGOUT when you have finished a Prestige management session. The Prestige automatically logs you out if it is left idle for five minutes; press ENTER to display the Login screen again and then log back in.
P-335WT No configuration changes will be saved to the Prestige until you click Finish. 1. Click Wizard Setup in the main menu to display the first wizard screen. System Name is a unique name to identify the Prestige in an Ethernet network. Enter a descriptive name. The Domain Name entry is what is propagated to the DHCP clients on the LAN. If you leave this blank, the domain name obtained by DHCP from the ISP is used. Click Next to continue. 2. Set up your wireless LAN using the following screen.
P-335WT The wireless stations and Prestige must use the same SSID, channel ID and WPA-PSK (if WPA-PSK is enabled), WEP encryption key (if WEP is enabled) for wireless communication. 3. Choose Basic(WEP) security in the previous screen to setup WEP Encryption parameters. WEP (Wired Equivalent Privacy) encrypts data frames before transmitting over the wireless network. The higher the WEP Encryption, the higher the security but the slower the throughput.
P-335WT Select the Yes radio button and click Finish to enable One-Touch Intelligent Security Technology (OTIST), complete the wizard setup and save your configuration. Select the Yes radio button and click Next to proceed with the setup wizard and enable OTIST only when you click Finish in the final wizard screen. Select the No radio button and click Next to proceed to the following screen. Select the No radio button and click Finish to complete the wizard setup and save your configuration.
P-335WT Select Get automatically from ISP if your ISP did not assign you a fixed IP address. Select Use fixed IP address to give the Prestige a fixed, unique IP address. The fixed IP address should be in the same subnet as your broadband modem or router. 8. Select Get automatically from ISP (Default) in the previous screen and click Next to view the following WAN MAC Address screen.
P-335WT WAN IP Address Assignment Enter the IP address of your Prestige in dotted decimal notation. If you change the Prestige’s IP address, you must use the new IP address if you want to access the web configurator again. Enter a Remote IP Address and the Remote IP Subnet Mask of the neighboring device, if you know it. If you do not, leave the Remote IP Subnet Mask field as 0.0.0.0. DNS Server Address Assignment Enter the DNS server's IP address in the field to the right.
P-335WT Select the Active check box to have the Prestige apply bandwidth management to traffic going out through the Prestige's WAN or LAN port. Enter the amount of Managed Bandwidth in kbps (2 to 100,000) that you want to allocate for traffic. 20 kbps to 20,000 kbps is recommended. The recommendation is to set this speed to be equal to or less than the speed of the broadband device connected to the WAN port.
P-335WT Select High, Mid or Low priority for each service to have your Prestige limit the bandwidth used by bandwidth-hungry applications (or individuals) by allocating the maximum bandwidth for WAN and LAN traffic. If the rules set up in this wizard are changed in the advanced setup, then the service priority will be set to Other. The Advanced Media Bandwidth Management configuration screens allow you to edit set class configurations and edit these rules. Click Finish to save and complete the wizard setup.
P-335WT PROBLEM Cannot access the Prestige from the LAN. CORRECTIVE ACTION Check the cable connection between the Prestige and your computer or hub. Refer to the Rear Panel section for details. Ping the Prestige from a LAN computer. Make sure your computer Ethernet card is installed and functioning properly. Cannot ping any computer on the LAN. If the 10/100M LAN LEDs are off, check the cable connections between the Prestige and your LAN computers.
P-335WT DEUTSCH 1 Vorstellung des Prestige Der Prestige ist ein Breitband-Gateway zur gemeinsamen Nutzung mit integriertem WLAN-Zugriffspunkt (AP) und 10/100 Mbps-Switch mit vier Ports, der den Aufbau eines kleinen Heim-/Büronetzwerkes und die gemeinsame Internet-Nutzung per Breitbandmodem (Kabel/DSL) kinderleicht macht. Zu den Hauptmerkmalen des Prestige zählen Medienbandbreitenverwaltung, eingebettete 802.
P-335WT DEUTSCH 2 Hardware-Installation 2.1 Rückseite BENENNUNG USB PRINTER PORT BESCHREIBUNG Verbinden Sie einen USB-Drucker über ein USB-Kabel mit diesem Anschluss. Der Prestige hat einen integrierten Druckserver, der dem Netzwerk eine gemeinsame Nutzung eines Druckers erlaubt. Der Prestige erkennt automatisch die Marke und das Modell des USB-Druckers. Nicht im Anhang des Benutzerhandbuchs aufgeführte Drucker sind nicht kompatibel mit dem Prestige.
P-335WT DEUTSCH 2.2 LEDs an der Vorderseite Die LED NETZ [PWR] blinkt während des Systemtests und leuchtet konstant, wenn der Test erfolgreich war. Die LEDs LAN und WAN leuchten auf, sobald die entsprechenden Anschlüsse hergestellt sind. LED NETZ [PWR] FARBE STATUS BESCHREIBUNG Aus Das Prestige wird nicht mit Strom versorgt. Gelb Ein Die Stromversorgung des Prestige ist zu gering. Grün Ein Das Prestige wird mit Strom versorgt. Blinkend Das Prestige führt den Systemtest durch.
P-335WT DEUTSCH LED FARBE WLAN Grün OTIST Grün USB Grün STATUS BESCHREIBUNG Aus Die WLAN-Verbindung ist nicht bereit oder ist fehlgeschlagen. Ein Das Prestige hat eine erfolgreich hergestellte WLAN-Verbindung. Blinkend Das Prestige sendet/empfängt Daten. Aus OTIST ist nicht aktiviert, oder die WLAN -Einstellungen wurden nach dem Aktivieren der OTIST manuell konfiguriert. Ein Die OTIST ist aktiviert und die Wireless-Sicherheitseinstellungen werden einem drahtlosen Client weitergegeben.
P-335WT DEUTSCH [Control Panel]. 2. Klicken Sie in Systemsteuerung [Control Panel] auf Netzwerkverbindungen [Network Connections] (Netzwerk- und DFÜVerbindungen.unter Windows 2000/NT). 3. Klicken Sie mit der rechten Maustaste auf LANVerbindung [Local Area Connection]. Klicken Sie anschließend auf Eigenschaften [Properties].
P-335WT DEUTSCH 4. Wählen Sie Internetprotokoll [Internet Protocol] (TCP/IP) und klicken anschließend auf Eigenschaften [Properties]. 5. Wählen Sie Folgende IP-Adresse verwenden [Use the following IP Address] und geben dann eine IPAdresse [IP address] (zwischen 192.168.1.3 und 192.168.1.254) ein. 6. Geben Sie 255.255.255.0 als Subnetz-Maske [Subnet mask] ein. 1 7. Klicken Sie auf Erweitert.
P-335WT DEUTSCH Keine Gateways konfiguriert Erweiterte TCP/IP-Einstellungen [Advanced TCP/IP Settings] 9. Klicken Sie auf OK [OK], um das Fenster Eigenschaften von Internetprotokoll (TCP/IP) [Internet Protocol TCP/IP Propertis] zu schließen. 10. Klicken Sie auf Schließen [Close] (OK unter Windows 2000/NT), um das Eigenschaften von LANVerbindung-Fenster zu schließen. 11. Schließen Sie das Netzwerkverbindungen [Network Connections]-Fenster (Netzwerk- und DFÜVerbindungen.unter Windows 2000/NT). 3.
P-335WT DEUTSCH 3.3 Testen der Verbindung mit dem Prestige 1. Klicken Sie auf Start [Start], Programme [Programs], Zubehör [Accessories] und dann Eingabeaufforderung [Command Prompt]. 2. Tippen Sie "ping" in das Eingabeaufforderungs [Command Prompt]-Fenster ein. Geben Sie anschließend ein Leerzeichen und dann die IP-Adresse des Prestige (192.168.1.2 ist die Standardadresse) ein. 3. Drücken Sie die Eingabetaste. Der Bildschirm erscheint wie folgend. C:\>ping 192.168.1.1 Pinging 192.168.1.
P-335WT DEUTSCH Website-Adresse 2. Das Standard-Kennwort (“1234”) ist bereits (in nicht lesbarer Form) im Kennwortfeld eingetragen. Klicken Sie auf Anmelden [Login], um zu einem Bildschirm zu gelangen, auf dem Sie aufgefordert werden, Ihr Kennwort zu ändern. Klicken Sie auf Zurücksetzen [Reset], um zum StandardKennwort im Kennwortfeld zurückzukehren. Standardkennwort 3.
P-335WT DEUTSCH Wenn Sie das Kennwort nicht ändern, erscheint das folgende Fenster, wann immer Sie sich anmelden. Standardkennwort ändern 4. Sie sollten nun zum Bildschirm HAUPTMENÜ [MAIN MENU] des Webkonfigurators gelangen. Klicken Sie auf ASSISTENT [WIZARD], um eine Reihe von Dialogfeldern aufzurufen, die Sie bei der Erstkonfiguration Ihres Prestige unterstützen. Klicken Sie auf BM-SETUP [BM SETUP], um die Konfiguration des MedienbandbreitenManagements auf Ihrem Prestige zu beginnen.
P-335WT DEUTSCH ASSISTENT [WIZARD] BANDBREITEN-MANAGEMENT-ASSISTANT [BANDWIDTH MANAGEMENT WIZARD] Navigationsfeld ABMELDEN [LOGOUT] 4.2 Internet-Zugang mit dem Assistenten Verwenden Sie die folgenden Schaltflächen, um den Assistenten zu navigieren: Zurück (Back) Klicken Sie auf Zurück (Back), um zum vorherigen Fenster zurückzukehren. Weiter (Next) Klicken Sie auf Weiter (Next), um zum nächsten Fenster zu gelangen.
P-335WT DEUTSCH Name (SSID) [System Name] ist ein einmaliger Name, um das Prestige im Ethernet-Netzwerk zu identifizieren. Geben Sie einen beschreibenden Namen ein. Der Domänenname [Domain Name] wird den DHCP-Clients im LAN übermittelt. Falls Sie dieses Feld frei lassen, wird der über DHCP vom Internet-Dienstanbieter bezogene Domänenname verwendet. Klicken Sie auf Weiter [Next], um fortzufahren. 2. Stellen Sie Ihr drahtloses LAN auf dem zweiten Assistent-Fenster ein.
P-335WT DEUTSCH Die drahtlosen Stationen und Prestige müssen die selbe SSID, Kanal-ID und WPAPSK (wenn WPA-PSK aktiviert ist), WEP-Schlüssel (wenn WEP aktiviert ist) für eine drahtlose Kommunikation verwenden. 3. Wählen Sie Standard [Basic] (WEP) in dem vorherigen Fenster, um die WEPVerschlüsselungsparameter einzustellen. Verwenden Sie die Gemeinsamer [Passphrase], um einen Schlüssel automatisch erzeugen zu lassen. Oder geben Sie manuell einen Schlüssel in eines der Schlüssel [Key] 1~ 4 Felder ein.
P-335WT DEUTSCH Pre-Shared Key [Gemeinsamer Schlüssel] Geben Sie einen gemeinsamen Schlüssel ein, um eine sicherere drahtlose Verbindung als die mit der WEP-Verschlüsselung zu erhalten. Geben Sie 8 bis 31 ASCII-Zeichen unter Berücksichtigung der Groß/Kleinschreibung ein. Auf dem erweiterten Wireless-Fenster können Sie die sicherste drahtlose Verbindung mit WPA einstellen. Hierzu müssen Sie einen RADIUS-Server konfigurieren. 5.
P-335WT DEUTSCH Wählen Sie Yes (Ja) und klicken anschließend auf Finish (Fertig stellen), um die One-Touch Intelligent Security Technology (OTIST) zu aktivieren. Vervollständigen Sie die Konfiguration mit Hilfe des Assistenten. Wählen Sie Yes (Ja) und klicken anschließend auf Next (Weiter), um mit dem Assistenten fortzufahren. Die OTIST wird nur dann aktiviert, wenn Sie auf Finish (Fertig stellen) auf dem letzten Assistentenfenster klicken.
P-335WT DEUTSCH Wählen Sie Ethernet, wenn der WANAnschluss für reguläres Ethernet verwendet wird. Wählen Sie von Standard, Telia anmelden oder eine RoadRunner-Version. Für manche RoadRunner-Versionen brauchen Sie einen Benutzernamen, ein Kennwort und eine Anmeldeserver-IP-Adresse. PPPoE oder das Point-to-Point Protocol over Ethernet (PPP over Ethernet) funktioniert ebenfalls als Einwahlverbindung. Daher brauchen Sie ebenfalls einen Benutzernamen, ein Kennwort und eventuell auch einen PPPoE-Dienstnamen.
P-335WT DEUTSCH WAN MAC-Adresse Das Feld WAN MAC-Adresse ermöglicht die Konfiguration der MAC-Adresse des WAN-Anschlusses - entweder durch Verwendung der Werkseinstellung oder durch Nachbilden (Klonen) der MACAdresse eines Computers in Ihrem LAN. Wählen Sie Werkseinstellung (Factory Default), um die im Werk zugewiesene MAC-Adresse zu verwenden.
P-335WT DEUTSCH WAN IP-Adresszuweisung Geben Sie die IP-Adresse Ihres Prestiges im gepunkteten Dezimalzeichensystem ein. Wenn Sie die IP-Adresse des Prestige ändern, müssen Sie die neue IPAdresse verwenden, um wieder auf das Web-Konfigurationsprogramm zuzugreifen. Geben Sie die Remote-IP-Adresse und die Remote-IP-Subnetzmaske des benachbarten Gerätes ein, wenn Sie diese Daten wissen. Wenn nicht, dann belassen Sie 0.0.0.0 in dem Remote-IPSubnetzmaske-Feld.
P-335WT DEUTSCH Markieren Sie das Kontrollkästchen Aktiv [Active], um die Bandbreite des über die WAN-, LAN- oder WLAN-Ports des Prestige laufenden Datenverkehrs vom Prestige verwalten zu lassen. Geben Sie unter Verwaltete Bandbreite in kbps [Managed Bandwidth in kbps] (2 bis 100000) die Bandbreite an, die dem Datenverkehr zugewiesen werden soll. Wir empfehlen eine Einstellung zwischen 20 kbps und 20000 kbps.
P-335WT DEUTSCH Wählen Sie Hoch [High], Mittel [Mid] oder Niedrig [Low] als Priorität für jeden Dienst, für den Ihr Prestige die Bandbreite von Bandbreiten-intensiven Anwendungen (oder Personen) durch Begrenzung der maximalen Bandbreite für WAN-, LAN- und WLANDatenverkehr einschränken soll. Falls die mit Hilfe dieses Assistenten festgelegten Regeln bei der erweiterten Einrichtung geändert werden, so wird die Dienstpriorität auf Andere [Other] eingestellt.
P-335WT DEUTSCH 5 Fehlerbehebung PROBLEM Beim Einschalten des Prestige leuchten keine LEDs auf. BEHEBUNG Vergewissern Sie sich, dass Sie das Netzgerät an das Prestige und an eine entsprechende Stromquelle angeschlossen haben. Überprüfen Sie sämtliche Kabelverbindungen. Leuchten die LEDs immer noch nicht auf, liegt unter Umständen ein Hardware-Problem vor. In diesem Fall sollten Sie sich mit Ihrem örtlichen Händler in Verbindung setzen. Vom LAN ist kein Zugriff auf das Prestige möglich.
P-335WT ESPAÑOL 1 Introducción al dispositivo Prestige El dispositivo Prestige es una puerta de enlace para compartir recursos de banda ancha con un punto de acceso LAN inalámbrico integrado y un conmutador de 10/100 Mbps de cuatro puertos que facilita la configuración de una pequeña red doméstica y de trabajo, así como el uso compartido del acceso a Internet a través de un módem de banda ancha (cable o DSL).
P-335WT ESPAÑOL 2 Instalación del hardware 2.1 Panel posterior ETIQUETA PUERTO IMPRESORA USB DESCRIPCIÓN Utilice un cable USB para conectar una impresora USB a este puerto. El Prestige cuenta con un servidor de impresión incorporado que permite a la red compartir una impresora. El Prestige detecta automáticamente la marca y modelo de la impresora USB. Los dispositivos que no sean las impresoras USB que aparecen enumeradas en el ápendice de la Guía del usuario no son compatibles con el Prestige.
P-335WT ESPAÑOL 2.2 Indicadores luminosos LED del panel frontal El LED PWR (ALIMENTACIÓN) parpadea mientras se realiza la comprobación del sistema y, a continuación permanece encendido si dicha comprobación se realiza correctamente. Los LED LAN y WAN se encienden si las redes están conectadas correctamente. LED PWR (ALIMENTACIÓN) COLOR ESTADO DESCRIPCIÓN Apagado El dispositivo ZyAIR no recibe corriente.
P-335WT ESPAÑOL LED COLOR Ámbar WLAN Verde OTIST Verde USB Verde ESTADO DESCRIPCIÓN Encendido La conexión Ethernet de 100 Mb del dispositivo Prestige funciona correctamente. Parpadea El dispositivo Prestige está enviando o recibiendo datos. Apagado La conexión WLAN no está preparada o no funciona. Encendido La conexión WLAN del dispositivo Prestige funciona correctamente. Parpadea El dispositivo Prestige está enviando o recibiendo datos.
P-335WT ESPAÑOL 1. Haga clic en inicio [start] (Inicio en Windows 2000/NT), Configuración [Settings], Panel de control [Control Panel]. 3. Haga clic con el botón derecho Conexión de área local 2. En el Panel de control, haga doble clic en y, a continuación, en Propiedades [Properties]. Conexiones de red (Conexiones de red y de acceso telefónico en Windows 2000/NT).
P-335WT ESPAÑOL 4. Seleccione Protocolo de internet (TCP/IP), a continuación, haga clic en Propiedades [Properties]. 5. Seleccione Usar la siguiente dirección IP [Use the following IP Address] y rellene una Dirección IP [IP address] (entre 192.168.1.3 y 192.168.1.254). 6. Escriba 255.255.255.0 como la Máscara de subred [Subnet mask]. 1 7. Haga clic en Avanzada [Advanced].
P-335WT ESPAÑOL Sin Pasarela configurada. Configuraciones avanzadas de TCP/IP [Advanced TCP/IP Settings] 9. Haga clic en Aceptar [OK] para cerrar la ventana Propiedades de Protocolo Internet TCP/IP [Internet Protocol TCP/IP Propertis]. 10. Haga clic en Cerrar [Close] (Aceptar en Windows 2000/NT) para cerrar la ventana Propiedades de conexión de área local. 11. Cierre la ventana Conexiones de red [Network Connections] (Conexión de red y de acceso telefónico en Windows 2000/NT). 3.
P-335WT ESPAÑOL 3.3 Probar la conexión con el Prestige 1. Haga clic en Inicio, (Todos) los programas, Accesorios y, a continuación, Línea de comandos. 2. En la ventana Símbolo del sistema [Command Prompt], escriba "ping 192.168.1.1" seguido de un espacio y la dirección IP del Prestige (192.168.1.2 es la predeterminada). 3. Pulse INTRO [ENTER]. Aparece la pantalla siguiente. C:\>ping 192.168.1.1 Pinging 192.168.1.1 with 32 bytes of data: Reply from 192.168.1.1: bytes=32 time=10ms TTL=254 Reply from 192.168.
P-335WT ESPAÑOL 4.1 Obtener acceso al dispositivo Prestige a través de la utilidad de configuración Web 1. Inicie el explorador Web. Especifique “192.168.1.1” como dirección del sitio Web. Dirección del sitio web. 2. La contraseña predeterminada (“1234”) ya figura en el campo correspondiente en un formato ilegible. Haga clic en Iniciar sesión (Login) para pasar a una pantalla que permite cambiar la contraseña.
P-335WT ESPAÑOL Si no se cambia la contraseña, aparece la pantalla siguiente cada vez que se inicia sesión. Cambiar contraseña predeterminada. 4. Ahora debe aparecer la pantalla MENÚ PRINCIPAL (MAIN MENU) de la utilidad de configuración Web. Haga clic en ASISTENTE (WIZARD) para dar paso a una serie de pantallas que le ayudarán a configurar el dispositivo Prestige por primera vez.
P-335WT ESPAÑOL ASISTENTE [WIZARD] ASISTENTE PARA CONFIGURACIÓN DE BANDA ANCHA [BANDWIDTH MANAGEMENT WIZARD] Panel de navegación FIN DE SESIÓN [LOGOUT] 4.2 Acceso a Internet mediante el asistente Utilice los botones siguientes para navegar por el Asistente: Atrás (Back) Haga clic en Atrás (Back) para volver a la pantalla anterior. Siguiente (Next) Haga clic en Siguiente (Next)para continuar con la pantalla siguiente.
P-335WT ESPAÑOL El nombre de sistema [System Name] es un nombre exclusivo para identificar el Prestige en una red Ethernet. Introduzca un nombre descriptivo. La entrada Nombre del dominio (Domain Name) se propaga a los clientes DHCP de la red LAN. Si deja este campo en blanco, se utilizará el nombre de dominio que DHCP obtiene de ISP. Haga clic en Siguiente (Next) para continuar. 2. Utilice la segunda pantalla del asistente para configurar la LAN inalámbricas.
P-335WT ESPAÑOL Las estaciones inalámbricas y el Prestige deben utilizar el mismo SSID, ID de canal y WPA-PSK (si está habilitado WPAPSK), la misma clave de cifrado WEP (si está habilitado WEP) para comunicaciones inalámbricas. 3. Seleccione seguridad Básico [Basic] (WEP) en la pantalla anterior para configurar parámetros de Cifrado WEP. WEP (Privacidad equivalente a cableado) cifra marcos de datos antes de transmitirlos sobre la red inalámbrica.
P-335WT ESPAÑOL Clave precompartida [Pre-Shared Key] Escriba una clave precompartida para que disponer de una conexión inalámbrica más segura que el cifrado WEP. Escriba entre 8 y 63 caracteres ASCII distinguiendo entre mayúsculas y minúsculas. Puede configurar la conexión inalámbrica más segura configurando WPA en la pantalla inalámbrica avanzada. Necesita configurar un servidor RADIO para poder utilizar este método. 5.
P-335WT ESPAÑOL 6. Esta pantalla del asistente dispone de tres variaciones dependiendo del tipo de encapsulado que utilice. Utilice la información de Información de cuenta de Internet para completar los campos. Seleccione Ethernet cuando el puerto WAN se utilice como un puerto Ethernet normal. Seleccione entre Estándar, Inicio de sesión Telia o una versión de RoadRunner. Necesitará la información de Nombre de usuario, Contraseña y Dirección IP de servidor para algunas versiones de Roadrunner.
P-335WT ESPAÑOL Dirección WAN MAC El campo Dirección WAN MAC permite a los usuarios configurar la dirección MAC de los puertos WAN utilizando los valores predeterminados de fábrica o clonando la dirección MAC de un equipo de la LAN. Seleccione Valores predeterminados de fábrica para utilizar la dirección MAC predeterminada asignada en fábrica. También puede seleccionar Copiar la dirección MAC - IP de este equipo e introducir la dirección IP del equipo de la LAN cuya dirección MAC desea clonar.
P-335WT ESPAÑOL Si tiene algún problema con el acceso a Internet, siga las instrucciones en pantalla. 4.3 Utilizar el Asistente de administración de ancho de banda 1. Haga clic en Configuración BM (BM SETUP) en el menú principal para mostrar la primera pantalla del asistente. Seleccione la casilla de verificación Activo (Active) para que el dispositivo Prestige administre el ancho de banda para el tráfico saliente a través de su puerto WAN, LAN o WLAN.
P-335WT ESPAÑOL Aplique la administración del ancho de banda seleccionando servicios en la lista proporcionada. Haga clic en Siguiente (Next) para continuar. 3. La tercera pantalla del asistente permite configurar prioridades para los servicios enumerados.
P-335WT ESPAÑOL ¡Buen trabajo! Ha finalizado la configuración de la administración de ancho de banda para los medios mediante el Asistente para obtener acceso a Internet. Ahora puede continuar configurando su dispositivo. Haga clic en cualquier vínculo de menú del panel de exploración para obtener acceso a su pantalla de configuración.
P-335WT ESPAÑOL PROBLEMA ACCIÓN CORRECTIVA Si el proveedor de servicios Internet (ISP) comprueba la dirección MAC WAN, debe clonar la dirección MAC a partir de un equipo de la red LAN. Haga clic en WAN y, a continuación, en la ficha LAN, seleccione Clonar esta dirección MAC del equipo - Dirección IP (Spoof this Computer's MAC address - IP Address) y especifique la dirección IP del equipo de la red LAN cuya dirección MAC vaya a clonar.
P-335WT Français 1 Présentation du Prestige Le Prestige est une passerelle de partage d'accès à large bande, intégrant un Point d'Accès LAN sans-fil et un switch quatre ports 10/100MBps facilitant ainsi la constitution d'un réseau pour les petits bureaux/bureaux à domicile et le partage d'un Accès Internet par l'intermédiaire du modem à large bande (câble ou DSL). Les caractéristiques clés du Prestige comprennent la Gestion de la Bande Passante du Média, la Sécurité LAN sans-fil 802.
P-335WT Français 2 Installation Matérielle 2.1 Panneau Arrière INSCRIPTION DESCRIPTION PORT IMPRIMANTE USB Utilisez un câble USB pour connecter une imprimante USB à ce port. Le Prestige dispose d'un serveur d'impression intégré permettant à un réseau de partager une imprimante. Le Prestige est capable de détecter automatiquement la marque et le modèle de l'imprimante USB.
P-335WT Français 2.2 LEDs du panneau frontal La LED PWR clignote tout en réalisant les tests du système et reste allumée si les tests sont concluants. Les LEDs LAN et WAN restent allumées si elles sont correctement connectées. LED COULEUR PWR DESCRIPTION Eteinte Le Prestige ne reçoit pas d'alimentation. Orange Allumée La puissance d'alimentation du Prestige est faible. Vert Allumée Le Prestige reçoit une alimentation. Clignotante Le Prestige est en train d'effectuer des tests.
P-335WT Français LED COULEUR Vert OTIST Vert USB Verte ETAT DESCRIPTION Allumée Le Prestige a réussi sa connexion WLAN. Clignotante Le Prestige émet/reçoit des données. Éteint OTIST n'est pas activé ou les paramètres du WLAN ont été configurés manuellement après le succès de OTIST. Allumé OTIST est activé et les paramètres de sécurité sans fil sont donnés à un client sans fil. La DEL reste allumée à moins que les paramètres du WLAN ne soient modifiés.
P-335WT Français 2. Dans le Panneau de Configuration, double-cliquez sur Connexions Réseau[Network Connections] (Connexions réseau et Accès à distance sous Windows 2000/NT). 3. Cliquez avec le bouton droit sur Connexion au réseau local [Local Area Connection] puis cliquez sur Propriétés [Properties].
P-335WT Français 4. Sélectionnez Protocole Internet (TCP/IP)[Internet Protocol (TCP/IP)] puis cliquez sur Propriétés [Properties] Propriétés de Connexion au réseau local [Local Area Connection Properties] 5. Sélectionnez Utiliser l'Adresse IP suivante [Use the following IP Address] et saisissez une adresse IP [IP address] (entre 192.168.1.3 et 192.168.1.254). 6. Saisissez 255.255.255.0 comme Masque de sousréseau [Subnet mask]. 1 7. Cliquez sur Avancé [Advanced] .
P-335WT Français Pas de passerelle configurée. Paramètres TCP/IP Avancés [Advanced TCP/IP Settings] 9. Cliquez sur OK pour fermer la fenêtre Propriétés du Protocole Internet(TCP/IP) [Internet Protocol (TCP/IP) Properties]. 10. Cliquez sur Fermer [Close] (OK [OK] sous Windows 2000/NT) pour fermer la fenêtre Propriétés de connexion au Réseau Local [Local Area Connection Properties]. 11. Fermez la fenêtre Connexions Réseau [Network Connections] (Connexions réseau et Accès à distance sous Windows 2000/NT).
P-335WT Français 3.3 Tester la Connexion au Prestige 1. Cliquez sur Démarrer[Start], (Tous)Programmes [(All)Programs], Accessoires [Accessories] puis sur Invite de commandes [Command Prompt]. 2. Dans la fenêtre Invite de commandes [Command Prompt], saisissez "ping 192.168.1.1” avec un espace puis l'adresse IP du Prestige (192.168.1.2 est la valeur par défaut). 3. Pressez ENTREE. L'écran ci-dessous s'affiche. C:\>ping 192.168.1.1 Pinging 192.168.1.1 with 32 bytes of data: Reply from 192.168.1.
P-335WT Français 4.1 Accéder à votre Prestige via Configurateur WEB 1. Lancez votre navigateur Web. Saisissez “192.168.1.1” comme adresse de site Web. Adresse du site web. 2. Le mot de passe par défaut (“1234”) se trouve déjà dans le champ mot de Passe (dans un format illisible). Cliquez sur Connexion[Login] pour faire apparaître un écran vous demandant de changer votre mot de passe. Cliquez sur Réinitialiser[Reset] pour revenir sur le mot de passe par défaut dans le champ mot de Passe.
P-335WT Français Changer le mot de passe par défaut 4. Vous devez voir maintenant l’écran MENU PRINCIPAL[MAIN MENU] du configurateur WEB. Cliquez sur ASSISTANT[WIZARD] pour lancer une série d’écrans vous aidant à configurer votre Prestige pour la première fois. Cliquez sur CONFIGURATION DE LA BANDE PASSANTE [BM SETUP] pour lancer une série d'écrans vous aidant à configurer la gestion de la bande passante du média sur votre Prestige.
P-335WT Français ASSISTANT [WIZARD] ASSISTANT DE GESTION DE BANDE PASSANTE [BANDWIDTH MANAGEMENT WIZARD] Panneau de Navigation [Navigation panel] FIN DE SESSION [LOGOUT] 4.2 Accès Internet en utilisant l’Assistant Utilisez les boutons suivants pour naviguer dans l'Assistant : Retour [Back] Cliquez sur Retour [Back] pour retourner sur l'écran précédent. Suivant [Next] Cliquez sur Suivant [Next] pour passer à l'écran suivant.
P-335WT Français Le Nom du Système [System Name] est un nom unique pour identifier le Prestige dans un réseau Ethernet. Saisissez un nom descriptif. La saisie du Nom de Domaine Domain[Domain Name correspond à ce qui est propagé aux clients DHCP sur le réseau LAN. Si vous laissez ce champ vide, le nom de domaine obtenu par DHCP depuis le FAI sera utilisé. Cliquez sur Suivant [Next]pour continuer. 2. Utilisez le deuxième écran de l'assistant pour configurer le LAN sans fil.
P-335WT Français Les stations sans fil et le Prestige doivent partager les mêmes paramètres SSID, ID de canal et WPA-PSK (si WPA-PSK est activé), Clé de cryptage WEP (si WEP est activé) pour que les communications sans fil soient possibles. 3. Choisissez la sécurité Basique [Basic] (WEP) dans l'écran précédent pour configurer les paramètres de Cryptage WEP. Utilisez Phrase de passe [Passphrase] pour générer automatiquement une clé ou entrez manuellement une clé dans l'un de champs Clé [Key] 1~ 4.
P-335WT Français Clé prépartagée [Pre-Shared Key] Tapez une clé prépartagée pour pouvoir avoir une connexion sans fil plus sure qu'avec le cryptage WEP. Tapez 8 à 31 caractères ASCII sensibles à la casse. Pour avoir le niveau de sécurité maximum sur vos communications sans fil, configurez WPA dans l'écran sans fil avancé. Pour cela, vous devez configurer un serveur RADIUS. 5. L'écran suivant vous permet d'activer la technologie OTIST (Prestige One-Touch Intelligent Security Technology).
P-335WT Français 6. Cet écran d'assistant possède trois variantes en fonction du type d'encapsulation que vous utilisez. Utilisez les informations fournies dans Informations relatives au Compte Internet pour renseigner les champs. Choisissez Ethernet lorsque le port WAN est utilisé comme port Ethernet standard. Choisissez entre la version Standard, Connexion Telia ou une version RoadRunner.
P-335WT Français Adresse MAC WAN Le champ adresse MAC WAN permet à l'utilisateur de configurer l'adresse MAC du port WAN, soit en utilisant la valeur d'usine par défaut, soit en clonant l'adresse MAC d'un ordinateur de votre réseau. Sélectionnez Valeur d'usine par défaut pour utiliser l'adresse MAC par défaut assignée en usine. Vous pouvez également sélectionner Capturer l’adresse MAC de cet ordinateur – Adresse IP et saisir l'adresse IP de l'ordinateur du réseau LAN dont vous voulez capturer l'adresse MAC.
P-335WT Français Si vous rencontrez des problèmes avec votre Accès Internet, suivez les instructions à l'écran. 4.3 Utiliser l’Assistant de Gestion de la Bande Passante 1. Cliquez sur CONFIGURATION DE LA BANDE PASSANTE[BM SETUP]dans le menu principal pour afficher l’écran initial de l’assistant. Cochez la case Active[Active]pour que le Prestige applique la gestion de la bande passante au trafic sortant à travers le port WAN, LAN ou le port WLAN du Prestige.
P-335WT Français Appliquez la gestion de la bande passante en sélectionnant les services dans la liste fournie. Cliquez sur Suivant[Next] pour continuer. 3. Le troisième écran de l’assistant vous permet de configurer les priorités pour les services listés.
P-335WT Français Bravo! Vous avez terminé la configuration de la Gestion de la Bande Passante du Média à l'aide de l'Assistant d'Accès à Internet. Vous pouvez maintenant continuer à configurer votre périphérique. Cliquez sur n'importe quel lien du menu situé dans le panneau de navigation pour accéder à son écran de configuration.
P-335WT Français PROBLEME ACTION CORRECTIVE Si votre FAI vérifie l'adresse MAC WAN, vous devrez cloner l'adresse MAC d'un ordinateur du réseau. Cliquez sur WAN puis sur l'onglet MAC, sélectionnez Capturer l’adresse MAC de cet ordinateur – Adresse IP[Spoof this Computer's MAC address - IP Address]et saisissez l'adresse IP de l'ordinateur du réseau LAN dont vous voulez capturer l'adresse MAC.
P-335WT ITALIANO 1 Introduzione a Prestige Prestige è un gateway broadband con AP LAN wireless integrato e quattro porte 10/100 Mbps che consente di creare facilmente una piccola rete domestica/per ufficio e condividere Internet utilizzando la un modem per banda larga (cavo/ADSL). Tra le funzioni chiave di Prestige ci sono la gestione della banda, una protezione integrata 802.11g, la OneTouch Intelligent Security Technology, server di stampa, un firewall, VPN, un filtro per i contenuti, NAT e UpnP.
P-335WT ITALIANO 2 Installazione dell’hardware 2.1 Pannello posteriore DEFINIZIONE PORTA PER STAMPANTE USB DESCRIZIONE Utilizzare un cavo USB per collegare una stampante USB a questa porta. Il Prestige ha un server di stampa incorporato, che permette alla rete la condivisione della stampante. Il Prestige rileva automaticamente il modello e la marca della stampante USB. Periferiche diverse dalle stampanti USB elencate nell’appendice della Guida utente non sono compatibili con il Prestige.
P-335WT ITALIANO 2.2 LED del pannello frontale Il LED PWR (alimentazione) lampeggia mentre è eseguito il controllo del sistema, e resta acceso se il controllo è riuscito. I LED LAN e WAN si accendono se le reti sono collegate in modo appropriato. LED COLORE PWR DESCRIZIONE Spento Prestige non riceve alimentazione. Ambra Acceso L’alimentazione di Power è troppo debole. Verde Acceso Prestige riceve alimentazione. Lampeggiante Prestige sta eseguendo il controllo. Spento La LAN non è collegata.
P-335WT ITALIANO LED COLORE Verde OTIST Verde USB Verde STATO DESCRIZIONE Acceso Prestige ha una connessione WLAN. Lampeggiante Prestige sta inviando/ricevendo dati. Spento La tecnologia OTIST non è attiva o le impostazioni della WLAN vengono configurate manualmente dopo che la tecnologia OTIST è stata attivata con successo. Acceso La tecnologia OTIST è attiva e le impostazioni di sicurezza wireless sono date ad un client wireless.
P-335WT ITALIANO 2. Sul pannello di controllo, fare un doppio click sulle connessioni di rete (Connessioni di rete e connessione remota su Windows 2000/NT). Pannello di controllo [Control Panel] 3. Fare click con il tasto destro su Connessione alla rete locale e poi Proprietà.
P-335WT ITALIANO 4. Selezionare il protocollo Internet (TCP/IP) e poi fare click su Proprietà[Properties]. 5. Selezionare Utilizza il seguente indirizzo IP[Use the following IP Address] ed immettere un indirizzo IP[IP Address] (tra 192.168.1.3 e 192.168.1.254). 6. Digitare 255.255.255.0 come Subnet mask[Subnet mask]. 1 7. Fare click su Avanzate[Advanced]. Proprietà di connessione alla rete locale [Local Area Connection Properties] Proprietà del protocollo Internet [Internet Protocol Properties] 8.
P-335WT ITALIANO I gateway non sono configurati. Impostazioni avanzate del TCP/IP 9. Fare clic su OK[OK] per chiudere la finestra delle Proprietà protocollo Internet TCP/IP[Internet Protocol (TCP/IP) Properties]. 10. Fare click su Chiudi[Close] (OK[OK] su Windows 2000/NT) per chiudere la finestra delle proprietà di connessione alla rete locale. 11. Chiudere la finestra delle Connessioni di rete[Network Connections] (Connessioni di rete e connessione remota su Windows 2000/NT). 3.
P-335WT ITALIANO 3.3 Testare la connessione a Prestige 1. Fare click su Start, (tutti i) Programmi, Accessori e poi Prompt dei Comandi. 2. Nella finestra Prompt dei programmi [Command Prompt], digitare "ping 192.168.1.1” seguito da uno spazio e dall’indirizzo IP di Prestige (192.168.1.2 è il predefinito). 3. Premere INVIO[ENTER]. Verrà visualizzata la seguente schermata. C:\>ping 192.168.1.1 Pinging 192.168.1.1 with 32 bytes of data: Reply Reply Reply Reply from from from from 192.168.1.1: 192.168.1.
P-335WT ITALIANO Indirizzo del sito web 2. La password predefinita (“1234”) è già inserita nel campo password (in formato illeggibile). Fare clic su Accesso[Login] per procedere ad una schermata che richiede di modificare la password. Fare clic su Ripristina[Reset] per ripristinare la password predefinita nel campo password. Password di default 3.
P-335WT ITALIANO Se non modificate la password, apparirà la seguente schermata ogni volta che effettuerete il login. Modificare la password di default. 4. Ora sullo schermo si dovrebbe vedere il MENU PRINCIPALE[MAIN MENU] della configurazione su base Web. Fare clic su PROCEDURA GUIDATA[WIZARD] per fare apparire una serie di schermate che aiutano durante la configurazione iniziale di Prestige.
P-335WT ITALIANO INSTALLAZIONE GUIDATA [WIZARD] INSTALLAZIONE GUIDATA DELLA GESTIONE DELLA LARGHEZZA DI BANDA [BANDWIDTH MANAGEMENT WIZARD] Pannello di navigazione DISCONNESSIONE [LOGOUT] 4.2 Accesso ad Internet Utilizzando la procedura guidata Utilizzare i seguenti tasti per navigare attraverso l’installazione guidata: Indietro [Back] Ciccare su indietro [Back] per tornare alla schermata precedente. Successivo [Next] Cliccare su successivo [Next] per continuare alla schermata successiva.
P-335WT ITALIANO Nome del sistema[System Name] è un nome unico che identifica Prestige su una rete Ethernet. Immettere un nome descrittivo. Nome del dominio[Domain Name] è il nome propagato ai client DHCP sulla LAN. Se si lascia vuoto questo campo, è utilizzato il nome del dominio ottenuto da DHCP dall’ISP. Fare clic su Avanti[Next] per continuare. 2. Utilizzate la seconda schermata di installazione guidata per configurare la rete LAN wireless.
P-335WT ITALIANO Le stazioni wireless e Prestige devono utilizzare lo stesso SSID, ID canale e WPAPSK (se il WPA-PSK è abilitato), chiave di cifratura WEP (se il WEP è abilitato) per le comunicazioni wireless. 3. Scegliete la sicurezza di base [Basic] (WEP) nella schermata precedente per configurare i parametri di cifratura WEP. Il WEP (Wired Equivalent Privacy) cifra i frame dei dati prima di trasmetterli sulle reti wireless.
P-335WT ITALIANO 5. La seguente schermata consente di abilitare One-Touch Intelligent Security Technology (OTIST) di Prestige. La tecnologia OTIST consente a Prestige di assegnare ai client wireless il SSID di Prestige e le impostazioni di cifratura WEP o WPA-PSK. Il client wireless deve inoltre supportare la tecnologia OTIST ed averla abilitata. Vedere la Guida utente per uteriori informazioni.
P-335WT ITALIANO Selezionare Ethernet se la porta WAN viene utilizzata come una normale Ethernet. Selezionare tra Standard, Telia Login oppure una versione RoadRunner. Avrete bisogno di User Name, Password e Indirizzo IP del server di login per alcune versioni di Roadrunner. I protocolli PPPoE o Point-to-Point su Ethernet (PPP su Ethernet) funzionano anche come connessioni remote. Perciò avrete inoltre bisogno di username e password e possibilmente del nome del servizio PPPoE.
P-335WT ITALIANO Indirizzo MAC della WAN Il campo dell’indirizzo MAC della WAN permette agli utenti di configurare l’indirizzo MAC della porta WAN o usando le impostazioni predefinite o clonando l’indirizzo MAC da un computer della vostra LAN. Selezionare Predefinite per usare l’indirizzo MAC di default. In alternativa, selezionare Indovina l’indirizzo MAC – l’indirizzo IP di questo computer ed inserire l’indirizzo IP del computer sulla LAN di cui state copiando l’indirizzo MAC.
P-335WT ITALIANO Se avete problemi di accesso ad Internet, seguite le istruzioni riportate sullo schermo. 4.3 Uso della Procedura guidata per la Gestione della Banda 1. Fare clic su Gestione BM [BM SETUP] nel menu principale per visualizzare la prima schermata della procedura guidata. Selezionare la casella Attiva [Active] per fare in modo che Prestige applichi la gestione della banda al traffico in uscita dalle porte WAN, LAN o WLAN di Prestige.
P-335WT ITALIANO Applicare la gestione della banda selezionando i servizi dall’elenco fornito. Fare clic su Avanti [Next] per continuare. 3. La terza schermata della procedura guidata consente di impostare le priorità dei servizi elencati. Selezionare Alta [High], Media [Mid] o Bassa [Low] per ognuno dei servizi per i quali si vuole che Prestige limiti la banda utilizzata da applicazioni (o persone) che ne richiedono molta definendo la banda massima per il traffico WAN, LAN e WLAN.
P-335WT ITALIANO Perfetto! La configurazione della Gestione della Banda [Media Bandwidth Management] utilizzando la procedura guidata per l’accesso a Internet. Si può adesso proseguire nella configurazione del dispositivo. Fare clic su un qualsiasi collegamento presente nel menu del pannello di navigazione per accedere a questa schermata di configurazione.
P-335WT ITALIANO PROBLEMA Impossibile ottenere un indirizzo IP WAN dal provider Internet. AZIONE CORRETTIVA L’indirizzo IP WAN è fornito dopo che il provider Internet ha verificato: indirizzo MAC, nome Host o identificativo utente. Ottenere il metodo di verifica utilizzato dal provider Internet e configurare i campi corrispondenti. Se il provider Internet controlla l’indirizzo MAC WAN, bisogna clonare l’indirizzo MAC da un computer della LAN.
P-335WT 中文 依據 低功率電波輻射性電機管理辦法 第十二條 經型式認證合格之低功率射頻電機,非經許可,公司、商號或使用、者均不得擅自變更頻率、加大功率或變更原設 計之特性及功能。 第十四條 低功率射頻電機之使用不得影響飛航安全及干擾合法通信;經發現有干擾現象時,應立即停用,並改善至無干擾時 方得繼續使用。前項合法通信,指依電信規定作業之無線電信。低功率射頻電機須忍受合法通信或工業、科學及醫療用電波 輻射性電機設備之干擾 1 Prestige 簡介 Prestige 是一款寬頻分享閘道器,內建 1 個無線網路存取點和 4 個 10/100Mbps 的交換器連接埠,讓使用 者可以輕鬆利用它來建立小型家用或辦公室網路,並透過寬頻(Cable/DSL)數據機分享網路資源。 Prestige 的主要功能包括頻寬流量管理、內崁式的 802.
P-335WT 中文 3. 在本頁面中選擇您要檢視的驗證。 2 硬體安裝 2.
P-335WT 中文 2.
P-335WT 中文 LED 燈 顏色 WLAN (無線區域 網路) 綠色 OTIST 綠燈 USB 綠色 狀態 說明 滅 WLAN 連線未備妥或失敗。 亮 Prestige 已成功連接 10Mb 的 WLAN。 閃爍 Prestige 正在傳送/接收資料。 滅 OTIST 未啟用或是 OTIST 啟用後,變更 WLAN 設定值。 亮 OTIST 已啟用,且無線網路安全設定值已指派給無線網路用戶端。除非變 更 WLAN 設定值,否則 LED 會一直亮著。 閃爍 OTIST 作用中。 滅 列印伺服器連線未備妥或已失敗。 亮 列印伺服器成功建立連線。 閃爍 列印伺服器正在傳送/接收資料。 3 設定電腦的 IP 位址 Prestige 出廠時已設定成將指派一個 IP 位址給您的電腦。本節將設定您的電腦可接收 IP 位址或指派 一個子網路遮罩為 255.255.255.0、範圍在 192.168.1.2 到 192.168.1.
P-335WT 中文 2. 在控制台(Control Panel)中,按兩下網路連線 (Network Connections)(在 Widows 2000/NT 中為網路 與撥號連線(Network and Dial-up Connections))。 3.
P-335WT 中文 4. 選擇 TCP/IP (Internet Protocol) ,再選擇內容 (Properties)。 5. 選擇使用以下 IP 位址(Use the following IP Address),並填入 IP 位址(IP address)(介於 192.168.1.3 與 192.168.1.254 之間)。 6. 鍵入 255.255.255.0 做為子網路遮罩(Subnet mask)。 1 7. 請點選進階 (Advanced) 區域連線內容(Local Area Connection Properties) Internet Protocol 內容 (Internet Protocol Properties) 8.
P-335WT 中文 未配置通訊閘。 進階 TCP/IP 設定值 (Advanced TCP/IP Settings) 9. 按下確定 (OK),關閉 Internet Protocol TCP/IP 內容(Internet Protocol TCP/IP Properties)視窗。 10. 按一下關閉(Close)(在 Windows 2000/NT 中為確定(OK))來關閉區域連線內容(Local Area Connection Properties) 視窗。 11. 關閉網路連線(Network Connections)視窗(在 Windows 2000/NT 中為網路及撥號連線(Network and Dial-up Connections))。 3.2 檢查/更新電腦的 IP 位址 1. 依序按下電腦螢幕上的開始 (Start)、所有程式或程式集 (All Programs)、附屬應用程式 (Accessories) 和命令提示字 元 (Command Prompt)。 2.
P-335WT 中文 3.3 測試對於 Prestige 的連線 1. 按一下開始(Start)、所有程式或程式集(All Programs)、附屬應用程式(Accessories)和命令提示字元(Command Prompt)。 2. 在命令提示字元(Command Prompt)視窗中,鍵入 "ping 192.168.1.1”,後面加上一個空格,以及 Prestige 的 IP 位址(預 設值為 192.168.1.2)。 3. 請按下 ENTER。以下畫面會顯示出來。 C:\>ping 192.168.1.1 Pinging 192.168.1.1 with 32 bytes of data: Reply Reply Reply Reply from from from from 192.168.1.1: 192.168.1.1: 192.168.1.1: 192.168.1.
P-335WT 中文 網站位址。 2. 預設密碼 (“1234”)已經出現在密碼欄中 (以加密格式顯示)。按下登入 (Login),前進到下個 畫面時會要求您變更密碼 。按下重新設定 (Reset) 會回復為密碼欄位中的預設密碼。 預設密碼。 3.
P-335WT 中文 如果您沒有變更密碼,您每次登入時,以下這個畫面都會顯示出 來。 變更預設密碼。 4.
P-335WT 中文 精靈 (WIZARD) 頻寬管理配置 (Bandwidth Management)精靈 導覽面板 登出 (LOGOUT) 4.2 使用精靈存取網路 請使用以下按鈕來導覽「精靈」: 上一步(Back) 按上一步(Back)回到上一個畫面。 下一步(Next) 按下一步(Next)前進到下一個畫面。 在您按一下完成(Finish)之前,Prestige 不會儲存任何配置變更。 1.
P-335WT 中文 系統名稱(System Name)是在乙太網路 中識別 Prestige 的唯一名稱。請輸入一 個敘述性的名稱。 網域名稱 (Domain Name) 項目是傳送 到區域網路上的 DHCP 用戶端的資料。 當此欄位空白時會使用從 ISP 的 DHCP 所取得的網域名稱。 按下一步 (Next)繼續設定。 2. 使用第二個精靈畫面來設定無線區域網路。 名稱(SSID)是用來在無線區域網路中識別 Prestige 的唯一名稱。請輸入一個描述性 的名稱。 由 IEEE 802.
P-335WT 中文 針對無線通訊,無線基地台與 Prestige 必須使用相同的 SSID、頻 道 ID 與 WEP 加密金鑰(如果啟用了 WEP 的話)。 3. 請在前一個畫面中選擇基本(Basic)(WEP)安全性來設定 WEP 加密參數。 WEP(有線對應隱私權)會在於無線網路上 傳輸之前加密資料數據片段。 WEP 加密越高,安全性也越高,但流量 會越慢。 請使用密碼 (Passphrase)來自動產 生一個金鑰,或在金鑰 (Key) 1~ 4 欄位其中一 欄中手動輸入一個金 請從 WEP 加密(WEP Encryption)下拉式 清單中選擇 64-bit、128-bit 或 256-bit。 請選擇一個金鑰(Key)按鈕來使用其做為 WEP 金鑰。 您可以透過以下任一方式產生或手動輸入 一個 WEP 金鑰: 輸入一個密碼(Passphrase)(最多 32 個可 列印字元)並按一下產生(Generate)。 Prestige 會自動產生一個 WEP 金鑰。 或者 在金鑰(Key)欄位中手動輸入一個金鑰, 並選擇 ASCII 或 Hex 的 WEP 金鑰輸入 方法。 4.
P-335WT 中文 選擇 Yes (是) 圓鈕後按下 Finish (結束) 可啟用 One-Touch Intelligent Security Technology (OTIST) 、完成設定精靈並 儲存您的設定值。 選擇 Yes (是) 圓鈕後按下 Next (下一 步),繼續設定精靈,並只有當您在最後 的精靈畫面中按下 Finish 後才啟用 OTIST。 選擇 No (否) 圓鈕後按下 Next,前進到 下一個畫面。 選擇 No 圓鈕並按下 Finish,完成設定 精靈並儲存您的配置。 預設的 OTIST Setup Key (設定金鑰) 是 “01234567”。您可在網路配置程式中變更 此金鑰。Prestige 和無線網路用戶端都必 區使用相同的 OTIST 「設定金鑰」。 6.
P-335WT 中文 如果您的 ISP 沒有指派給您固定 IP 位 址,請選擇 Get automatically from ISP (從 ISP 自動取得)。 請使用密碼 (Passphrase)來自動產 生一個金鑰,或在金鑰 (Key) 1~ 4 欄位其中一 欄中手動輸入一個金 8.
P-335WT 中文 WAN IP Address Assignment (指派 WAN IP 位址) 以帶點進位表示法輸入您的 Prestige IP 位址。 若您變更了 Prestige’ 的 IP 位址,要再次 存取網路配置您必須使用新的 IP 位址。 如果您知道的話,請輸入鄰近裝置的 Remote IP Address (遠端 IP 位址) 和 Remote IP Subnet Mask (遠端 IP 子網 路遮罩)。不知道的話請將 Remote IP Subnet Mask 欄位保留為 0.0.0.0。 指派 DNS 伺服器位址 請從右邊輸入 DNS 伺服器的 IP 位址。如果您不想配置 DNS 伺服器,請將 IP 位址保留為 0.0.0.0。 如果您沒有配置系統 DNS 伺服器,在配置 VPN、DDNS 和 時間伺服器時您必須使用 IP 位址。 按下 Next (下一部) 繼續。 10. 確認您的設定。 如果您有任何網路存取的問題,請依照 螢幕上的指示處理。 4.3 使用頻寬管理配置 (Bandwidth Management)精靈 1.
P-335WT 中文 請勾選啟動 (Active),讓 Prestige 可以 管理所有經由 WAN, LAN 或 WLAN 埠 傳送出去的資料流量。 請在限制頻寬 (Managed Bandwidth) 欄位填入您想要分配的頻寬流量(2100,000 kbps)。流量計算單位為 kbps(千位元/秒)。建議您設定在 20 kbps 到 20,000 kbps 之間。此設定值最 好等於或小於 WAN 埠寬頻連線的速 度。 例如,當 WAN 埠的寬頻上傳速度為 1000 Kbps 時,請將此欄位設為 1000 Kpbs (或小於 1000 Kpbs)。 2. 進入第二個精靈畫面,選擇想要管理的服務類型。 由畫面上列出的選項中,勾選您想要管理 的服務類型。 按下一步 (Next)繼續。 3.
P-335WT 中文 請針對每一種服務分別選擇高 (High),中 (Mid)或低 (Low)優先順序,讓 Prestige 可以限制那些頻寬需求量大的應用程式 (或個人),在 WAN,LAN 及 WLAN 埠的 最大頻寬使用量。 當您在 advanced(進階)配置,改變了此 畫面內某一項服務的設定原則時,該服務 的優先順序會變成其它 (Other’s)。進階 頻寬管理配置 (Advanced Media Bandwidth Management)畫面,可以讓 您修改服務類型及這些服務的優先順序。 按下結束 (Finish),將設定值儲存並完成 精靈配置。 4. 這是最後一個精靈畫面。 太棒了!您已經利用網路配置程式完成 了頻寬管理配置。現在您可以繼續其它 的配置步驟。 按下導覽畫面中任一功能選項的超連結,可以進入相關的配置畫面。 按下維護 (MAINTENANCE)功能選項,查看您目前的系統資訊,統計報告,進行韌體更新及維護配置檔案等。請按下登出 (LOGOUT) ,離開網頁配置程式。為了安全起見,建議您完成配置後一定要登出。一旦登出後,您必須重新輸入密碼才能再 登入。 4.
P-335WT 中文 問題 更正動作 無法從 LAN 存取 Prestige。 請檢查 Prestige 和您的電腦或集線器之間的連線。詳細資訊請參閱背面板一節。 無法偵測 任何在 LAN 上 的電腦。 如果 10/100M LAN LED 燈號熄滅了,請檢查 Prestige 與您的 LAN 電腦之間的連線。 無法從 ISP 取得 WAN IP 位址。 當 ISP 驗證了 MAC 位址、主機名稱或使用者 ID 之後才會提供您 WAN IP。 請從 LAN 上的電腦偵測 Prestige。請確定您電腦的乙太網路(Ethernet)卡已正確安裝且正常作 用中。 請驗證 Prestige 與 LAN 電腦之間的 IP 位址與子網路遮罩是在同樣的 IP 位址範圍內。 請找出您的 ISP 使用的驗證方式並配置對應的欄位。 如果 ISP 檢查 WAN MAC 位址,您應該從 LAN 電腦上複製 MAC 位址。請按下 WAN 後再按 下 MAC 標籤頁,選擇模擬此電腦的 MAC 位址-IP 位址(Spoof this Computer's MAC address - IP Address),然後輸入