Prestige 202H Plus ISDN Internet Access Router Quick Start Guide Version 3.
Prestige 202H Plus Quick Start Guide Table of Contents 1 Introducing the Prestige...............................................................................................................................................3 2 Hardware Installation ..................................................................................................................................................4 2.1 Rear Panel ..................................................................................................
Prestige 202H Plus Quick Start Guide 1 Introducing the Prestige The Prestige 202H Plus is an ISDN Internet access router that offers a complete Internet access solution. The prestige is equipped with two integrated phone ports for connecting analog phones and fax devices. It also provides advanced calling features, such as call waiting, three-way calling, call transferring and forwarding.
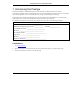
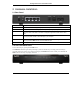
Prestige 202H Plus Quick Start Guide 2 Hardware Installation 2.1 Rear Panel LABEL DESCRIPTION ON/OFF Turn the router on and off by pushing the power button (in is ON, out is OFF). POWER 12VAC Connect to a power source using the power adapter for your region (see your User’s Guide). LAN 1-4 Connect to computer(s) / external hub(s) using an Ethernet cable. The LAN ports are autocrossover, which means either a crossover or straight-through Ethernet cable will do in either case.
Prestige 202H Plus Quick Start Guide LED PWR/SYS COLOR Green ISDN LNK ISDN B1, B2 Phone 1-2 DESCRIPTION On The Prestige is receiving power and functioning properly. Blinking The Prestige is rebooting. On Power to the Prestige is too low. Off The system is not ready or has malfunctioned. On The Prestige has a successful 10Mb Ethernet connection. Blinking The Prestige is sending/receiving data. Amber On The Prestige has a successful 100Mb Ethernet connection.
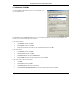
Prestige 202H Plus Quick Start Guide 3.1 Windows 95/98/Me Click Start, Settings, Control Panel and double-click the Network icon to open the Network window. The Network window Configuration tab displays a list of installed components. You need a network adapter, the TCP/IP protocol and Client for Microsoft Networks. If you need the adapter: a. In the Network window, click Add. b. Select Adapter and then click Add. c. Select the manufacturer and model of your network adapter and then click OK.
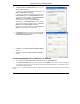
Prestige 202H Plus Quick Start Guide e. Restart your computer so the changes you made take effect. In the Network window Configuration tab, select your network adapter's TCP/IP entry and click Properties. 1. Click the IP Address tab. -If your IP address is dynamic, select Obtain an IP address automatically. -If you have a static IP address, select Specify an IP address and type your information into the IP Address and Subnet Mask fields. 2. Click the DNS Configuration tab.
Prestige 202H Plus Quick Start Guide 3. Click the Gateway tab. -If you do not know your gateway’s IP address, remove previously installed gateways. -If you have a gateway IP address, type it in the New gateway field and click Add. 4. Click OK to save and close the TCP/IP Properties window. 5. Click OK to close the Network window. Insert the Windows CD if prompted. 6. Turn on your Prestige and restart your computer when prompted. 3.2 Verifying Your Computer’s IP Address 1. Click Start and then Run.
Prestige 202H Plus Quick Start Guide 5. The Internet Protocol TCP/IP Properties screen opens (the General tab in Windows XP). - To have your computer assigned a dynamic IP address, click Obtain an IP address automatically. If you know your DNS sever IP address(es), type them in the Preferred DNS server and/or Alternate DNS server fields. -To configure a static IP address, click Use the following IP Address and fill in the IP address (choose one from192.168.1.2 to 192.168.1.254), Subnet mask (255.255.255.
Prestige 202H Plus Quick Start Guide 4 Configuring Your Prestige Choose one of these methods to access and configure the Prestige. This Quick Start Guide shows you how to use the web configurator wizard only. See your User’s Guide for background information on all Prestige features and SMT configuration. Click the web configurator online help for screen-specific web help. Web Configurator SMT (System Management Terminal).
Prestige 202H Plus Quick Start Guide If you do not change the password, the following screen appears every time you log in. 4. You should now see the Site Map screen. Click Wizard Setup to begin a series of screens to help you configure your Prestige for the first time. Click a link under Advanced Setup in the navigation panel to configure advanced Prestige features, such as Password setup, WAN and LAN settings, NAT, Dynamic DNS, Firewall, and VPN.
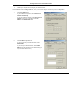
Prestige 202H Plus Quick Start Guide 4.2 Common Screen Command Buttons The following table shows common command buttons found on many web configurator screens. Back Click Back to return to the previous screen. Apply Click Apply to save your changes back to the Prestige. Reset/Cancel Click Reset or Cancel to begin configuring this screen afresh. 4.3 Using the Wizard to Configure for Internet Access 1. Click Wizard Setup in the main menu to display the first wizard screen.
Prestige 202H Plus Quick Start Guide 2. Click the Next button to continue. The second wizard screen helps you set up your Prestige for Internet access. In the Service Name field, enter your ISP’s name. Enter the Primary and the Secondary Phone numbers to connect to the ISP. Next, enter the user name and password exactly as your ISP assigned them.
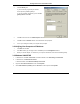
Prestige 202H Plus Quick Start Guide 4. To change the LAN information on the Prestige, click Change LAN Configuration. Otherwise click Save Settings to save the configuration and skip to step 5.
Prestige 202H Plus Quick Start Guide From the DHCP Server drop-down list box, select On to allow your Prestige to assign IP addresses, an IP default gateway and DNS servers to computer systems that support the DHCP client. Select Off to disable DHCP server. When DHCP server is used, set the following items: Specify the first of the contiguous addresses in the IP address pool in the Client IP Pool Starting Address field. Specify the size or count of the IP address pool in the Size of Client IP Pool field.
Prestige 202H Plus Quick Start Guide 4.4 Test Your Internet Connection Launch your web browser and navigate to www.zyxel.com. You don’t need a dial-up program such as Dial Up Networking. Internet access is just the beginning. Refer to the User’s Guide for more detailed information on the complete range of Prestige features. 5 Advanced Configuration This section shows how to configure some of the advanced features of the Prestige. 5.
Prestige 202H Plus Quick Start Guide Figure 1 NAT: Mode 2. Click Edit Details. Figure 2 SUA/NAT Server The following table describes the labels in this screen.
Prestige 202H Plus Quick Start Guide Table 1 SUA/NAT Server LABEL DESCRIPTION Start Port No. Type a port number in this field. To forward only one port, type the port number again in the End Port field. To forward a series of ports, type the start port number here and the end port number in the End Port field. End Port No. Type a port number in this field. To forward only one port, type the port number in the Start Port field above and then type it again in this field.
Prestige 202H Plus Quick Start Guide 5.4 Enabling the Firewall From the main screen, click Advanced Setup, Firewall and then Config to open the Configuration screen. Enable (or activate) the firewall by selecting the Enable Firewall check box as seen in the following screen. Figure 4 Enabling the Firewall 5.
Prestige 202H Plus Quick Start Guide Figure 5 Rule Summary The following table describes the labels in this screen. Table 2 Rule Summary LABEL DESCRIPTION The default action for packets not matching following rules Should packets that do not match the following rules be blocked or forwarded? Make your choice from the drop down list box. Note that “block” means the firewall silently discards the packet.
Prestige 202H Plus Quick Start Guide Table 2 Rule Summary LABEL DESCRIPTION Source IP This drop-down list box displays the source addresses or ranges of addresses to which this firewall rule applies. Please note that a blank source or destination address is equivalent to Any. Destination IP This drop-down list box displays the destination addresses or ranges of addresses to which this firewall rule applies. Please note that a blank source or destination address is equivalent to Any.
Prestige 202H Plus Quick Start Guide Figure 6 Creating/Editing A Firewall Rule The following table describes the labels in this screen. Table 3 Creating/Editing A Firewall Rule LABEL Source Address DESCRIPTION Click SrcAdd to add a new address, SrcEdit to edit an existing one or SrcDelete to delete one. Please see the next section for more information on adding and editing source addresses.
Prestige 202H Plus Quick Start Guide Table 3 Creating/Editing A Firewall Rule LABEL Destination Address DESCRIPTION Click DestAdd to add a new address, DestEdit to edit an existing one or DestDelete to delete one. Please see the following section on adding and editing destination addresses. Services Available/ Selected Services Highlight a service from the Available Services box on the left, then click >> to add it to the Selected Services box on the right.
Prestige 202H Plus Quick Start Guide Table 4 Adding/Editing Source and Destination Addresses LABEL Address Type Start IP Address DESCRIPTION Do you want your rule to apply to packets with a particular (single) IP address, a range of IP addresses (e.g., 192.168.1.10 to 192.169.1.50), a subnet or any IP address? Select an option from the drop down list box Enter the single IP address or the starting IP address in a range here. End IP Address Enter the ending IP address in a range here.