
802.11g Wireless 4-port Router User's Guide
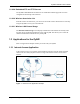

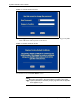
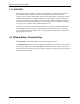
Table Of Contents
- User’s Guide
- Copyright
- Federal Communications Commission (FCC) Interference Statement
- ZyXEL Limited Warranty
- Customer Support
- Table of Contents
- List of Figures
- List of Tables
- Preface
- Getting to Know Your ZyAIR
- 1.1 Introducing the ZyAIR
- 1.2 ZyAIR Features
- 1.2.1 Physical Features
- 1.2.2 Firmware Features
- 1.2.2.1 Internal RADIUS Server
- 1.2.2.2 Wi-Fi Protected Access
- 1.2.2.3 802.11b Wireless LAN Standard
- 1.2.2.4 802.11g Wireless LAN Standard
- 1.2.2.5 STP (Spanning Tree Protocol) / RSTP (Rapid STP)
- 1.2.2.6 Certificates
- 1.2.2.7 Limit the number of Client Connections
- 1.2.2.8 SSL Passthrough
- 1.2.2.9 Firewall
- 1.2.2.10 Brute-Force Password Guessing Protection
- 1.2.2.11 Wireless LAN MAC Address Filtering
- 1.2.2.12 WEP Encryption
- 1.2.2.13 IEEE 802.1X Network Security
- 1.2.2.14 Universal Plug and Play (UPnP)
- 1.2.2.15 Dynamic DNS Support
- 1.2.2.16 PPPoE Support (RFC2516)
- 1.2.2.17 PPTP Encapsulation
- 1.2.2.18 Network Address Translation (NAT)
- 1.2.2.19 Traffic Redirect
- 1.2.2.20 NAT for Single-IP-address Internet Access
- 1.2.2.21 DHCP (Dynamic Host Configuration Protocol)
- 1.2.2.22 Multicast
- 1.2.2.23 IP Alias
- 1.2.2.24 IP Policy Routing
- 1.2.2.25 SNMP
- 1.2.2.26 Full Network Management
- 1.2.2.27 Logging and Tracing
- 1.2.2.28 Diagnostics Capabilities
- 1.2.2.29 Embedded FTP and TFTP Servers
- 1.2.2.30 Wireless Association List
- 1.2.2.31 Wireless LAN Channel Usage
- 1.3 Applications for the ZyAIR
- Introducing the Web Configurator
- Wizard Setup
- System Screens
- LAN Screens
- Wireless Configuration and Roaming
- Wireless Security
- 7.1 Wireless Security Overview
- 7.2 Security Parameters Summary
- 7.3 WEP Overview
- 7.4 Configuring WEP Encryption
- 7.5 Introduction to WPA
- 7.6 Configuring WPA-PSK Authentication
- 7.7 Wireless Client WPA Supplicants
- 7.8 Configuring WPA Authentication
- 7.9 Introduction to RADIUS
- 7.10 Configuring RADIUS
- 7.11 802.1x Overview
- 7.12 Dynamic WEP Key Exchange
- 7.13 Configuring 802.1x and Dynamic WEP Key Exchange
- 7.14 Configuring 802.1x and Static WEP Key Exchange
- 7.15 Configuring 802.1x
- 7.16 MAC Filter
- Internal RADIUS Server
- WAN
- Single User Account (SUA) / Network Address Translation (NAT)
- Static Route Screens
- Remote Management Screens
- UPnP
- Firewalls
- Firewall Screens
- Content Filtering
- Certificates
- 17.1 Certificates Overview
- 17.2 Self-signed Certificates
- 17.3 Configuration Summary
- 17.4 My Certificates
- 17.5 Certificate File Formats
- 17.6 Importing a Certificate
- 17.7 Creating a Certificate
- 17.8 My Certificate Details
- 17.9 Trusted CAs
- 17.10 Importing a Trusted CA’s Certificate
- 17.11 Trusted CA Certificate Details
- Log Screens
- Maintenance
- Introducing the SMT
- General Setup
- Menu 2 WAN Setup
- LAN Setup
- Internet Access
- Remote Node Configuration
- Static Route Setup
- Dial-in User Setup
- Network Address Translation (NAT)
- Filter Configuration
- Enabling the Firewall
- SNMP Configuration
- System Security
- System Information and Diagnosis
- Firmware and Configuration File Maintenance
- System Maintenance and Information
- Remote Management
- Call Scheduling
- Appendix A
- Appendix B
- Appendix C
- Appendix D
- Appendix E
- Appendix F
- Appendix G
- Appendix H
- Appendix I
- Appendix J
- Appendix K
- Appendix L
- Index

ZyAIR G-2000 Plus User’s Guide
Chapter 2 Introducing the Web Configurator 44
CHAPTER 2
Introducing the Web
Configurator
This chapter describes how to access the ZyAIR web configurator and provides an overview
of its screens. The default IP address of the ZyAIR is 192.168.1.1.
2.1 Web Configurator Overview
The embedded web configurator (ewc) allows you to manage the ZyAIR from anywhere
through a browser such as Microsoft Internet Explorer or Netscape Navigator. Use Internet
Explorer 6.0 and later or Netscape Navigator 7.0 and later versions with JavaScript enabled. It
is recommended that you set your screen resolution to 1024 by 768 pixels. The screens you see
in the web configurator may vary somewhat from the ones shown in this document due to
differences between individual firmware versions.
2.2 Accessing the ZyAIR Web Configurator
1 Make sure your ZyAIR hardware is properly connected and prepare your computer/
computer network to connect to the ZyAIR (refer to the Quick Start Guide).
2 Launch your web browser.
3 Type "192.168.1.1" as the URL.
4 Type "1234" (default) as the password and click Login. In some versions, the default
password appears automatically - if this is the case, click Login.
5 You should see a screen asking you to change your password (highly recommended) as
shown next. Type a new password (and retype it to confirm) and click Apply or click
Ignore.
Note: If you do not change the password, the following screen
appears every time you login.