
802.11g Wireless 4-port Router User's Guide
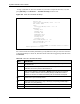
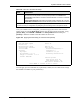


Table Of Contents
- User’s Guide
- Copyright
- Federal Communications Commission (FCC) Interference Statement
- ZyXEL Limited Warranty
- Customer Support
- Table of Contents
- List of Figures
- List of Tables
- Preface
- Getting to Know Your ZyAIR
- 1.1 Introducing the ZyAIR
- 1.2 ZyAIR Features
- 1.2.1 Physical Features
- 1.2.2 Firmware Features
- 1.2.2.1 Internal RADIUS Server
- 1.2.2.2 Wi-Fi Protected Access
- 1.2.2.3 802.11b Wireless LAN Standard
- 1.2.2.4 802.11g Wireless LAN Standard
- 1.2.2.5 STP (Spanning Tree Protocol) / RSTP (Rapid STP)
- 1.2.2.6 Certificates
- 1.2.2.7 Limit the number of Client Connections
- 1.2.2.8 SSL Passthrough
- 1.2.2.9 Firewall
- 1.2.2.10 Brute-Force Password Guessing Protection
- 1.2.2.11 Wireless LAN MAC Address Filtering
- 1.2.2.12 WEP Encryption
- 1.2.2.13 IEEE 802.1X Network Security
- 1.2.2.14 Universal Plug and Play (UPnP)
- 1.2.2.15 Dynamic DNS Support
- 1.2.2.16 PPPoE Support (RFC2516)
- 1.2.2.17 PPTP Encapsulation
- 1.2.2.18 Network Address Translation (NAT)
- 1.2.2.19 Traffic Redirect
- 1.2.2.20 NAT for Single-IP-address Internet Access
- 1.2.2.21 DHCP (Dynamic Host Configuration Protocol)
- 1.2.2.22 Multicast
- 1.2.2.23 IP Alias
- 1.2.2.24 IP Policy Routing
- 1.2.2.25 SNMP
- 1.2.2.26 Full Network Management
- 1.2.2.27 Logging and Tracing
- 1.2.2.28 Diagnostics Capabilities
- 1.2.2.29 Embedded FTP and TFTP Servers
- 1.2.2.30 Wireless Association List
- 1.2.2.31 Wireless LAN Channel Usage
- 1.3 Applications for the ZyAIR
- Introducing the Web Configurator
- Wizard Setup
- System Screens
- LAN Screens
- Wireless Configuration and Roaming
- Wireless Security
- 7.1 Wireless Security Overview
- 7.2 Security Parameters Summary
- 7.3 WEP Overview
- 7.4 Configuring WEP Encryption
- 7.5 Introduction to WPA
- 7.6 Configuring WPA-PSK Authentication
- 7.7 Wireless Client WPA Supplicants
- 7.8 Configuring WPA Authentication
- 7.9 Introduction to RADIUS
- 7.10 Configuring RADIUS
- 7.11 802.1x Overview
- 7.12 Dynamic WEP Key Exchange
- 7.13 Configuring 802.1x and Dynamic WEP Key Exchange
- 7.14 Configuring 802.1x and Static WEP Key Exchange
- 7.15 Configuring 802.1x
- 7.16 MAC Filter
- Internal RADIUS Server
- WAN
- Single User Account (SUA) / Network Address Translation (NAT)
- Static Route Screens
- Remote Management Screens
- UPnP
- Firewalls
- Firewall Screens
- Content Filtering
- Certificates
- 17.1 Certificates Overview
- 17.2 Self-signed Certificates
- 17.3 Configuration Summary
- 17.4 My Certificates
- 17.5 Certificate File Formats
- 17.6 Importing a Certificate
- 17.7 Creating a Certificate
- 17.8 My Certificate Details
- 17.9 Trusted CAs
- 17.10 Importing a Trusted CA’s Certificate
- 17.11 Trusted CA Certificate Details
- Log Screens
- Maintenance
- Introducing the SMT
- General Setup
- Menu 2 WAN Setup
- LAN Setup
- Internet Access
- Remote Node Configuration
- Static Route Setup
- Dial-in User Setup
- Network Address Translation (NAT)
- Filter Configuration
- Enabling the Firewall
- SNMP Configuration
- System Security
- System Information and Diagnosis
- Firmware and Configuration File Maintenance
- System Maintenance and Information
- Remote Management
- Call Scheduling
- Appendix A
- Appendix B
- Appendix C
- Appendix D
- Appendix E
- Appendix F
- Appendix G
- Appendix H
- Appendix I
- Appendix J
- Appendix K
- Appendix L
- Index

ZyAIR G-2000 Plus User’s Guide
Chapter 37 Call Scheduling 374
Once your schedule sets are configured, you must then apply them to the desired remote
node(s). Enter 11 from the Main Menu and then enter the target remote node index. Using
[SPACE BAR], select PPPoE or PPPoA in the Encapsulation field and then press
[ENTER] to make the schedule sets field available as shown next.
Figure 216 Applying Schedule Set(s) to a Remote Node (PPPoE)
Menu 11.1 - Remote Node Profile
Rem Node Name= MyISP Route= IP
Active= Yes
Encapsulation= PPPoE Edit IP= No
Service Type= Standard Telco Option:
Service Name= Allocated Budget(min)= 0
Outgoing: Period(hr)= 0
My Login= Schedules= 1,2,3,4
My Password= ******** Nailed-Up Connection= No
Retype to Confirm= ********
Authen= CHAP/PAP
Session Options:
Edit Filter Sets= No
Idle Timeout(sec)= 100
Edit Traffic Redirect= No
Press ENTER to Confirm or ESC to Cancel:
You can apply up to four schedule sets, separated by commas, for one remote node. Change
the schedule set numbers to your preference(s).
Action Forced On means that the connection is maintained whether or not there is a demand
call on the line and will persist for the time period specified in the Duration field.
Forced Down means that the connection is blocked whether or not there is a demand
call on the line.
Enable Dial-On-Demand means that this schedule permits a demand call on the line.
Disable Dial-On-Demand means that this schedule prevents a demand call on the line.
When you have completed this menu, press [ENTER] at the prompt “Press ENTER to confirm or ESC
to cancel” to save your configuration or press [ESC] to cancel and go back to the previous screen.
Table 126 Menu 26.1 Schedule Set Setup
FIELD DESCRIPTION