
802.11g Wireless 4-port Router User's Guide
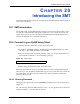
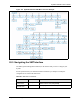
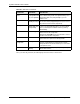
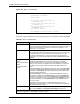
Table Of Contents
- User’s Guide
- Copyright
- Federal Communications Commission (FCC) Interference Statement
- ZyXEL Limited Warranty
- Customer Support
- Table of Contents
- List of Figures
- List of Tables
- Preface
- Getting to Know Your ZyAIR
- 1.1 Introducing the ZyAIR
- 1.2 ZyAIR Features
- 1.2.1 Physical Features
- 1.2.2 Firmware Features
- 1.2.2.1 Internal RADIUS Server
- 1.2.2.2 Wi-Fi Protected Access
- 1.2.2.3 802.11b Wireless LAN Standard
- 1.2.2.4 802.11g Wireless LAN Standard
- 1.2.2.5 STP (Spanning Tree Protocol) / RSTP (Rapid STP)
- 1.2.2.6 Certificates
- 1.2.2.7 Limit the number of Client Connections
- 1.2.2.8 SSL Passthrough
- 1.2.2.9 Firewall
- 1.2.2.10 Brute-Force Password Guessing Protection
- 1.2.2.11 Wireless LAN MAC Address Filtering
- 1.2.2.12 WEP Encryption
- 1.2.2.13 IEEE 802.1X Network Security
- 1.2.2.14 Universal Plug and Play (UPnP)
- 1.2.2.15 Dynamic DNS Support
- 1.2.2.16 PPPoE Support (RFC2516)
- 1.2.2.17 PPTP Encapsulation
- 1.2.2.18 Network Address Translation (NAT)
- 1.2.2.19 Traffic Redirect
- 1.2.2.20 NAT for Single-IP-address Internet Access
- 1.2.2.21 DHCP (Dynamic Host Configuration Protocol)
- 1.2.2.22 Multicast
- 1.2.2.23 IP Alias
- 1.2.2.24 IP Policy Routing
- 1.2.2.25 SNMP
- 1.2.2.26 Full Network Management
- 1.2.2.27 Logging and Tracing
- 1.2.2.28 Diagnostics Capabilities
- 1.2.2.29 Embedded FTP and TFTP Servers
- 1.2.2.30 Wireless Association List
- 1.2.2.31 Wireless LAN Channel Usage
- 1.3 Applications for the ZyAIR
- Introducing the Web Configurator
- Wizard Setup
- System Screens
- LAN Screens
- Wireless Configuration and Roaming
- Wireless Security
- 7.1 Wireless Security Overview
- 7.2 Security Parameters Summary
- 7.3 WEP Overview
- 7.4 Configuring WEP Encryption
- 7.5 Introduction to WPA
- 7.6 Configuring WPA-PSK Authentication
- 7.7 Wireless Client WPA Supplicants
- 7.8 Configuring WPA Authentication
- 7.9 Introduction to RADIUS
- 7.10 Configuring RADIUS
- 7.11 802.1x Overview
- 7.12 Dynamic WEP Key Exchange
- 7.13 Configuring 802.1x and Dynamic WEP Key Exchange
- 7.14 Configuring 802.1x and Static WEP Key Exchange
- 7.15 Configuring 802.1x
- 7.16 MAC Filter
- Internal RADIUS Server
- WAN
- Single User Account (SUA) / Network Address Translation (NAT)
- Static Route Screens
- Remote Management Screens
- UPnP
- Firewalls
- Firewall Screens
- Content Filtering
- Certificates
- 17.1 Certificates Overview
- 17.2 Self-signed Certificates
- 17.3 Configuration Summary
- 17.4 My Certificates
- 17.5 Certificate File Formats
- 17.6 Importing a Certificate
- 17.7 Creating a Certificate
- 17.8 My Certificate Details
- 17.9 Trusted CAs
- 17.10 Importing a Trusted CA’s Certificate
- 17.11 Trusted CA Certificate Details
- Log Screens
- Maintenance
- Introducing the SMT
- General Setup
- Menu 2 WAN Setup
- LAN Setup
- Internet Access
- Remote Node Configuration
- Static Route Setup
- Dial-in User Setup
- Network Address Translation (NAT)
- Filter Configuration
- Enabling the Firewall
- SNMP Configuration
- System Security
- System Information and Diagnosis
- Firmware and Configuration File Maintenance
- System Maintenance and Information
- Remote Management
- Call Scheduling
- Appendix A
- Appendix B
- Appendix C
- Appendix D
- Appendix E
- Appendix F
- Appendix G
- Appendix H
- Appendix I
- Appendix J
- Appendix K
- Appendix L
- Index

ZyAIR G-2000 Plus User’s Guide
255 Chapter 20 Introducing the SMT
After you enter the password, the SMT displays the main menu, as shown next.
Move to a “hidden”
menu
Press [SPACE BAR]
to change No to Yes
then press [ENTER].
Fields beginning with “Edit” lead to hidden menus and
have a default setting of No. Press [SPACE BAR] once to
change No to Yes, then press [ENTER] to go to the
“hidden” menu.
Move the cursor [ENTER] or [UP]/
[DOWN] arrow keys.
Within a menu, press [ENTER] to move to the next field.
You can also use the [UP]/[DOWN] arrow keys to move to
the previous and the next field, respectively.
Entering information Type in or press
[SPACE BAR], then
press [ENTER].
You need to fill in two types of fields. The first requires you
to type in the appropriate information. The second allows
you to cycle through the available choices by pressing
[SPACE BAR].
Required fields <?> or ChangeMe All fields with the symbol <?> must be filled in order to be
able to save the new configuration.
All fields with ChangeMe must not be left blank in order to
be able to save the new configuration.
N/A fields <N/A> Some of the fields in the SMT will show a <N/A>. This
symbol refers to an option that is Not Applicable.
Save your
configuration
[ENTER] Save your configuration by pressing [ENTER] at the
message “Press ENTER to confirm or ESC to cancel”.
Saving the data on the screen will take you, in most cases
to the previous menu.
Exit the SMT Type 99, then press
[ENTER].
Type 99 at the main menu prompt and press [ENTER] to
exit the SMT interface.
Table 82 Main Menu Commands
OPERATION KEYSTROKE DESCRIPTION