
802.11g Wireless 4-port Router User's Guide
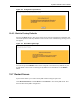
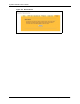
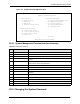
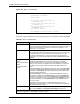
Table Of Contents
- User’s Guide
- Copyright
- Federal Communications Commission (FCC) Interference Statement
- ZyXEL Limited Warranty
- Customer Support
- Table of Contents
- List of Figures
- List of Tables
- Preface
- Getting to Know Your ZyAIR
- 1.1 Introducing the ZyAIR
- 1.2 ZyAIR Features
- 1.2.1 Physical Features
- 1.2.2 Firmware Features
- 1.2.2.1 Internal RADIUS Server
- 1.2.2.2 Wi-Fi Protected Access
- 1.2.2.3 802.11b Wireless LAN Standard
- 1.2.2.4 802.11g Wireless LAN Standard
- 1.2.2.5 STP (Spanning Tree Protocol) / RSTP (Rapid STP)
- 1.2.2.6 Certificates
- 1.2.2.7 Limit the number of Client Connections
- 1.2.2.8 SSL Passthrough
- 1.2.2.9 Firewall
- 1.2.2.10 Brute-Force Password Guessing Protection
- 1.2.2.11 Wireless LAN MAC Address Filtering
- 1.2.2.12 WEP Encryption
- 1.2.2.13 IEEE 802.1X Network Security
- 1.2.2.14 Universal Plug and Play (UPnP)
- 1.2.2.15 Dynamic DNS Support
- 1.2.2.16 PPPoE Support (RFC2516)
- 1.2.2.17 PPTP Encapsulation
- 1.2.2.18 Network Address Translation (NAT)
- 1.2.2.19 Traffic Redirect
- 1.2.2.20 NAT for Single-IP-address Internet Access
- 1.2.2.21 DHCP (Dynamic Host Configuration Protocol)
- 1.2.2.22 Multicast
- 1.2.2.23 IP Alias
- 1.2.2.24 IP Policy Routing
- 1.2.2.25 SNMP
- 1.2.2.26 Full Network Management
- 1.2.2.27 Logging and Tracing
- 1.2.2.28 Diagnostics Capabilities
- 1.2.2.29 Embedded FTP and TFTP Servers
- 1.2.2.30 Wireless Association List
- 1.2.2.31 Wireless LAN Channel Usage
- 1.3 Applications for the ZyAIR
- Introducing the Web Configurator
- Wizard Setup
- System Screens
- LAN Screens
- Wireless Configuration and Roaming
- Wireless Security
- 7.1 Wireless Security Overview
- 7.2 Security Parameters Summary
- 7.3 WEP Overview
- 7.4 Configuring WEP Encryption
- 7.5 Introduction to WPA
- 7.6 Configuring WPA-PSK Authentication
- 7.7 Wireless Client WPA Supplicants
- 7.8 Configuring WPA Authentication
- 7.9 Introduction to RADIUS
- 7.10 Configuring RADIUS
- 7.11 802.1x Overview
- 7.12 Dynamic WEP Key Exchange
- 7.13 Configuring 802.1x and Dynamic WEP Key Exchange
- 7.14 Configuring 802.1x and Static WEP Key Exchange
- 7.15 Configuring 802.1x
- 7.16 MAC Filter
- Internal RADIUS Server
- WAN
- Single User Account (SUA) / Network Address Translation (NAT)
- Static Route Screens
- Remote Management Screens
- UPnP
- Firewalls
- Firewall Screens
- Content Filtering
- Certificates
- 17.1 Certificates Overview
- 17.2 Self-signed Certificates
- 17.3 Configuration Summary
- 17.4 My Certificates
- 17.5 Certificate File Formats
- 17.6 Importing a Certificate
- 17.7 Creating a Certificate
- 17.8 My Certificate Details
- 17.9 Trusted CAs
- 17.10 Importing a Trusted CA’s Certificate
- 17.11 Trusted CA Certificate Details
- Log Screens
- Maintenance
- Introducing the SMT
- General Setup
- Menu 2 WAN Setup
- LAN Setup
- Internet Access
- Remote Node Configuration
- Static Route Setup
- Dial-in User Setup
- Network Address Translation (NAT)
- Filter Configuration
- Enabling the Firewall
- SNMP Configuration
- System Security
- System Information and Diagnosis
- Firmware and Configuration File Maintenance
- System Maintenance and Information
- Remote Management
- Call Scheduling
- Appendix A
- Appendix B
- Appendix C
- Appendix D
- Appendix E
- Appendix F
- Appendix G
- Appendix H
- Appendix I
- Appendix J
- Appendix K
- Appendix L
- Index

ZyAIR G-2000 Plus User’s Guide
Chapter 20 Introducing the SMT 252
CHAPTER 20
Introducing the SMT
This chapter explains how to access and navigate the System Management Terminal and gives
an overview of its menus.
20.1 SMT Introduction
The ZyAIR’s SMT (System Management Terminal) is a menu-driven interface that you can
access from a terminal emulator through the console port or over a telnet connection. This
chapter shows you how to access the SMT (System Management Terminal) menus, how to
navigate the SMT and how to configure SMT menus.
20.2 Connect to your ZyAIR Using Telnet
The following procedure details how to telnet into your ZyAIR.
1 In Windows, click Start (usually in the bottom left corner), Run and then type “telnet
192.168.1.1” (the default IP address) and click OK.
2 For your first login, enter the default password “1234”. As you type the password, the
screen displays an asterisk “*” for each character you type.
Figure 115 Login Screen
Password : xxxx
3 After entering the password you will see the main menu.
Please note that if there is no activity for longer than five minutes (default timeout period)
after you log in, your ZyAIR will automatically log you out. You will then have to telnet into
the ZyAIR again. You can use the web configurator or the CI commands to change the
inactivity time out period.
20.2.1 Entering Password
The login screen appears after you press [ENTER], prompting you to enter the password, as
shown next.
For your first login, enter the default password “1234”. As you type the password, the screen
displays an asterisk “*” for each character you type.