
802.11g HomePlug AV ADSL2+ Gateway User's Guide
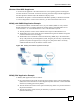
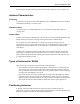


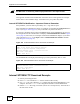


Table Of Contents
- User’s Guide
- Introduction
- Introducing the P-660HWP-Dx
- Introducing the Web Configurator
- 2.1 Web Configurator Overview
- 2.2 Accessing the Web Configurator
- 2.2.1 User Access
- 2.2.2 Administrator Access
- 2.3 Resetting the P-660HWP-Dx
- 2.3.1 Using the Reset Button
- 2.4 Navigating the Web Configurator
- 2.4.1 Navigation Panel
- 2.4.2 Status Screen
- 2.4.3 Status: Any IP Table
- 2.4.4 Status: WLAN Status
- 2.4.5 Status: Bandwidth Status
- 2.4.6 Status: Powerline Statistics
- 2.4.7 Status: Packet Statistics
- 2.4.8 Changing Login Password
- Wizards
- Network
- WAN Setup
- 5.1 WAN Overview
- 5.1.1 Encapsulation
- 5.1.2 Multiplexing
- 5.1.3 Encapsulation and Multiplexing Scenarios
- 5.1.4 VPI and VCI
- 5.1.5 IP Address Assignment
- 5.1.6 Nailed-Up Connection (PPP)
- 5.1.7 NAT
- 5.2 Metric
- 5.3 Traffic Shaping
- 5.3.1 ATM Traffic Classes
- 5.4 Zero Configuration Internet Access
- 5.5 Internet Connection
- 5.5.1 Configuring Advanced Internet Connection Setup
- 5.6 Configuring More Connections
- 5.6.1 More Connections Edit
- 5.6.2 Configuring More Connections Advanced Setup
- 5.7 Traffic Redirect
- 5.8 Configuring WAN Backup
- LAN Setup
- 6.1 LAN Overview
- 6.1.1 LANs, WANs and the P-660HWP-Dx
- 6.1.2 DHCP Setup
- 6.1.3 DNS Server Address
- 6.1.4 DNS Server Address Assignment
- 6.2 LAN TCP/IP
- 6.2.1 IP Address and Subnet Mask
- 6.2.2 RIP Setup
- 6.2.3 Multicast
- 6.2.4 Any IP
- 6.3 Configuring LAN IP
- 6.3.1 Configuring Advanced LAN Setup
- 6.4 DHCP Setup
- 6.5 LAN Client List
- 6.6 LAN IP Alias
- Wireless LAN
- 7.1 Wireless Network Overview
- 7.2 Wireless Network Setup
- 7.2.1 Requirements
- 7.2.2 Setup Information
- 7.3 Wireless Security Overview
- 7.3.1 SSID
- 7.3.2 MAC Address Filter
- 7.3.3 User Authentication
- 7.3.4 Encryption
- 7.3.5 One-Touch Intelligent Security Technology (OTIST)
- 7.4 General Wireless LAN Screen
- 7.4.1 No Security
- 7.4.2 WEP Encryption
- 7.4.3 WPA-PSK/WPA2-PSK
- 7.4.4 WPA/WPA2
- 7.4.5 Wireless LAN Advanced Setup
- 7.5 OTIST
- 7.5.1 Enabling OTIST
- 7.5.2 Starting OTIST
- 7.5.3 Notes on OTIST
- 7.6 MAC Filter
- 7.7 WMM QoS
- 7.7.1 WMM QoS Example
- 7.7.2 WMM QoS Priorities
- 7.7.3 Services
- 7.8 QoS Screen
- 7.8.1 ToS (Type of Service) and WMM QoS
- 7.8.2 Application Priority Configuration
- Powerline
- Network Address Translation (NAT)
- 9.1 NAT Overview
- 9.1.1 NAT Definitions
- 9.1.2 What NAT Does
- 9.1.3 How NAT Works
- 9.1.4 NAT Application
- 9.1.5 NAT Mapping Types
- 9.2 SUA (Single User Account) Versus NAT
- 9.3 SIP ALG
- 9.4 NAT General Setup
- 9.5 Port Forwarding
- 9.5.1 Default Server IP Address
- 9.5.2 Port Forwarding: Services and Port Numbers
- 9.5.3 Configuring Servers Behind Port Forwarding (Example)
- 9.6 Configuring Port Forwarding
- 9.6.1 Port Forwarding Rule Edit
- 9.7 Address Mapping
- 9.7.1 Address Mapping Rule Edit
- WAN Setup
- Security
- Firewalls
- 10.1 Firewall Overview
- 10.2 Types of Firewalls
- 10.2.1 Packet Filtering Firewalls
- 10.2.2 Application-level Firewalls
- 10.2.3 Stateful Inspection Firewalls
- 10.3 Introduction to ZyXEL’s Firewall
- 10.3.1 Denial of Service Attacks
- 10.4 Denial of Service
- 10.4.1 Basics
- 10.4.2 Types of DoS Attacks
- 10.5 Stateful Inspection
- 10.5.1 Stateful Inspection Process
- 10.5.2 Stateful Inspection and the P-660HWP-Dx
- 10.5.3 TCP Security
- 10.5.4 UDP/ICMP Security
- 10.5.5 Upper Layer Protocols
- 10.6 Guidelines for Enhancing Security with Your Firewall
- 10.6.1 Security In General
- 10.7 Packet Filtering Vs Firewall
- 10.7.1 Packet Filtering:
- 10.7.2 Firewall
- Firewall Configuration
- 11.1 Access Methods
- 11.2 Firewall Policies Overview
- 11.3 Rule Logic Overview
- 11.3.1 Rule Checklist
- 11.3.2 Security Ramifications
- 11.3.3 Key Fields For Configuring Rules
- 11.4 Connection Direction
- 11.4.1 LAN to WAN Rules
- 11.4.2 Alerts
- 11.5 General Firewall Policy
- 11.6 Firewall Rules Summary
- 11.6.1 Configuring Firewall Rules
- 11.6.2 Customized Services
- 11.6.3 Configuring a Customized Service
- 11.7 Example Firewall Rule
- 11.8 Predefined Services
- 11.9 Anti-Probing
- 11.10 DoS Thresholds
- 11.10.1 Threshold Values
- 11.10.2 Half-Open Sessions
- 11.10.3 Configuring Firewall Thresholds
- Content Filtering
- Certificates
- 13.1 Certificates Overview
- 13.1.1 Advantages of Certificates
- 13.2 Self-signed Certificates
- 13.3 Verifying a Certificate
- 13.3.1 Checking the Fingerprint of a Certificate on Your Computer
- 13.4 Configuration Summary
- 13.5 My Certificates
- 13.6 My Certificates > Details
- 13.7 My Certificates > Create
- 13.8 My Certificates > Import
- 13.8.1 Certificate File Formats
- 13.9 Trusted CAs
- 13.10 Trusted CA Details
- 13.11 Trusted CA > Import
- 13.12 Trusted Remote Hosts
- 13.13 Trusted Remote Hosts > Import
- 13.14 Trusted Remote Host Certificate Details
- 13.15 Directory Servers
- 13.16 Directory Server Add or Edit
- Firewalls
- Advanced
- Static Route
- Bandwidth Management
- 15.1 Bandwidth Management Overview
- 15.2 Application-based Bandwidth Management
- 15.3 Subnet-based Bandwidth Management
- 15.4 Application and Subnet-based Bandwidth Management
- 15.5 Scheduler
- 15.5.1 Priority-based Scheduler
- 15.5.2 Fairness-based Scheduler
- 15.6 Maximize Bandwidth Usage
- 15.6.1 Reserving Bandwidth for Non-Bandwidth Class Traffic
- 15.6.2 Maximize Bandwidth Usage Example
- 15.6.3 Bandwidth Management Priorities
- 15.7 Over Allotment of Bandwidth
- 15.8 Configuring Summary
- 15.9 Bandwidth Management Rule Setup
- 15.10 DiffServ
- 15.10.1 DSCP and Per-Hop Behavior
- 15.10.2 Rule Configuration
- 15.11 Bandwidth Monitor
- Dynamic DNS Setup
- Remote Management Configuration
- 17.1 Remote Management Overview
- 17.1.1 Remote Management Limitations
- 17.1.2 Remote Management and NAT
- 17.1.3 System Timeout
- 17.2 WWW
- 17.3 Telnet
- 17.4 Configuring Telnet
- 17.5 Configuring FTP
- 17.6 SNMP
- 17.6.1 Supported MIBs
- 17.6.2 SNMP Traps
- 17.6.3 Configuring SNMP
- 17.7 Configuring DNS
- 17.8 Configuring ICMP
- 17.9 TR-069
- Universal Plug-and-Play (UPnP)
- 18.1 Introducing Universal Plug and Play
- 18.1.1 How do I know if I'm using UPnP?
- 18.1.2 NAT Traversal
- 18.1.3 Cautions with UPnP
- 18.2 UPnP and ZyXEL
- 18.2.1 Configuring UPnP
- 18.3 Installing UPnP in Windows Example
- 18.3.1 Installing UPnP in Windows Me
- 18.3.2 Installing UPnP in Windows XP
- 18.4 Using UPnP in Windows XP Example
- 18.4.1 Auto-discover Your UPnP-enabled Network Device
- 18.4.2 Web Configurator Easy Access
- Maintenance and Troubleshooting
- Appendices and Index
Appendix C Internal SPTGEN
P-660HWP-Dx User’s Guide
36
" DO NOT alter or delete any field except parameters in the Input column.
This appendix introduces Internal SPTGEN. All menus shown in this appendix are example
menus meant to show SPTGEN usage. Actual menus for your product may differ.
Internal SPTGEN File Modification - Important Points to Remember
Each parameter you enter must be preceded by one “=”sign and one space.
Some parameters are dependent on others. For example, if you disable the Configured field in
menu 1 (see Figure 184 on page 35), then you disable every field in this menu.
If you enter a parameter that is invalid in the Input column, the P-660HWP-Dx will not save
the configuration and the command line will display the Field Identification Number. Figure
185 on page 36, shown next, is an example of what the P-660HWP-Dx displays if you enter a
value other than “0” or “1” in the Input column of Field Identification Number 1000000
(refer to Figure 184 on page 35).
Figure 185 Invalid Parameter Entered: Command Line Example
The P-660HWP-Dx will display the following if you enter parameter(s) that are valid.
Figure 186 Valid Parameter Entered: Command Line Example
Internal SPTGEN FTP Download Example
1 Launch your FTP application.
2 Enter "
bin". The command “bin” sets the transfer mode to binary.
3 Get "
rom-t" file. The command “get” transfers files from the P-660HWP-Dx to your
computer. The name “
rom-t” is the configuration filename on the P-660HWP-Dx.
4 Edit the "
rom-t" file using a text editor (do not use a word processor). You must leave
this FTP screen to edit.
field value is not legal error:-1
ROM-t is not saved, error Line ID:10000000
reboot to get the original configuration
Bootbase Version: V2.02 | 2/22/2001 13:33:11
RAM: Size = 8192 Kbytes
FLASH: Intel 8M *2
Please wait for the system to write SPT text file(ROM-t)...
Bootbase Version: V2.02 | 2/22/2001 13:33:11
RAM: Size = 8192 Kbytes
FLASH: Intel 8M *2