
Installation Guide
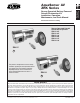


AquaSense Battery
Powered Flush
Valves/Retrofit Kits
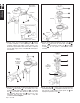
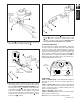
ZR Flush Valve/ZRK Retrofit Kit
Solenoid Replacement Instructions
Special Note On #9 – Removing Old Solenoid Valve
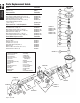
1. If the white connector is not fully accessible then the sensor
module must be removed from the case in order to reassemble
the solenoid connector to the sensor connector.
2. Remove the battery cover (Item #10) from the RetroFlush
sensor assembly (Item #9).
3. Remove the battery case (Item #15) and disconnect from the
sensor.
4. Remove the sensor module (Item #12) held in place by two
screws (Item #13) and rubber plug (Item #14).
5. To install new solenoid, lightly lubricate the solenoid O-ring
seal with silicone grease provided to prevent damage while
reassembling the unit. Insert the solenoid (Item #7) into the
housing and install the solenoid retaining clip (Item #8). When
installed properly, the end of the solenoid is free to rotate.
Notes: Be careful not to crimp the battery wires while
inserting the solenoid into the housing. Also, be sure the
blue and gray wires of the solenoid valve extend into the
sensor module cavity of the housing (Item #9).
6. Connect the sensor module blue and gray wires to the solenoid
valve blue and gray wires and reinstall the sensor module.
Note: Be very careful not to crimp the wires when reinstal-
ling the sensor module. Replace the two screws (do not
overtighten) and rubber plug holding the sensor module
in place.
7. Replace the battery pack and reconnect to the sensor.
8. Continue with Step 3 and beyond under “Installing The New
Solenoid” on page 4.
FV51-ZRK Page 5