
Installation Guide
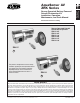


AquaSense Battery
Powered Flush
Valves/Retrofit Kits
ZR Flush Valve/ZRK Retrofit Kit
Solenoid Replacement Instructions
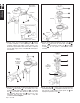
Removing The Old Solenoid
1. Turn off water supply to flush valve at shut off (S.O.).
2. Cycle the valve once – flush it to relieve pressure holding the
valve closed. If the sound of running water is present, tighten
shut off.
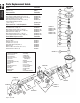
3. Remove the main valve body cap (Item #1) from the flush
valve (Item #6) using a wrench.
4. Remove the plastic diaphragm cover (Item #2) from the top of
the diaphragm assembly.
5. Remove the diaphragm assembly (Item #3) from the flush
valve (Item #6).
6. Using a screwdriver, remove the riser tube (Item #5) from the
solenoid (Item #7).
7. Remove the RetroFlush sensor assembly (Item #9) from the
flush valve handle port using a wrench on the handle nut
(Item #11).
8. Remove the solenoid retaining clip (Item #8) and gently pull
the solenoid (Item #7) out of the housing. Note: Pay special
attention to the position of the retaining clip ends to
ensure proper reassembly into the proper slots.
9. Disconnect the sensor cable connector from the solenoid.
Note: If the white connector is not fully accessible,
then see the special instructions on page 5.
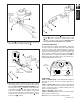
Installing The New Solenoid
1. Connect the cable connector on the solenoid (Item #7) to the
sensor cable connector.
2. Lightly lubricate the solenoid O-ring seal with silicone grease
provided to prevent damage while reassembling the unit.
Insert the solenoid (Item #7) into the housing and install the
solenoid retaining clip (Item #8). When installed properly, the
end of the solenoid housing is free to rotate. Note: Be careful
not to crimp the battery wires while inserting the solenoid
into the housing.
3. Reinstall the RetroFlush sensor assembly (Item #9) onto the
flush valve using a wrench. Be sure the solenoid inlet (threaded
hole) is facing upward when installed in the flush valve. If not,
remove Item #9 and rotate the solenoid for proper position.
4. Remove old O-ring (Item #4) from the upper part of the riser
tube (Item #5). Install new quad ring (Item #4) onto the riser
tube (Item #5) making sure the quad ring is not twisted.
Lightly lubricate the quad ring with the silicone grease provided.
5. Reinstall the riser tube (Item #5) onto the solenoid (Item #7).
Tighten snug with screwdriver, do not overtighten.
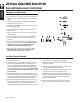
6. Reinstall the original diaphragm assembly (Item #3) onto the
flush valve (Item #6).
7. Reinstall the original plastic diaphragm cover (Item #2) on
top of the diaphragm assembly (Item #3).
8. Reinstall the main valve body cap (Item #1) onto the flush
valve (Item #6) using a wrench. Tighten properly.
9. Remove battery cover (Item #10) from RetroFlush sensor
assembly (Item #9) with the hex key wrench provided and
press reset button located on the sensor module case.
Reinstall cover (Item #10).
10. Turn on water supply and cycle flush valve for normal
operation. Adjust stop valve for optimal flow to the fixture.
Page 4 FV51-ZRK