
Installation Guide


AquaSense Battery
Powered Flush
Valves/Retrofit Kits
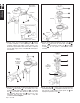
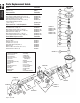
1 Remove control stop cover button or cover and use
a slotted screwdriver to close water supply control screw
(clockwise rotation). Push handle to relieve pressure in the
flushometer’s upper chamber and to assure water is completely
shut off. Water supply control screw must be turned tight to
shut off water.
A A
3 Remove blue solenoid valve cap. Attach Zurn RetroFlush sensor
assembly with gasket to the handle port of the
flushometer. Hand tighten new handle nut – positioning
hole to top. Remove blue filtered riser tube cover. Insert
Zurn RetroFlush filtered riser tube from the top of the
flushometer and screw into solenoid valve – snug with
screwdriver. Do not overtighten.
G H
I
J
K
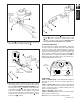
2 Remove existing manual flushometer chrome cover and
plastic cap and remove the internal parts assembly .
Remove manual flushometer handle nut and handle
assembly . Be sure gasket is removed with handle
assembly.
B
C D
E
F
4 Assure riser tube is vertical. Insert new Zurn RetroFlush
internal diaphragm kit . Diaphragm kit will slide over riser
tube and seat in valve. Replace original plastic cap and
fully tighten original brass cover .
K
L
B
C
New
RetroFlush
Diaphragm
Kit
B
C
L
Water Supply
Control Screw
A
A
Stop Cover varies.
Picture shown is most common.
Discard
Clockwise
*Sloan Royal and Regal
Off
Push
Handle
Gasket
B
C
D
F
E
K
G
I
J
H
K
Hand turn
end with
threaded hole
so hole is
positioned
at top.
Discard
Page 2 FV51-ZRK