
Installation Guide


FV838 Rev. A 10/5/2023
Page 7
Retrot Installation Instruction
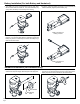
1.Turnothecontrolstopbyturningitclockwiseusingaathead
screwdriver.Then,usetheelectronicormanualoverridebutton
ormanualhandletoushthewateroutoftheushvalve.
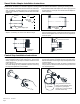
2. Remove the existing valve cap/head and diaphragm kit from the
valve body to achieve the desired state shown on the top right.
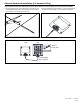
3.(FORULFUNIVERSALKITONLY)
Loosen the tailpiece nut from the control stop and slide the
tailpieceoutofthecontrolstop.Ifthevalvebodydoesnothave
matchingtailpiecetabsasshownonetheright,carefullyinsert
thetailpieceintothecontrolstop,tightenthetailpiecenut,and
proceed to Step 4.
Iftailpiecetabsarepresent,presstheFlowRestrictorinto
thetailpiece,aligningthetabswiththepocketsontheFlow
Restrictor. Carefully insert the tailpiece into the control stop and
tighten the tailpiece nut.
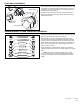
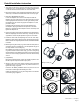
4. Ensure the Volume Control Ring is installed on the manifold stem.
Slidethediaphragmkitintothevalvebody,orientingtheorice
opposite the control stop as depicted in Figure on the bottom.
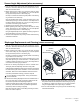
5.Install thevalve head and diaphragmkit onto thevalvebody.
Rotate the valve head so that the sensor window faces outward.
Refer to the Sensor Angle Adjustment section for additional details
if needed.
6.Beforetighteningthelockingring,ensurethatbothstrapwrench
and locking ring are completely dry. This will optimize the grip of
the strap wrench on the locking ring.
Handtightenthelockingringontothevalvebody.Ifthelocking
ringwillnotthreadontothevalvebody,gototheLockingRing
Change Section. Finish tightening the locking ring using the strap
wrench. Turn the locking ring at least 1/3 of a turn with the strap
wrench.
7. (if applicable)
Remove the Manual Handle. Place the Handle Cap Seal in the
Handle Cap and torque the handle cap in place.
8.Slowlyturnthecontrolstopcounter-clockwiseusingaathead
screwdrivertoturniton,andcheckforanyleaks.Ifleaksoccur,
tighten the locking ring further.
ProceedtotheBatteryInstallationsectiontopowerontheunit
andcheckforleaksagainafterushingthevalve.
Ifleaksarestillpresent,youmayusealargewrenchontheats
of the locking ring to tighten it.
Mating Pockets (X2)
Tailpiece Tabs (X2)
Orice
Volume
Control Ring
Manifold Stem