
Installation Guide


FV838 Rev. A 10/5/2023
Page 4
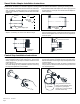
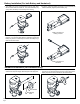
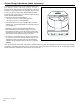
Battery orientation for
battery-powered
Battery orientation for
hardwired
Battery Installation (For both Battery and Hardwired)
1. Turn battery tray screw counterclockwise with the 3/32” Allen
Wrenchuntilitlooseandcomesout.Then,slidethebatterytray
out by hand; the battery screw will stay in the housing.
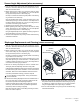
3.Slidethe batterytray backinto thevalve headand applyrm
pressure. Turn the 3/32” Allen Wrench clockwise to tighten the
battery tray screw to a dead-stop and ensure the battery tray is
ushwiththevalvehead.
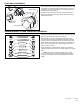
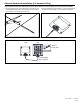
1.Looselyattachthesuppliedwallescutcheonontothewiresupplytube,
and then route the power supply cable through the wire supply tube.
2.Insertboththepowersupplycableandwiresupplytubeintoa
thru-hole on the wall. Hand-tighten the wire supply tube into the
battery tray and secure the escutcheon with the set screw.
2.Asshown,insert6(forbattery-powered)or4(forhardwired)AA
Alkaline batteries (supplied) into the battery tray.
Wire Supply
Tube
Escutcheon
Hardwired Installation (For Hardwired Only)