
Installation Guide


FV838 Rev. A 10/5/2023
Page 8
Sensor Range Adjustment (when necessary)
Toensureoptimalperformanceinvariousrestroomenvironments,
each ZER-TM is initially calibrated at the factory. However, in
situationswhere thereis lowlight orhighreectivity, itmightbe
necessary to make adjustments to the calibration distance of the
unit. This can be done using a Magic Magnet (P6900-AT-MAG).
Follow the steps outlined below to re-calibrate the ZER-TM using
a Magic Magnet (P6900-AT-MAG):
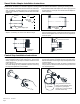
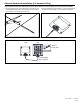
1.Standatthedesiredcalibrationdistance:
- ~28” from the sensor in a water closet application.
- ~22” from the sensor in a urinal application.
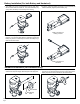
2. Place Magic Magnet to the right of the ZER-TM’s lens within
indicated area. Hold the Magic Magnet in that position until the
user LED lights up.
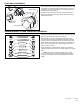
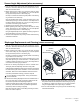
3. Maintain the position of the Magic Magnet until the user
LEDstartsblinking.Oncetheblinkingbegins,removethe
Magic Magnet and allow the user LED to blink 10 times while
remaining in the same position. A quick double-blink of the user
LED indicates that the calibration process is complete.
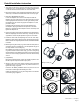
4.Toverifythenewcalibrationdistance,stepawayfromtheunit
for 5 seconds. Then return to the exact position at which it was
calibratedandobservetheuserLED.IftheuserLEDblinks,
it indicates that the calibration distance has been successfully
calibrated.
Note:Toensureproperfunctionality,makesurethecalibrationdistanceinwaterclosetapplicationspreventsthesensorfromdetecting
thestalldoor.Verifythisbyclosingthedoorfor10seconds,thenopeningit.Iftheushvalvedoesn’tactivate,thecalibrationdistanceis
suitable.Otherwise,recalibratetoacloserdistanceusingthemagnet.