Digital Terrestrial Receiver Picture similar SRT 8541FTA User Manual Bedienungsanleitung Manuel d’utilisation Manuale d’uso Manuale utente Manual del usuario Manual do utilizador Instrucciones de instalación Návod k obsluze Používateľská príručka Telepítési Utasítás Bruksanvisning Uživatelská příručka Korisnički priručnik Používateľská príručka Εγχειρίδιο χρήστη
27 Aug 2020 11:54
Licenses THIS PRODUCT IS LICENSED UNDER THE AVC PATENT PORTFOLIO LICENSE FOR THE PERSONAL AND NONCOMMERCIAL USE OF A CONSUMER TO (i) ENCODE VIDEO IN COMPLIANCE WITH THE AVC STANDARD (“AVC VIDEO”) AND/OR (ii) DECODE AVC VIDEO THAT WAS ENCODED BY A CONSUMER ENGAGED IN A PERSONAL AND NON-COMMERCIAL ACTIVITY AND/OR WAS OBTAINED FROM A VIDEO PROVIDER LICENSED TO PROVIDE AVC VIDEO. NO LICENSE IS GRANTED OR SHALL BE IMPLIED FOR ANY OTHER USE. ADDITIONAL INFORMATION MAY BE OBTAINED FROM MPEG LA, L.L.C.
TABLE OF CONTENTS 1.0 INTRODUCTION 3 1.1 Safety Instructions 3 1.2 Storage 3 1.3 Equipment Set-up 4 1.4 Accessories 4 1.5 Usage of external USB devices 4 2.0 YOUR RECEIVER 5 2.1 DEFAULT PIN: 0000 5 2.2 Front Panel 5 2.3 Rear Panel 5 2.4 Remote control 5 2.5 Installing the batteries 6 2.6 Using the remote control 6 3.0 CONNECTION 7 3.1 Connecting to a terrestrial antenna 7 3.2 Connecting to TV with HDMI cable 7 3.3 Connecting to TV with SCART cable 7 3.4 Connecting a USB storage device 7 3.
1.0 INTRODUCTION 1.1 Safety Instructions DO NOT INSTALL YOUR RECEIVER: In a closed or poorly ventilated cabinet; directly on top of or under any other equipment; on a surface which might obstruct the ventilation slots.
packaging with its accessories. Failing to comply with such packaging procedures could damage the product and void your warranty. 1.3 Equipment Set-up We recommend you to consult a professional installer to set up your equipment. Otherwise, please follow the instructions below: Refer to the user manual of your TV and, if applicable, your antenna. Make sure that the HDMI cable and, if applicable, outdoor components are in a good condition.
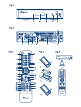
2.0 YOUR RECEIVER 2.1 DEFAULT PIN: 0000 2.2 Front Panel Fig. 1 1. IR Sensor 2. LED Display 3. Mode Indicator LED Receives commands from the remote control Shows channel number and time in standby RED indicates that the receiver is in STANDBY mode. 4. Standby/ON button 5. USB Switches the receiver ON or into Standby To connect your USB storage device. 2.3 Rear Panel 1. ANT IN 2. ETHERNET 3. S/PDIF Coaxial 4. 5. 6. 7. HDMI TV SCART Power cord Power switch Fig.
13. OK 14. MENU 15. 16. VOL+/VOL17. P+/P18. LIST 19. CH+/CH20. OPT 21. TEXT 22. SUB 23. 24. 2 25. 5 6 26. 4 27. u 28. 78 29. 3 30. COLOUR BUTTONS Opens the current channel list in menu: for confirmation Opens the main menu, in a menu you will get one step back. Exits from the menu or sub-menu. Increases/decreases the volume level. Page up/down in all list modes. Call the current channel list. Channel up/down.
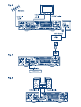
3.0 CONNECTION 3.1 Connecting to a terrestrial antenna Fig. 6 To receive broadcast signals, your terrestrial indoor or outdoor antenna must be connected to the ANT IN connector on the back of the receiver. Use a proper shielded antenna cable and suitable connectors. NOTE: If the signals at your location are too weak to receive proper signals with an indoor antenna, we recommend using an outdoor antenna which can be pointed towards the transmission tower. Ask your local dealer for more information.
3.7 Extended connections for your home entertainment Fig. 8 Connecting to a Digital Audio Amplifier with S/PDIF By connecting your receiver to a digital amplifier or home cinema set, you can enjoy the best possible sound quality and multi-channel audio (depending on broadcast). Connect your Digital Audio Amplifier or home cinema set with a suitable cinch cable to the S/PDIF connector on the back of the receiver.
NOTE: Wrong region selection can lead to missing channels or channels being stored at wrong positions in the channel list. Scrambled channels cannot be viewed with this model. When all settings have been made, press the GREEN Next button to continue. Aerial Adjustment This part of the wizard is of great help when setting up your antenna system. Use pq to move the highlight to the setting you wish to change and use t u to change values.
6.0 OPERATION Your new receiver is equipped with several features to make watching TV a true pleasure. This paragraph describes these features. Please do also read chapter 7.0 to get familiar with the menu of your receiver. 6.1 Changing channels Following ways are possible for changing channels with your new receiver: Via direct access using the 0~9 buttons. Via the channel list through OK and the P+/P- buttons. Via the pq buttons. 6.1.
select a stream and confirm with OK. The audio channel as stereo, mix, left and right can be selected with t u. 6.4 Teletext Your receiver includes a fully featured Teletext. To access Teletext, press TEXT in viewing mode and use the 0~9 buttons to enter the number of the page you wish to see. Use pq to select one page up or down, use t u to select subpages. Press or TEXT to get back to viewing mode. 6.5 Subtitles Some channels support a choice of subtitle languages.
If the channel is changed timeshifted content will only be accessible from the newly selected channel. 6.7.3 Timer recording There are 2 ways to set a timer: Programming a record timer via the EPG The easiest way to record an event is via the EPG. Press the EPG button to open the EPG, then use pq to select a channel. After that, press t u and use pq to select an event. You can book a record timer by pressing 4. If you press 4 again on this event, the timer will be disabled.
Use pq to select Scan mode, and select between Free which will only install Free-to-Air channels or All. This means that channels that are Free-to-Air or scrambled will be searched and stored. Use pq to select Channel No and select the channel number of the frequency you’d like to search. Press OK to open a list to make selection faster. The next option Modulation is to select between Only DVB-T or DVB-T+T2 modulation type. When in doubt, use the DVB-T+T2 setting.
7.2.1 TV Manager This menu allows you to create favourite lists, move channels in order, lock channels with PIN protection and delete channels from the TV list. 7.2.1.1 Adding channels to favourite lists Channels from the TV list can be added to up to 4 different favourite groups. Select Favourite and press OK, select the wanted favourite group and press OK. Use pq to select a channel you wish to add to a favourite group. When the highlight is on the channel of your choice, press OK.
highlight is on that channel, press OK. At the right hand side you will find the selection to delete from channel list. When you are ready, press 9 and confirm. 7.2.2 Radio Manager Create favourite lists, move channels in order, lock channels with PIN protection and delete channels from the radio list. The functions of handling are the same as in the TV Manager as described above.
on top and bottom of the picture on a 4:3 TV. Combined: shows a mix inbetween. Ignore: shows as it is. OSD Transparency: To set the OSD transparency from Opacity ~ 50% with 10% steps. OSD Timeout: Sets the time after which on screen banners and messages disappear. The range is 3~10 seconds. HDMI Audio Output: Toggles between PCM and Bitstream output. When PCM is selected, all digital audio will be converted to stereo audio.
Program Lock: Program Lock age: PIN Code Change: Old PIN Code: New PIN Code: Confirm: Switch all programme/channels lock to On or Off. If the lock is set in the TV or Radio Manager menu. You can select the lock separately for every channel which you like to protect it with a PIN code. Choose between: Off Lock None, Lock All, 4 years and up to 18 years. Channels with a parental rating above the chosen age will be protected with a PIN code (if available in your local broadcast.) Press OK to enter the menu.
Event Name: Displays, after you have saved the timer, the event name according to the EPG. This is only possible if EPG is available. When all settings are according to your wishes, use pq to move the highlight to Save and press OK to confirm. To quit the timer without saving your settings press 9. 7.4 Multimedia The Multimedia menu consists of the following submenus: Records, Movies, Music, Pictures, Record Setup and Storage Device Setup.
Pictures: pq: RED Option: Enter the folder with picture files. Use pq to select a picture. If the format is supported it shows the picture in the small picture-in-picture screen. Press OK to watch it in full screen mode. Before the playback of a picture in full screen, you can setup a slideshow/ diashow. Press the RED button Option to enter the sub option menu Slide change Time. Select time of the slide show or switch this function off. After you select a time, press OK and show starts to play.
WARNING: Formatting will permanently delete ALL data stored on the connected device. Please make a backup copy of all data you wish to keep before entering the Format menu. STRONG cannot be held responsible for loss of data from USB devices used with this receiver. NOTE: It is possible to use USB storage devices already formatted in NTFS.
7.6 Upgrade by USB This feature allows you to update the receiver software via the USB port. When a new software is available for your receiver, it can be downloaded from our website www.strong.tv. Place the software file (unzipped) in the root directory of your USB storage device (HDD, memory stick etc.) and connect the device to the USB port of the receiver. First a message box will appear that a USB device is found.
No picture or sound on TV or amplifier HDMI or SCART is not selected on your TV or amplifier or the unit is set to higher resolution as the TV supports. TV/amplifier is not switched on Switch to correct TV/amplifier input Select lower resolution on receiver Switch TV/amplifier on. Check if S/PDIF connection is used.
Demodulator Demodulator: Transmission mode: Guard intervals: QPSK, 16/64/256 QAM DVB-T2 (EN 302 755) normal and extended DVB-T2 = 1/128, 1/32, 1/16, 19/256, 1/8, 19/128, ¼ Video Decoder Video resolution: Decoding & Video Out: Aspect Ratio: Aspect Conversion: 576i, 576p, 720p, 1080i, 1080p PAL 4:3 and 16:9 Pan & Scan, Letterbox and Combined Audio Decoder Audio support: Sampling rate: Audio mode: Dolby Digital Plus*/AC3+/PCM MPEG MusiCam Layer II 32, 44.