Zviewer for iOS 1.0 User Manual Zviewer For iOS 1.
Zviewer for iOS 1.0 User Manual Contents 1 Software Installation................................................................................................................ 3 1.1 Introduction...................................................................................................................3 1.2 Environmental requirements.........................................................................................3 1.3 Installation Steps........................................................
Zviewer for iOS 1.0 User Manual 1 Software Installation 1.1 Introduction Zviewer for iOS is the mobile app used to stream live video from your ZMODO H.264 DVR or IP Network camera, and supports a four channel simultaneous view. This guide focuses on the installation and use of the application. 1.2 Environmental requirements Hardware: System: Network: iPhone® mobile phone or iPod® touch., iOS4.3 or higher WIFI or GPRS 1.3 Installation Steps Enter the iTunes App Store and download the Zviewer application.
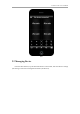
Zviewer for iOS 1.0 User Manual Start 2.2 Managing Device From the main interface, tap the SETTING button on the toolbar, and select Device manage (See Setting) to enter device management interface (See Devices).
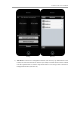
Zviewer for iOS 1.0 User Manual Setting Devices 1) Add device. In the device management interface (See Devices), tap ADD button on the toolbar, and enter the Add Device interface (See Add). The SAVE button will be enabled if all the required items are entered. Tap SAVE button to save and go back to the device management interface (See Devices).
Zviewer for iOS 1.0 User Manual Add 2) Delete device. On the device management interface (See Devices), tap EDIT button on the toolbar or swipe one row of the list (See Delete02) to delete one device.
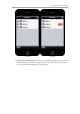
Zviewer for iOS 1.0 User Manual Delete01 Delete02 3) Revising device information. From the device management interface (See Devices), tap the desired device, and make your changes (See Edit). Tap DONE button on the toolbar to save, or tap the DEVICES button to exit without saving.
Zviewer for iOS 1.0 User Manual Edit 2.3 Playing Video 1) Tap any square box; a red border will appear around the channel when chosen (See Select).
Zviewer for iOS 1.0 User Manual Select 2) Tap the PLAY button. If the channel’s video player does not connect to a device, you will see a popup requesting a device selection (See Select Device). Select desired device to connect.
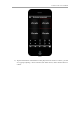
Zviewer for iOS 1.0 User Manual Select Device 3) From the Select Channel menu, tap the channel you would like to play (See Select Channel).
Zviewer for iOS 1.0 User Manual Select Channel 4) If the device information is correct, your video will start playing (See Play).
Zviewer for iOS 1.0 User Manual Play 2.4 Switching Devices From the main interface, tap SETTINGS button on the toolbar and select the Device Connect button (or long press the square box) to enter the Select Device interface. The rest of the steps will be the same as the steps listed in Section 2.3. 2.5 Switching Channels 1) Tap on the CH button at the bottom of the toolbar to reveal the change channel panel (See Channel 1); 2) Select the desired channel you to play.
Zviewer for iOS 1.0 User Manual Channel 1 After switch 2.6 Switching Display Modes 1) Double tap the video window to switch between single channel and four channel videos; 2) To switch between Portrait and Landscape modes, orient your phone horizontally or vertically (See Portrait, Landscape).
Zviewer for iOS 1.0 User Manual Portrait Landscape 2.7 PTZ Control 1) On the main interface, the bottom toolbar is above the PTZ control panel (See PTZ); 2) The PTZ control panel from the first row order: return to normal toolbar, tilt up, pan left, zoom in, aperture increase, focal length increase; The PTZ control panel second row order: tilt down, pan right, zoom out, aperture decrease, focal length decrease. Click the PTZ button bottom toolbar can hide the PTZ panel.
Zviewer for iOS 1.0 User Manual PTZ 2.8 Image Capture In portrait mode, SCREENSHOT button Save the file to the system. select a video, and tap the at the bottom of the toolbar.