User Manual IP Camera For further help, please visit www.zmodo.
Preface Preface Dear customer, Thank you for purchasing our products. If there are any questions, or requests, please do not hesitate to contact the dealer. Product Versions The content in this manual may be different from the product version you are using. If you meet any problems which can't be solved according to this manual, please contact our technical support or product supplier. This manual may contain several technical incorrect places, and the content is subject to change without notice.
Contents Contents Chapter 1 Product Introduction ............................................................................................................ 5 1.1 Brief Introduction ......................................................................................................................... 5 1.2 Main Features ............................................................................................................................. 5 1.3 Installation Statement ...............................
Contents 3.2.2 Main Interface of Zviewer ............................................................................................... 39 3.3 Device Management ................................................................................................................. 42 3.3.1 Add Device ...................................................................................................................... 42 3.3.2 Edit Device ...........................................................................
Contents Chapter 4 Access to IP camera on Internet Explorer ....................................................................... 84 4.1 Log In ........................................................................................................................................ 84 4.1.1 Set Security Levels ......................................................................................................... 84 4.1.2 Network Configuration ..............................................................
Chapter 1 Product Introduction Chapter 1 Product Introduction 1.1 Brief Introduction This IP monitoring product is the integrated IP network camera which has been designed for network video surveillance. High performance, monolithic SOC chip is utilized as a media processor which integrates video capture, compression, and transmission. A n embedded web server allows the user to view real-time footage and remotely control the camera via IE web browser.
Chapter 1 Product Introduction Note Installation Environment Do not install the camera in an area that is subject to violent vibrations. Do not aim the camera lens at the strong light such as sun or incandescent lamp. The strong light can cause fatal damage to the camera. To avoid heat accumulation, good ventilation is required for a proper operating environment.
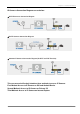
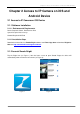
Chapter 1 Product Introduction IP Camera’s Connection Diagrams are as below: ▲Wi-Fi IP Cameras Connection Diagram ▲PoE IP Cameras Connection Diagram ▲Common IP Cameras Connection Diagram (No Wi-Fi and PoE Function) This user manual will mainly introduce three methods to access IP Camera: First Method: Access to IP Camera on iOS and Android Device Second Method: Access to IP Camera on Zviewer PC Third Method: Access to IP Camera on Internet Explore 7
Chapter 2 Access to IP Camera on iOS and Android Device Chapter 2 Access to IP Camera on iOS and Android Device 2.1 Access to IP Camera on iOS Device 2.1.1 Software Installation 2.1.1.1 Environmental Requirements Device Required: iPhone, iPod Touch or iPad System Required: iOS 4.3 or up Network Required: Wi-Fi/3G 2.1.1.2 Installation Steps Download and install the free Zmodo Zsight software from iTunes App Store or download Zsight for iOS from http://www.zmodo.com/support-software/. 2.1.
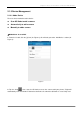
Chapter 2 Access to IP Camera on iOS and Android Device 2.1.3 Device Management 2.1.3.1 Add a Device There are three methods to add a device: Scan QR Code to add a camera Automatically to add a camera Manually to add a camera ▲Method One: Scan to Add 1. From the List tab, click the [+] icon (As Figure 2), this will take you to the “Add Device” section (As Figure 3). Figure 3 2.
Chapter 2 Access to IP Camera on iOS and Android Device 3. After scanning the camera, Zsight will open the Wi-Fi Connection Interface (As Figure 4). Figure 4 4. Select the Wi-Fi connection that your camera connects to, enter the Wi-Fi password, and select [Save] (As Figure 5).
Chapter 2 Access to IP Camera on iOS and Android Device 5. Click [Next], enter the default password”111111”, and click [Done] to add the devices (As Figure 6). Figure 6 Note For Wi-Fi IP Cameras, you can now disconnect the network cable and place the camera anywhere within the Wi-Fi signal range (as Figure 7).
Chapter 2 Access to IP Camera on iOS and Android Device ▲Method Two: Automatically Add 1. Click [Discovery] (As Figure 2), this will take you to the “Discovery” section. Click [Refresh], and your phone will automatically search all local devices (as Figure 8). Figure 8 2. After selecting the camera, Zsight will open the Wi-Fi Connection Interface (as Figure 9).
Chapter 2 Access to IP Camera on iOS and Android Device 3. Select the Wi-Fi connection that your camera connects to, enter the Wi-Fi password, and select [Save] (as Figure 10). Figure 10 4. Click [Next], enter the default password”111111”, and click [Done] to add the devices (as Figure 11).
Chapter 2 Access to IP Camera on iOS and Android Device Note For Wi-Fi IP Cameras, you can now disconnect the network cable and place the camera anywhere within the Wi-Fi signal range (as Figure 12). Figure 12 ▲Method Three: Manually Add From the List tab, click the [+] icon (As Figure 2), this will take you to the “Add Device” section (As Figure 13). [ID] Enter device’s 10-digit ID (found from IP Camera’s label). [Name] Enter device’s name, with maximum 60 chars.
Chapter 2 Access to IP Camera on iOS and Android Device 2.1.3.2 Edit a Device From the List Menu, click to edit the device info, click [Done] to save or [Cancel] to cancel (as Figure 14). Figure 14 2.1.3.3 Delete a Device Click and drag from right-to-left the device that you wish to delete, this will display the “Delete Box.” Click [Delete], then click [OK] to confirm delete (as Figure 15).
Chapter 2 Access to IP Camera on iOS and Android Device 2.1.4 Video Play 1. Select the device from the List Menu on your mobile device, and you will be able to see the video stream (as Figure 16). Figure 16 2. If this is the first time using the default password to connect video, you will be prompted to change the default password, click [Later] to change password later (As Figure 17).
Chapter 2 Access to IP Camera on iOS and Android Device 3. Click [Yes] to change password, enter the new password, and click [Save] when finished (As Figure18). Figure 18 4. Switch between Portrait and Landscape views by turning your phone horizontally or vertically (As Figure 19).
Chapter 2 Access to IP Camera on iOS and Android Device 2.1.5 Two-way Audio (Only for Device Which Supports this Function) 1. Under real-time video, “Voice” and “Talkback” functions are turned off by default (As Figure 20). Figure 20 2. Click [ ] to enable voice function, the voice icon will turn green, now you can hear device sound from your mobile device (As Figure 21).
Chapter 2 Access to IP Camera on iOS and Android Device 3. Click [ ] to enable talkback function, the talkback icon will turn green, now IP Camera and mobile device can realize two-way voice talkback. With exclusive mode, when a mobile device enables its talkback function, other mobile device can not initiate this function (As Figure 22). Figure 22 4.
Chapter 2 Access to IP Camera on iOS and Android Device 2.2 Access to IP Camera on Android Device 2.2.1 Software Installation 2.2.1.1 Environmental Requirements Device Required: Mobile phone with Android system System Required: Android v2.3 up Network Required: Wi-Fi/3G 2.2.1.2 Installation Steps Download and install the free Zmodo Zsight software from Google Play or download Zsight for Android from http://www.zmodo.com/support-software/. 2.2.
Chapter 2 Access to IP Camera on iOS and Android Device 2.2.3 Device Management 2.2.3.1 Add a Device There are three methods to add a device: Scan QR Code to add a camera Automatically to add a camera Manually to add a camera ▲Method One: Scan to Add 1. From the List tab, click the [Add] icon (As Figure 2), this will take you to the “Add Device” section (As Figure 3). Figure 3 2.
Chapter 2 Access to IP Camera on iOS and Android Device 3. After scanning the camera, Zsight will open the Wi-Fi Connection Interface (As Figure 4). Figure 4 4. Select the Wi-Fi connection that your camera connects to, enter the Wi-Fi password, and select [Save] (As Figure 5).
Chapter 2 Access to IP Camera on iOS and Android Device 5. Click [Next], enter the default password”111111”, and click [Save] to add the devices (As Figure 6). Figure 6 Note For Wi-Fi IP Cameras, you can now disconnect the network cable and place the camera anywhere within the Wi-Fi signal range (as Figure 7).
Chapter 2 Access to IP Camera on iOS and Android Device ▲Method Two: Automatically Add 1. Click [Discovery] (As Figure 2), this will take you to the “Discovery” section. Click [Refresh], and your phone will automatically search all local devices (as Figure 8). Figure 8 2. After selecting the camera, Zsight will open the Wi-Fi Connection Interface (as Figure 9).
Chapter 2 Access to IP Camera on iOS and Android Device 3. Select the Wi-Fi connection that your camera connects to, enter the Wi-Fi password, and select [Save] (as Figure 10). Figure 10 4. Click [Next], enter the default password”111111”, and click [Save] to add the devices (As Figure 11).
Chapter 2 Access to IP Camera on iOS and Android Device Note For Wi-Fi IP Cameras, you can now disconnect the network cable and place the camera anywhere within the Wi-Fi signal range (as Figure 12). Figure 12 ▲Method Three: Manually Add From the List tab, click the [Add] icon (As Figure 2), this will take you to the “Add Device” section (As Figure 13). [ID] Enter device’s 10-digit ID (found from IP Camera’s label). [Name] Enter device’s name, with maximum 60 chars.
Chapter 2 Access to IP Camera on iOS and Android Device 2.2.3.2 Edit a Device 1. Select the device that you wish to edit and press it for several seconds until the Menu Box is displayed (As Figure 14). Figure 14 2. Click [Edit], this will take you to the “Edit Device” section. Edit device information, then click [Save] to save or [Back] to cancel (As Figure 15).
Chapter 2 Access to IP Camera on iOS and Android Device 2.2.3.3 Delete a Device 1. Select the device that you wish to delete and press it for several seconds until the Menu Box is displayed (As Figure 16). Figure 16 2. Click [Delete], this will take you to the “Delete Device” section. Then click [OK] to confirm delete; or [Cancel] to cancel the delete (As Figure 17).
Chapter 2 Access to IP Camera on iOS and Android Device 2.2.4 Video Play 1. Select the device from the List Menu on your mobile device, and you will be able to see the video stream (As Figure 18). Figure 18 2. If this is the first time using the default password to connect video, you will be prompted to change the default password, click [Later] to change password later (As Figure 19).
Chapter 2 Access to IP Camera on iOS and Android Device 3. Click [Yes] to change password, enter the new password, and click [Save] when finished (As Figure 20). Figure 20 4. Switch between Portrait and Landscape views by turning your phone horizontally or vertically (As Figure 21 and Figure 22).
Chapter 2 Access to IP Camera on iOS and Android Device 2.2.5 Two-way Audio (Only for Device Which Supports this Function) 1. Under real-time video, “Voice” and “Talkback” functions are turned off by default (As Figure 23). Figure 23 2. Click [ ] to enable voice function, the voice icon will turn green, now you can hear device sound from your mobile device (As Figure 24).
Chapter 2 Access to IP Camera on iOS and Android Device 3. Click [ ] to enable talkback function, the talkback icon will turn green, now IP Camera and mobile device can realize two-way voice talkback. With exclusive mode, when a mobile device enables its talkback function, other mobile device can not initiate this function (As Figure 25). Figure 25 4.
Chapter 3 Access to IP Camera on Zviewer PC Chapter 3 Access to IP camera on Zviewer PC 3.1 Installation and Uninstallation 3.1.1 Operating Environment Operating Environment Software Subitem Description Operating system Windows XP/ Vista/Win7/Window8 Minimum configuration 1.6 GHz CPU, 1G memory, 1024x768 display resolution, 100G HD Recommended configuration 2.2 GHz or faster CPU, 2G or more memory, 1280x1024 display resolution, 500G or larger HD Hardware 3.1.2 Zviewer Installation 1.
Chapter 3 Access to IP Camera on Zviewer PC 2. Click [Next] to continue, or [Cancel] to exit setup (As Figure 2). Figure 2 3. Select the installation path, then click [Next] (As Figure 3).
Chapter 3 Access to IP Camera on Zviewer PC 4. Select the start menu folder, then click [Next] (As Figure 4). Figure 4 5. You will be prompted to choose whether to create shortcut on your desktop, click [Create a desktop icon] to facilitate operation, then click [Next] (As Figure 5).
Chapter 3 Access to IP Camera on Zviewer PC 6. Click [Install] to install Zviewer on your PC (As Figure 6). Figure 6 7. Click [Finish] to finish the installation of Zviewer (As Figure 7).
Chapter 3 Access to IP Camera on Zviewer PC 3.1.3 Zviewer Uninstallation Click [Start]-[All Programs]-[ZMODO]-[Zviewer]-[Uninstall Zviewer], and uninstall Zviewer as prompted. 1. Click [Y] to confirm uninstall Zviewer (As Figure 8). Figure 8 2. Choose whether to delete all config files and log files of Zviewer (As Figure 9).
Chapter 3 Access to IP Camera on Zviewer PC 3.2 Operation and Use 3.2.1 User Login Launch Zviewer on your PC, if this is the first time to login, enter the default user name “admin” and the default password “111111”, then click [Login] (As Figure 10). Figure 10 If check the box “Remember me”, you can have the system remember the user name and password, so that you do not need to type it each time, only click [Login] to login Zviewer.
Chapter 3 Access to IP Camera on Zviewer PC 3.2.2 Main Interface of Zviewer Zviewer main interface is as follows: Figure 11 Main Interface Function Area No. Description Device List Toolbar PTZ Control Panel Image Quality Control Panel Device List: Display all added devices, including IPC and NVR.
Chapter 3 Access to IP Camera on Zviewer PC Toolbar Function Icon Description 1 channel Mode: Click for 1 channel video display layout 4-channel Mode: Click for 4-channel video display layout 8-channel Mode: Click for 8-channel video display layout Full Screen Mode: Click for full-screen display at any layout Talkback: Click to enable talkback function (Only for IP Cameras with this function) Voice: Click to enable voice function (Only for IP Cameras with this function) PTZ Control Panel Function (Only
Chapter 3 Access to IP Camera on Zviewer PC Image Quality Control Panel Function Icon Description Adjust the brightness Brightness Adjust the contrast Contrast Adjust the saturation Saturation Reset Restore default settings Color Adjust the color (color or black and white) Orientation Voltage Adjust the orientation (normal, flip, mirror, flip plus mirror) Adjust the voltage 41
Chapter 3 Access to IP Camera on Zviewer PC 3.3 Device Management 3.3.1 Add Device The first time to successfully launch Zviewer, system will automatically enters to the “Discovery” interface, to search and add device (As Figure 12). Figure 12 3.3.1.1 Auto Search to Add a Device 1. Select the type of to-be-searched devices (IPC, NVR or ALL), default type is ALL. Click [Search] to search device (As Figure 13).
Chapter 3 Access to IP Camera on Zviewer PC 2. Click [Add All] to add your devices, you will be prompted with “Add devices to system successfully” after successfully adding them (As Figure 14). Figure 14 3.3.1.2 Manually Add a Device There are mainly two methods to manually add a device: ▲First Method: Add a device by its IP 1. Find [ ] “Setting”, and click [Device Management]. Right click in the blank area on the right, then click [Add] (As Figure 15).
Chapter 3 Access to IP Camera on Zviewer PC Or find [ ] “Live”, right click [Devices], then click [Add Device] (As Figure 16). Figure 16 2. After either of the above operation, you will enter to “New Device Add Wizard” section (As Figure 17). [Device by ID] Keep uncheck [Name] Enter the device name [Type] Select device type (IPC or NVR) After the settings are finished, click [Next].
Chapter 3 Access to IP Camera on Zviewer PC 3. System shall automatically identify and add the values of “Port”, “Max Channel”, “Login” and “Password”, enter device IP, then click [Finish] (As Figure 18). [IP] Enter device IP (searched by IPCSearch, please check out Section 2.1.2 for more information on IPCSearch). [Max Channel] Quantity of channels of the device [Login] User name of the device, default is “admin” [Password] Login password, default is “111111” Figure 18 4.
Chapter 3 Access to IP Camera on Zviewer PC ▲Second Method: Add a device by its ID 1. Find [ ] “Setting”, and click [Device Management]. Right click in the blank area on the right, then click [Add] (As Figure 20). Figure 20 Or find [ ] “Live”, right click [Devices], then click [Add Device] (As Figure 21).
Chapter 3 Access to IP Camera on Zviewer PC 2. After either of the above operation, you will enter to “New Device Add Wizard” section (As Figure 22). Click [Device by ID], click on the 10-digit Device ID (found from the label of the IP Camera) and click [Next]. Figure 22 3. System shall automatically identify and add the values of “Max Channel”, “Login” and “Password”, then click [Finish]. You will be prompted with “Add Device Successfully” after successfully adding it (As Figure 23).
Chapter 3 Access to IP Camera on Zviewer PC 3.3.2 Edit Device 1. Find [ ] “Setting”, and click [Device Management]. Right click in the blank area on the right, then click [Edit] (As Figure 24). Figure 24 Or find [ ] “Live”, right click a device from the Device List, then click [Edit Device] (As Figure 25).
Chapter 3 Access to IP Camera on Zviewer PC 2. You will enter to “Edit Device Add Wizard” section (As Figure 26), you can edit device name, then click [Next]. Figure 26 3. You can modify device information (IP, Port, Max Channel, User Name and Password), then click [Finish] (As Figure 27).
Chapter 3 Access to IP Camera on Zviewer PC 3.3.3 Delete Device 1. Find [ ] “Setting”, and click [Device Management]. Right click in the blank area on the right, then click [Delete] (As Figure 28). Figure 28 Or find [ ] “Live”, right click a device from the Device List, then click [Delete Device] (As Figure 29). Figure 29 2. This will take you to the “Delete Device” section (As Figure 30). Click [Yes] to confirm delete. Click [No] to cancel delete.
Chapter 3 Access to IP Camera on Zviewer PC 3.4 Video Browsing 3.4.1 Open the Video After devices are successfully added, find [ three methods to open the video. ], this will take you to “Live” interface, there are mainly ▲First Method: Double-click a device from the Device List on the left to open the video. ▲Second Method: Drag a device from the Device List on the left to the Play Window.
Chapter 3 Access to IP Camera on Zviewer PC 3.4.2 Close the Video There are mainly two methods to close the video. ▲First Method: Right click a device name from the Device List, and then click [Close] to close the video (As Figure 33). Figure 33 ▲ Second Method: Click [×] at the top right corner of the open video window to close it (As Figure 34).
Chapter 3 Access to IP Camera on Zviewer PC 3.4.3 Video Display Screen ▲ Click [ ] for one channel video display layout (As Figure 35). Figure 35 ▲ Click [ ] for 4-channel video display layout (As Figure 36).
Chapter 3 Access to IP Camera on Zviewer PC ▲ Click [ ] for 8-channel video display layout (As Figure 37). Figure 37 ▲ Click [ ] for full-screen display at any layout, click [ESC] to exit full screen mode. Note 1. Default video display screen is 4-channel display layout. 2. Under live video mode, double click any video at any layout for full-screen display, then click [ESC] key or double click to exit full screen mode.
Chapter 3 Access to IP Camera on Zviewer PC 3.4.4 Two-way Audio (Only for Device Which Supports this Function) 1. Under real-time video, “Voice” and “Talkback” functions are turned off by default. Click a device from the Device List. 2. Click [ ] to enable voice function, the voice icon will change to [ ]. 3. Click [ ] to enable talkback function, the talkback icon will turn green [ ]. 4.
Chapter 3 Access to IP Camera on Zviewer PC 3.4.5 Screenshot 1. Select screenshot storage path: Find [ ] “Setting”, click [Local Settings], then click […] to set screenshot storage path, default storage path is “C:\Program Files\ZMODO\Zviewer\ZviewerImage” (As Figure 39). Figure 39 2. Under real-time video, click [ ] on the Play Window for a screenshot (As Figure 40). After a successful screenshot, you can find the screenshot image from the above storage path.
Chapter 3 Access to IP Camera on Zviewer PC 3.5 Record Settings 3.5.1 Video Storage Setting Find [ 41). ] “Setting”, click [Local Settings], you can set video storage settings in this interface (As Figure Figure 41 [Video Storage Path] Click […] to set video storage path, default storage path is “C:\Program Files\ZMODO\ZViewer\Zviewer Video”. [HDD Full] When hard drive is full, if you set as [Overwrite], then hard drive will automatically clear the oldest video files and continue recording.
Chapter 3 Access to IP Camera on Zviewer PC 3.5.2 Recording Schedule Setting Find [ ] “Setting”, and click [Recording Schedule], you can set the local manual recording plan, the selected device will begin recording at the set time period. The video files will be stored in the local PC. The file path can be modified at [Local Settings] and the stored video can play back locally. Figure 42 Steps for setting the local recording plan: 1.
Chapter 3 Access to IP Camera on Zviewer PC Note 1: Left click [ ] to set the recording plan for the week (As Figure 44). Figure 44 Note 2: Left click the day of the week (i.e 45).
Chapter 3 Access to IP Camera on Zviewer PC Note 3: Left click 0 to 24 area of the timeline to set the recording plan for the same time period of the whole week (As Figure 46). Figure 46 2. Click the device allocated for the recording plan to select, one or more devices can be selected and then click [Save], you will be prompted after recording schedule is successfully saved (As Figure 47). Figure 47 You can also firstly select the device, and then set recording plan. 3.5.
Chapter 3 Access to IP Camera on Zviewer PC 3.6 Video Playback 3.6.1 Playback Interface Click [ ] “Playback” to enter into the video playback interface (As Figure 48). Figure 48 Playback Interface Function Area No.
Chapter 3 Access to IP Camera on Zviewer PC 3.6.2 Playback Search Select the device from the list to play back video, and select the specific date from the calendar on the left bottom, then click [ ] (As Figure 49). Figure 49 1. Before a device means that the device is recording. 2. If selected device has video file on the selected date, system will automatically play back the video from the earliest time of the day, and show the playback process on the time bar. 3.
Chapter 3 Access to IP Camera on Zviewer PC 3.6.3 Playback Control Click the [ ]/[ ]/[ ]/[ ] to play/stop/fast forward/slow playback video. The blue bar means there is a recording it that time period; The green bar means already played back video; The grey area means no recording in that time period; You can drag on the blue time bar to adjust the playback process. : Control the display accuracy of the play scale. 24-hour display accuracy 2-hour display accuracy 1 hour display accuracy 0.
Chapter 3 Access to IP Camera on Zviewer PC 3.7 User Management Click [ ], then click [User Management] to enter into the “User Management” interface (As Figure 50).
Chapter 3 Access to IP Camera on Zviewer PC 3.7.1 Add User 1. Right click in the blank area on the right, then click [Add], this will take you to the “Add New User” section (As Figure 51). Figure 51 2. Enter new user’s information (As Figure 52). Figure 52 [Role] Administrator or Operator [User Name] User name of the user [Password] Password of the user [Telephone] Contact number of the user After entering the above information, click the [Submit] button.
Chapter 3 Access to IP Camera on Zviewer PC 3.7.2 Edit User 1. Right click a user, then click [Edit], this will take you to the “Edit User Info” section (As Figure 53). Figure 53 2. Enter user’s information (As Figure 54). Figure 54 After editing the info, click the [Submit] button.
Chapter 3 Access to IP Camera on Zviewer PC 3.7.3 Delete User 1. Right click a user, then click [Delete] to delete the user. This will take you to the “Delete User” section (As Figure 55). Figure 55 2. Click [Yes] to confirm delete. Click [No] to cancel delete. Figure 56 Note 1. “Admin” user is the system default super administrator user and cannot be deleted, but its password can be changed. 2. Super administrator can delete users: select a user and click [Delete] to delete a user.
Chapter 3 Access to IP Camera on Zviewer PC 3.8 Device Settings Go back to the “Live” interface, right click a device from the Device List, and select “Device Settings” to set device configuration parameters (As Figure 57). Figure 57 3.8.1 System Information Such information as device name, software and hardware version information and network connection status will be displayed on the interface (As Figure 58).
Chapter 3 Access to IP Camera on Zviewer PC 3.8.2 System Settings 3.8.2.1 Date Time Settings (As Figure 59) Figure 59 [Synchronization Method] Select [Use Local Time] and click [Sync Time] to utilize the PC system time synchronization. 3.8.2.2 User Settings (As Figure 60) Figure 60 Note 1. Each IP Camera can be set to be used by multiple users. 2. User privilege: Administrator (Root) Ordinary users (Ordinary) 3. Modify password: click [Modify] to modify the password, and enter the new password. 4.
Chapter 3 Access to IP Camera on Zviewer PC 3.8.2.3 Upgrade Device Firmware (As Figure 61) Figure 61 Click [Update Device Firmware], select the to-be-updated file, and click [Update]. 3.8.2.4 Backup Restore Settings (As Figure 62) Figure 62 [Periodic Maintaining] Choose any time of any day and set the time for auto reboot, and click [Submit]. [Restore Factory Setting] Click it to make all settings restore to factory condition. [Reboot Device] Click it to reset device.
Chapter 3 Access to IP Camera on Zviewer PC 3.8.3 Network Parameters Settings 3.8.3.1 Basic Network (As Figure 63) Figure 63 [DHCP] Start the DHCP function of the router, then the IP camera will obtain an address automatically from the router. [IP Address] Set IP camera’s IP address. [Subnet Mask] Default is 255.255.255.
Chapter 3 Access to IP Camera on Zviewer PC 3.8.3.2 Wireless (As Figure 64) : Only for Wi-Fi IP Cameras. Figure 64 [Whether to use Wi-Fi] Select to enable the IP camera wireless network function. [Whether to use DHCP] If the router enables DHCP function, select it and the IP camera will automatically obtain address from router. [IP Addr] Set IP camera’s wireless IP address. [Subnet mask] Default is 255.255.255.0 (It is recommended to not change the Subnet mask.) [Gateway] Set the gateway IP of IPC.
Chapter 3 Access to IP Camera on Zviewer PC Figure 65 [Hotspot] Refers to SSID, which is the login name of wireless network for authentication, it must be consistent with the SSID of the wireless gateway (router/AP). (Such as: TP-LINK_4A2DDC).
Chapter 3 Access to IP Camera on Zviewer PC 3.8.3.3 Port (As Figure 66) Figure 66 [Web Listening Port] Default value is 80 [Video Listening Port] Default value is 8000 [Mobile Phone Listening Port] Default value is 9000 After setting all the parameters, click the [Submit] button. 3.8.3.4 PPPOE (As Figure 67) Figure 67 [Switch] Enable or disable the PPPoE dial-up function. [User] Obtained from Internet service providers. [Password] Obtained from Internet service providers.
Chapter 3 Access to IP Camera on Zviewer PC 3.8.3.5 UPnP (As Figure 68) Figure 68 [Switch] It has server with UPNP function in LAN. Enable this function, the server will automatically forward the set port to public network. [Web Mapping Port] Set the web port which will be mapping to the server. [Video Mapping Port] Set the digital video port which will be mapping to the server. [Phone Mapping Port] Set the mobile phone port which will be mapping to the server.
Chapter 3 Access to IP Camera on Zviewer PC 3.8.3.6 E-mail (As Figure 69) Figure 69 This is used to set up the e-mail address and related parameter of the alarm e-mail features. This function is available when IP Camera connects to Internet, and Receive & Send E-mail Addresses shall enable SMTP Protocol. [SMTP Server] This is the sender e-mail server address. This address varies by e-mail providers. For example, the SMTP server for Gmail is: smtp.gmail.
Chapter 3 Access to IP Camera on Zviewer PC Common e-mail server configurations: ▲Gmail E-mail Server SMTP Server: smtp.gmail.com SMTP User name:username@gmail.com SMTP Port: 465 SSL: Enabled ▲Yahoo E-mail Server SMTP Server: smtp.mail.yahoo.com SMTP Username: username@yahoo.com or username@yahoo.com.cn SMTP Port: 465 SSL: Enabled ▲163 E-mail Server SMTP Server: smtp.163.com SMTP Username: username SMTP Port: 25 SSL: Disabled ▲126 E-mail Server SMTP Server: smtp.126.
Chapter 3 Access to IP Camera on Zviewer PC 3.8.3.7 FTP (As Figure 70) Figure 70 FTP services will send the alarm triggered recording file or captured photo via FTP to certain FTP server. [FTP server] IP address or HTTP network address of FTP server. [FTP port] Port of FTP server, default port is 21. [FTP user name and password] User name and password of FTP Server. After setting all the parameters, click the [Submit] button.
Chapter 3 Access to IP Camera on Zviewer PC 3.8.3.8 DDNS (As Figure 71) Figure 71 DDNS allows you to link a hostname to your dynamic IP address. This way when your IP address changes, you will not lose network connection. [Switch] Enable or disable the DDNS function. [Server] Set DDNS’s server (3322.org, dynDNS.org, 88ip, noip or zmododns). It is highly recommended to select “zmododns”, as this DNS service is operated and maintained by Zmodo. [DNS] The device domain which is set by user, such as mydvr.
Chapter 3 Access to IP Camera on Zviewer PC 3.8.4 Video Settings 3.8.4.1 Encoder Settings (As Figure 72) Figure 72 [Video Quality] User can choose suitable image quality per need: best, very good, good, general, or poor. [Stream Type] Two types: CBR (Constant bit rate) and VBR (Variable bit rate) to choose, CBR applies constant bit rate coding, VBR applies variable bit rate coding. [Resolution] System will automatically identify main stream and sub stream’s resolution.
Chapter 3 Access to IP Camera on Zviewer PC 3.8.4.2 Character Overlay (As Figure 73) Figure 73 [Title] Name of video channel will be shown on the up left of the image, maximum 16 characters. [Time format] You can choose whether to display title, date and time, and choose the time format. After setting all the parameters, click the [Submit] button. 3.8.4.3 Video Block (As Figure 74) Figure 74 [Video Shield Switch] Enable or disable the video shield function.
Chapter 3 Access to IP Camera on Zviewer PC 3.8.5 Storage Settings 3.8.5.1Storage Management (As Figure 75) Figure 75 You can view the total disk capacity and the remaining space, and set loop video. 3.8.5.2 Video Plans (As Figure 76) Figure 76 [Appointment Setting] Set time of timed video recording, can be set to everyday specific video time, up to 4 time period.
Chapter 3 Access to IP Camera on Zviewer PC 3.8.6 Alarm Settings Figure 77 [Protection Time Setting] Set the time of motion detection. It can set detailed time periode of everyday, up to four different time periods. [Motion Detection Switch] Set whether to edit the mobile area or open the motion detection. [Motion Detection Setting] After enable motion detection switch, the setting interface will appear grid line.
Chapter 4 Access to IP Camera on Internet Explorer Chapter 4 Access to IP camera on Internet Explorer 4.1 Log In When using IE (Internet Explorer) to view the IP Camera for the first time, you will have to set the security level for ActiveX controls. 4.1.1 Set Security Levels Open Internet Explorer, enter the IE Tools menu and go to Tools -->Internet Options --->Security Settings ---->Custom Level. Find the item titled “Download unsigned ActiveX Controls” and change it to “Prompt.
Chapter 4 Access to IP Camera on Internet Explorer 4.1.2 Network Configuration In order to login and view your IP Camera from Internet Explorer, you will need to first find out the IP Address Segment, Default Gateway, and Subnet Mask of your computer. To find out the IP Address Segment, Default Gateway, and Subnet Mask, you will need to open the command prompt from a Windows PC that is connected to the same router that your IP Camera will be connected to.
Chapter 4 Access to IP Camera on Internet Explorer Figure 3 In the Networking tab of the IPC Config menu, you will need to change the settings of the camera to match your router settings (As Figure4). 1. In the IP field, type in the same IP address that appeared as the IPv4 Address on your ipconfig results, but label the last three digits to a larger value such as 101. 2. In the Gateway field, type in the same numbers that appeared as the Default Gateway in your ipconfig results. 3.
Chapter 4 Access to IP Camera on Internet Explorer 4.1.3 Wi-Fi Configuration (Only for Device Which Supports this Function) 1. Double click on the IP Camera that you just saved networking settings on, and click on the "WIFI" tab to enter to the “Wi-Fi” interface, select the check box to enable Wi-Fi (As Figure 5). Next, manually set the IP Addr field, Subnet Mask field, and Gateway field to match the settings that appear in the Networking tab of the IPC Config menu, then Click [Submit]. Figure 5 2.
Chapter 4 Access to IP Camera on Internet Explorer 3. Click [Add] or double click the auto searched Wi-Fi, this will take you to the “WIFI Wireless Network Settings” section. ▲Double click the searched Wi-Fi, you should enter “Wi-Fi password” (As Figure 7). Figure 7 ▲Click [Add], you should enter newly added “Wireless Network Name” , “Wi-Fi password”, and select “Authentication Mode” (As Figure 8).
Chapter 4 Access to IP Camera on Internet Explorer [Wireless Network] Refers to SSID, which is the login name of wireless network for authentication, it must be consistent with the SSID of the wireless gateway (router/AP). (Such as: TP-LINK_4A2DDC). [Authentication Mode] Which can be selected from the following the encryption methods: “Unencrypted”,“WEP Encrypted”,“WPA PSK Encrypted”,“WPA 2 PSK Encrypted”,“WPA PSK + WPA2 PSK Encrypted”.
Chapter 4 Access to IP Camera on Internet Explorer 4.1.4 Login 1. To view your IP Camera from Internet Explorer, open an Internet Explorer browser and type your camera’s IP Address into the Internet Explorer browser as it appears in the IPCSearch program. Enter the default Username “admin” and Password “111111”, select the language, and then click [OK] (As Figure 11). Figure 11 2. When prompted by Internet Explorer to install add-ons, click [Allow] to install all add-ons (As Figure 12).
Chapter 4 Access to IP Camera on Internet Explorer 4.2 Preview In the real-time preview interface, the user can control the video channel, record a short video, take a snapshot, full-screen preview, image color, orientation, and PTZ control (if applicable) (As Figure 13). Figure 13 4.2.1 Open Video Double -click the channel number or device name to open the video. 4.2.2 Close Video Right-click the device name, and choose [Close] to close the video stream.
Chapter 4 Access to IP Camera on Internet Explorer 4.2.5 Capture Right-click the image and click [capture] to capture a still image of the camera image. The capture photo is kept in catalog set by video capture. Please check out section “4.5 Local Configuration” for more information on storage directory. 4.2.6 Full-screen Preview Double-click the image to view the full-screen preview. Double-click once again to go back to the original image size. 4.2.
Chapter 4 Access to IP Camera on Internet Explorer 4.2.8 PTZ Settings (Only for PTZ IP Cameras) PTZ control allows the following camera motions: upward, downward, left, and right. The lens operation includes vary magnification, vary focus, vary iris, etc. Figure 16 Figure 17 Note It is only available for PTZ IP Cameras.
Chapter 4 Access to IP Camera on Internet Explorer 4.3 Two –way Audio (Only for Device Which Supports this Function) 1. Under real-time video, hover your mouse cursor over the Play Window, “Voice” and “Talkback” icon will appear at the bottom of the Play Window, remove the mouse cursor, the icons will disappear (As Figure 18). Figure 18 2.
Chapter 4 Access to IP Camera on Internet Explorer 4.4 Playback and Download 1. Click to enter to the “Playback and Download” interface (As Figure 20). Figure 20 2. Select the specific time, video type (All, Alarm, Motion, Schedule or Manual) and channel you want to playback, click [Search], a list of video information shall be displayed, then select the video you want to playback (As Figure 21).
Chapter 4 Access to IP Camera on Internet Explorer 3. The selected video shall be play backed, right click the selected video, then click [Download] to download the video (As Figure 22). Figure 22 4. The gray bar shall display the video playback process, and the video file shall be saved (As Figure 23). You can download and install Zmdplayer from http://www.zmodo.com/support-software/ for video playback.
Chapter 4 Access to IP Camera on Internet Explorer 4.5 Local Configuration Click [ ], this will take you to the “Device Parameters” section, then click [Local Configuration] to enter into “Local Configuration” section (As Figure 24). Figure 24 [Video files packaged time] This setting controls the length of the video files recorded. [Storage directory] Click […] to set file path for local recording and capture. After setting all the parameters, click the [Submit] button.
Chapter 4 Access to IP Camera on Internet Explorer 4.6 Remote Configuration Click [Remote Configuration] to enter into the “Remote Configuration” section. 4.6.1 Video Settings ▲Character Overlay Figure 25 [Title] This is the name of the video channel, and it is displayed on the upper left of the image. The maximum number of characters for this field is 16. Click the check box, and it will display on the screen. Un-check the check box, and it will not display the title on the screen.
Chapter 4 Access to IP Camera on Internet Explorer ▲Video Code Figure 26 [Video Quality] The user can choose the desired image quality: Best, Very Good, Good, General and Poor. [Stream Type] Two types: The two options are CBR (Constant bit rate) and VBR (Variable bit rate). CBR enables constant bit rate encoding; VBR enables variable bit rate encoding. CBR should yield a better overall image. [Resolution] System will automatically identify and add the image resolution of main stream and sub stream.
Chapter 4 Access to IP Camera on Internet Explorer ▲Video Block Figure 27 [Video shield switch] Enable or disable the video shield feature. [Shield area setting] You can set the shield area by dragging the mouse with the left button pressed, or cancel the shield box on the shield area by right-clicking the mouse. You can choose to shield the whole image, or only shield part of the image. Up to four areas can be masked. After setting parameters, click the [Submit] button.
Chapter 4 Access to IP Camera on Internet Explorer 4.6.2 Network Parameters Settings ▲Wired Settings Figure 28 [DHCP] If the router allows DHCP functionality, select DHCP to locate an un-used IP Address on the router. After the camera is configured and is able to be viewed online, it is recommended to keep DHCP disabled. [IP Address] Set the wired cable IP address of IP camera device. [Subnet mask] Default: 255.255.255.0 (It is recommended to not change the Subnet mask.
Chapter 4 Access to IP Camera on Internet Explorer ▲Wireless Settings (Only for Wi-Fi IP Cameras) Figure 29 [WIFI] Select this checkbox to open the Wi-Fi network function of IPC. [DHCP] If the router has DHCP enabled, select this, and the IP camera will automatically obtain an IP address from the router. [IP Address] Set wireless IP address of IP camera. [Subnet mask] Default: 255.255.255.0 (It is recommended to not change the Subnet mask.) [Gateway] Set the gateway IP of IPC.
Chapter 4 Access to IP Camera on Internet Explorer ▲Listening Port Figure 30 [Web Listening Port] The default port 80 is for accessing the camera through Internet Explorer. If it is necessary to change the port number, the address used to access the camera will use the following format: http://ip:port/. For example, if the web port is changed to 81, you would type http://192.168.0.100:81 into the IE address bar. [Video Listening Port] The default video port is 8000.
Chapter 4 Access to IP Camera on Internet Explorer ▲PPPOE Figure 31 [PPPOE] Set to open or close the PPPOE dial-up function [User] The ADSL dial-up account is obtained from the internet service provider. [Password] Password of ADSL dial-up account, obtained from the internet service provider After setting all parameters, click the [Submit] button.
Chapter 4 Access to IP Camera on Internet Explorer ▲UPNP Figure 32 [UPNP] If the router supports UPnP and has it enabled, by checking this box your router will automatically forward your ports. [Web Mapping Port] Set the web port which will be used by UPnP to automatically port forward. [Video Mapping Port] Set the video port which will be used by UPnP to automatically port forward. [Mobile Phone Mapping Port] Set the mobile phone port which will be used by UPnP to automatically port forward.
Chapter 4 Access to IP Camera on Internet Explorer ▲E-mail Figure 33 This is used to set up the e-mail address and related parameter of the alarm e-mail features. This function is available when IP Camera connects to Internet, and Receive & Send E-mail Addresses shall enable SMTP Protocol. [Server] This is the sender e-mail server address. This address varies by e-mail providers. For example, the SMTP server for Gmail is: smtp.gmail.
Chapter 4 Access to IP Camera on Internet Explorer Common e-mail server configurations: ▲Gmail E-mail Server SMTP Server: smtp.gmail.com SMTP User name:username@gmail.com SMTP Port: 465 SSL: Enabled ▲Yahoo E-mail Server SMTP Server: smtp.mail.yahoo.com SMTP Username: username@yahoo.com or username@yahoo.com.cn SMTP Port: 465 SSL: Enabled ▲163 E-mail Server SMTP Server: smtp.163.com SMTP Username: username SMTP Port: 25 SSL: Disabled ▲126 E-mail Server SMTP Server: smtp.126.
Chapter 4 Access to IP Camera on Internet Explorer ▲FTP Figure 34 FTP Settings will send snapshots from alarm based recordings to the FTP server specified. [FTP Sever] This is the IP address or HTTP network address of the FTP server. [FTP Port] This is the port of FTP server. [User] This is the username of the FTP Server. [Password] This is the password for the user specified above. After setting all parameters, click the [Submit] button.
Chapter 4 Access to IP Camera on Internet Explorer ▲DDNS Figure 35 DDNS allows you to link a hostname to your dynamic IP address. This way when your IP address changes, you will not lose network connection. [Switch] Used to enable or disable the automatic DDNS updates. [Server] The DDNS provider you have chosen. [DNS] The hostname created through your DDNS provider. [User] The username which you registered with your DDNS provider. [Password] The password for the username you specified above.
Chapter 4 Access to IP Camera on Internet Explorer 4.6.3 Storage Settings ▲ Storage Management Figure 36 If IP Camera has installed SD Card, you can view the total disk capacity and the remaining space. Loop Video Settings: Click [Loop Video], if SD Card memory is full, system will automatically clear the oldest video files and continue recording.
Chapter 4 Access to IP Camera on Internet Explorer ▲ Video Plans Figure 37 [Appointment Setting] Set time of timed video recording, can be set to everyday specific video time, up to 4 time period.
Chapter 4 Access to IP Camera on Internet Explorer 4.6.4 Alarm Settings ▲ Motion Alarm Figure 38 [Protection Time Setting] Set the time of motion detection. It can set detailed time periode of everyday, up to four different time periods. [Motion Detection Switch] Set whether to edit the mobile area or open the motion detection. [Motion Detection Setting] After enable motion detection switch, the setting interface will appear grid line.
Chapter 4 Access to IP Camera on Internet Explorer 4.6.5 System Information ▲ General Figure 39 [Pre-record Time] Set the pre-record time. After you’ve set the pre-record time, it will start recording before it triggered alarm, the in advance time is the pre-record time. [Record Delay] Set the record delay time. After you’ve set the record delay time, the record packing will be restarted after the delay time passed. [System Time Setting] Set the system time (manual or auto).
Chapter 4 Access to IP Camera on Internet Explorer ▲ Version Figure 40 Displays device name, system version, video/audio/alarm channel number and other information.
Chapter 4 Access to IP Camera on Internet Explorer 4.6.6 Advanced Settings ▲ User Management Figure 41 [Add User] Click in the blank area on the Users List, enter user name and password, select user types (root or ordinary), then click [Add], you are successful if prompted with “Operation Succeeded”. [Delete User] Click a user in the Users List, then click [Del], you are successful if prompted with “Operation Succeeded”.
Chapter 4 Access to IP Camera on Internet Explorer ▲ Regular Maintenance Figure 42 [Regular Maintenance] By checking the [Maintaining] box, you are choosing to automatically reboot the camera at a specified day of the week and time of day. It is recommended to reboot the cameras weekly by using this menu. After setting all parameters, click the [Submit] button. [Restore factory setting] Click this button to restore the device back to factory defaults.
Chapter 4 Access to IP Camera on Internet Explorer ▲ Software Update Figure 43 [Update File] Click [...] to browse your computer for the correct update file. Once you have selected the corrected file, click [Update]. During the update, it will display the update progress. After the update has finished, the IP Camera will automatically reboot. Log in to the device again and enter the “Software Update” interface to check whether the system version has been updated. Note 1.
Lifetime Customer Support Informative Knowledge Base at kb.zmodo.com 24/7 Live Support on www.zmodo.